


Soldering sterling silver is one of the fundamental skills that every jeweler should have. However, starting up at home can be a little intimidating so we've put together this step by step tutorial with a list of jewelry soldering tools and supplies to get started.
Learn to start silver soldering today! These days a lot of budding metalsmiths are firing up torches for the first time in order to tackle more advanced jewelry making techniques. Soldering sterling silver is one of the fundamental skills that every jeweler should have. However, starting up at home can be a little intimidating so we've put together this step by step tutorial and list of jewelry soldering tools & supplies to get you going.
Step 1: Prepare Your Work Area
a sterling silver metal blank
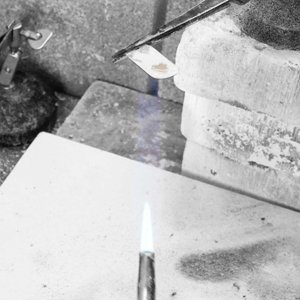
Safety first! Soldering involves an open flame and molten metal so you need to prepare a safe workplace. Make sure you are using a sturdy table. Cover the surface with a piece of aluminum, large tile or a thick block of wood so you don't accidentally scorch your table. Secure the aluminum or wood so it doesn't shift while you are working. Clear an area about 3 feet square of things you could bump into or damage with your torch.
Personal safety is also important! Protect yourself with safety glasses so you don't damage your eyes or prescription glasses. Denim or canvas apron over your clothing is also a good idea in case you drop a piece of hot metal. Avoid loose, bulky clothing when you are learning to solder and wear closed-toed shoes just to be on the safe side.
One last thing, ventilation is important when soldering. Please make sure you are in a well-ventilated area before beginning to solder. On all of our solder item detail pages online, you can find downloadable SDS sheets. These SDS sheets will give you all of the information about the material lists and what warnings they may have. We recommend downloading these sheets and keeping them on hand in your jewelry studio.
Step 2: Gather Supplies
Here is a handy jewelry supply list. Feel free to print it!
Below is a glossary of the jewelry soldering tools and supplies covered in the shopping list above.
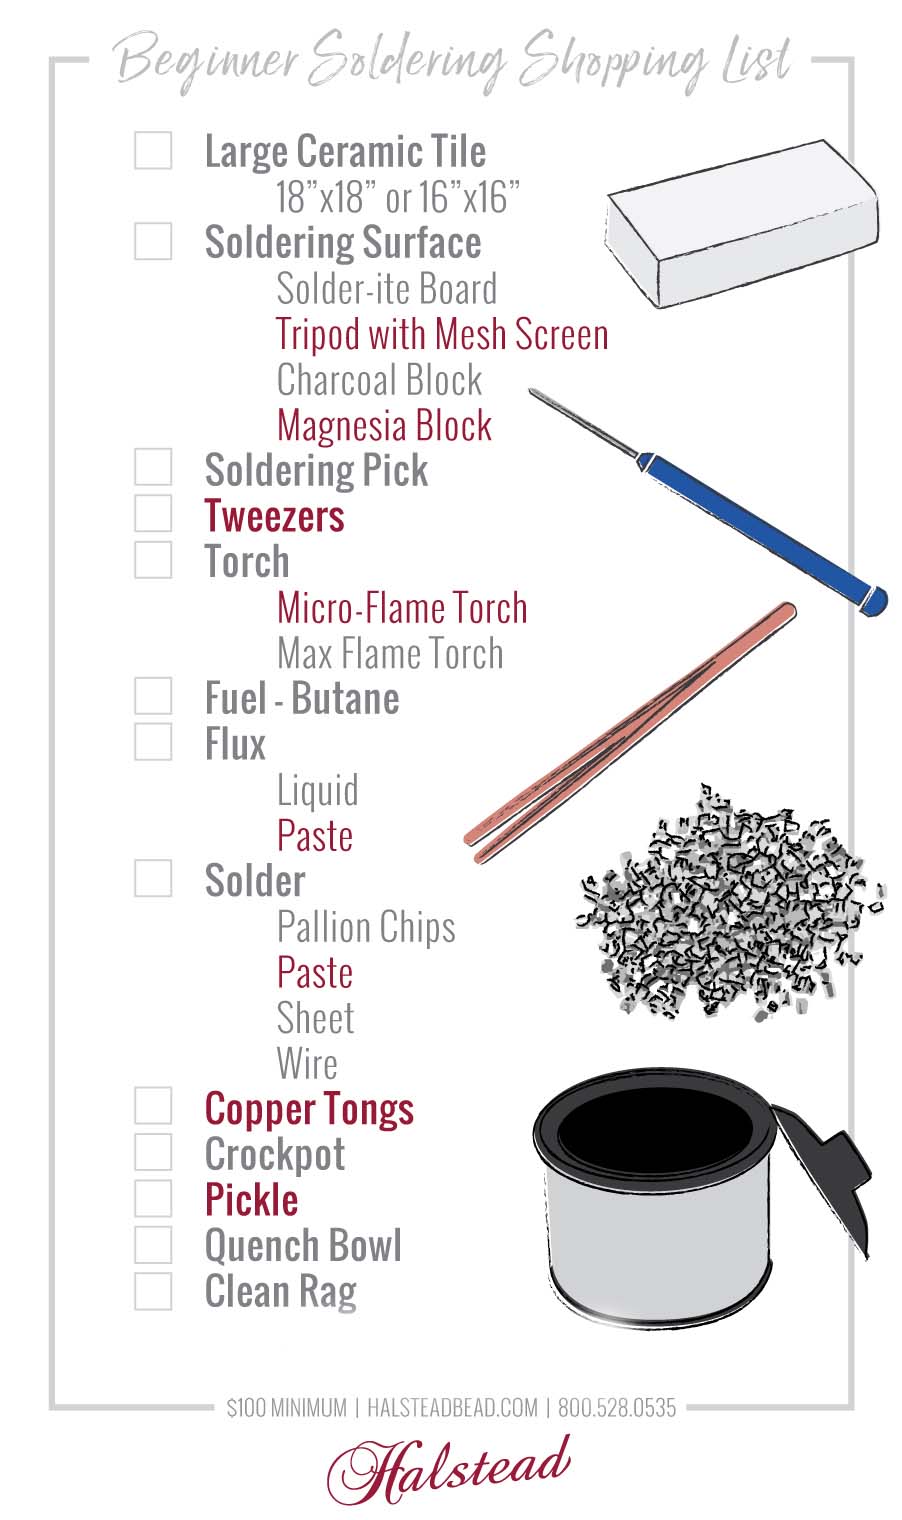
- Soldering surface - This is a small work area that will take the direct heat from your torch flame. Everyone has their own preference but common options include a mesh screen and tripod, magnesia block, a charcoal block, a honeycombed piece of ceramic or solderite board. You will only need one of these when you start out, but down the road, you will gather more of these soldering supplies as you learn new techniques.
- Soldering pick - You will need one of these to adjust your solder or jewelry piece while it is hot. Always keep a soldering pick in your dominant hand while soldering so you don't accidentally touch hot metal with your fingers in case something shifts.
- Tweezers - With a pair of tweezers you can grab a hot item and lay it off to the side to air cool plus you can also use it to place your solder as well.
- Torches and butane - Handheld Micro-flame or Max Flame torches are great starter torches for soldering silver. You will also need a butane canister from the hardware store. Practice lighting your torch, it can be tricky. Your altitude will affect where the gas valve setting should be when you ignite. Always point the torch away from you and hold it in your non-dominant hand while soldering.
- Flux - Flux is an oxygen reducing agent that will facilitate soldering and reduce firescale. You will need to choose between a liquid or paste flux. Paste flux can be applied with a small paintbrush but it tends to dry out so you'll need to periodically add water to soften it up. A liquid spray flux will cover your entire piece with flux, however, the nozzle tends to clog up so you'll need to occasionally unclog the tip.
- Solder - Silver solder comes in chips, sheet, wire or syringe paste forms. Everyone has their own preference and different forms can be better suited for specific soldering applications. Personally, I like the wire for ease of use. The temper of the solder refers to the melting point of the solder. There is soft, medium or hard solder. For simple starter projects, you will just need soft solder. As your skills advance you should have all three temper solders on hand so you can do more complicated soldering with multiple solder joints.
- Copper tongs - Do not put your tweezers in pickle! Steel will ruin your pickle solution so get in the habit of using copper tongs whenever you put items in your pickle pot or remove them.
- Crockpot - A small crockpot with a little bit of tap water combined with a scoop of pickle will warm up in five minutes and be ready to go. You can keep your pickle solution for weeks or longer before you need to swap it out for efficacy.
- Warning: Once the crockpot has pickle in it, you can no longer use it for food items.
- Pickle- Pickle dissolved in warm water is used to remove firescale from your silver after you have soldered it. Firescale is a surface effect on the metal that stains the silver red, orange or black. You can use Sparex or another brand as your pickling solution.
- Quench cup - A small ceramic cup or bowl with tap water.
- Clean Rag - Use a clean rag to dry your piece after quenching it in the warm water.
Additional Supplies:
- Sandpaper- Always lightly sand your metal right before soldering. Contaminants can prevent the metals from melting properly and/or bonding. Do your sanding in a separate area away from your soldering station to keep that area clean.
- Cooling surface - This can just be a place off to the side on your heat resistant work area, or you can use a steel bench block or a pumice cup for cooling.
- Sterling silver materials- Different tutorials will suggest different starter projects or drills to learn soldering skills. At a minimum, you should start with some sterling wire and jump rings on hand so you have practice materials.
For an overview of how to start soldering check out our video.
Step 3: Watch Tutorials
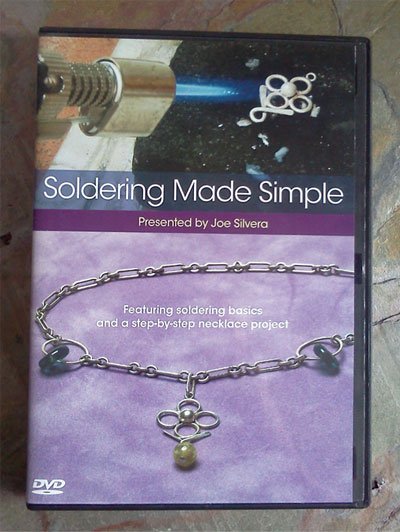
Don't just wing it. Soldering is complicated and you will become frustrated if you don't take a class or get good instructional reference materials. There are many books and videos available that offer silver soldering instruction. Check out our Youtube channel at Halstead to see several videos on soldering. My favorite DVD for purchase is Soldering Made Simple by Joe Silvera.
Step 4: Practice!
Tie your hair back, make sure the kids aren't around and lock your cat out of the room. You don't want to be distracted when you are new to soldering. Your first experience with the torch can be intimidating but you will get comfortable very quickly as long as you have a quiet workspace free from interruptions.
Before you even get out your metal you should practice turning your torch off and on several times. Like anything new, soldering takes a lot of practice and patience. Practice moving your torch flame on your soldering surface with your non-dominant hand while you maneuver the tip of your pick or tweezers near the flame in your dominant hand. These simple practice runs will not only build your confidence but also allow you time to get comfortable with the torch.
Step 5: Get Started Soldering
Now that you have all of the soldering tools and supplies that you need, it's time to start silver soldering. I keep the following reminder checklist in my studio so I stay on track whenever I pick up a soldering project. This checklist will assure you that you've done everything you need to do and in the correct order.
Note: Are you having problems with the solder not flowing? Check out the Top 5 Reasons Silver Solder Doesn't Flow article to help troubleshoot the problem.

Have fun soldering jewelry!
Soldering opens up a whole new world of design possibilities in your jewelry making. Experiment and enjoy the new horizons you encounter as your skills develop.
Now that you know how to solder silver get tips for soldering copper and brass by reading Erica's article: Soldering Copper & Brass Metals in the Jewelry Studio
Read on for More Soldering Tips:
3 Torch Tips for Soldering Jewelry
Solders, Torches & Fuels Used In A Jewelry Studio
Instructables Article & Video:
Design Inspirations for Soldering Jewelry:
6 Steps to Soldering Earring Posts
5 Creative Uses for Jump Rings in Jewelry Making
Soldering Half Round Wire & Pattern Wire For Rings
Halstead is one of North America's leading distributors of quality jewelry supplies. The firm is celebrating its 46th anniversary this year. Halstead specializes in wholesale findings, chain, and metals for jewelry artists.
Got questions? Email our studio coordinator Erica Stice at [email protected]. We’d love to hear from you. Sorry, studio support is not available by phone. Emails only, please.
Questions & Answers
Q: Hello I am new to soldering and I am very confused as to what materials you can and can’t soldering so what materials can you use when soldering. I design fused glass jewelry and I usually wire wrap but I want t set them in a bezel for rings etc. Please HELP - Lori
A: You can solder most metals but specific techniques vary slightly from metal to metal due to the different melting points of the materials. Gold-filled can be soldered but it is more difficult and not recommended for beginners. If you cannot attend a soldering class or seminar you can find many books and instructional DVDs for purchase or YouTube videos for free online. Soldering is difficult to do well without some instruction so it is worth investing in a one day course if you intend to make custom bezels.
Q: Hi! I recently started making sterling silver jewelry, but unsuccessful because after soldering, my sterling silver pieces become super fragile and break. Can you please tell me what I’m doing wrong? I tried to solder sterling silver ear wires to sterling silver earrings. First I dip sterling silver pieces into a mix of boric acid and denatured alcohol (to prevent burns), then I heat it until it starts to bubble, then I add some silver bearing paste (contains flux), join pieces together and heat again. And then I dip it into a warm pickle solution. After I clean and file my pieces, they easily break. I don’t know what it is I am doing wrong… I would really appreciate if you can steer me in the right direction. Thank you! - Elena
A: Sorry you’re having such a hard time soldering and hopefully these tips might help you. First, you should apply solder & flux before any heat is applied at all to the piece. Also, filing may be too rough and you may want to try wire solder instead of paste next time. Lastly, you should watch some YouTube videos to help educate yourself, there are many qualified how-to videos out there. Hope these tips help!
Q: I’m soldering fine but when I put my piece in the pickle it’s turning the joint black and I can easily break it. What am I doing wrong. Thanks - Em
A: Try to use flux liberally at the soldering point to prevent oxidation
Q: Is there a different flame temperature needed when using a torch on “Half-Hard” sterling silver? - Christina
A: Not that I’ve ever heard of but out of curiosity what are you using the flame for? Soldering? Annealing?
Q: Hello! I sort of have silver soldering down, but I’m starting to use gold fill wire and would love recommendations on what sort of solder and flux to use. I’ve searched everywhere for videos and can’t seem to find any. I’m trying to find a local class, but I need some help a bit sooner than that. I appreciate any help you can give me! Thank you! - Chanel
A: We do not recommend soldering gold-filled material at all. To read why check out this article: Soldering Gold-Filled Jewelry.

