


Bulk up your retail store with ready-to-wear jewelry pieces! Ready to wear items are great for low price point impulse purchase items making them quick upsells yet easy to stock.
Bulk up your retail store with ready-to-wear jewelry pieces! Retail boutiques and gift shops love these quick upsell items that are easy to stock and require very little effort on your part to produce. Silver jewelry options can include ready-to-wear sterling silver finger rings: from fancy styles to basic stacking rings; or, add adjustable ring bands so one-size-fits-all. Another alternative is to purchase charms or pendants which can be hung from finished necklaces. Slipping a charm on a finished neck chain takes seconds. You can also explore simple assembly techniques shown below to add a charm to a bracelet or earring hooks using only jump rings and pliers. Adding items like these not only keeps a constant supply of jewelry on hand but gives your store high-margin, quick turnover inventory with very little overhead.
Another great idea for your store is to add a case that features local handmade jewelry. Customers who live out of state love to purchase local handmade pieces from places they visit. It's a great opportunity for the community and the artisans that live there. Description cards about the artists on display will draw customers in with a sense of knowing the artist and the work put into each piece of jewelry.
The videos below show how easy it is to assemble simple ready-to-wear items.
Adding a Charm to a Finished Neck Chain
This is an easy way to quickly get a ready-to-wear piece into your jewelry retail store.
1. The first thing you'll want to see is if your charm or pendant comes with an attached jump ring (don't worry if it doesn't, I'll show you that step at the bottom of the article.) If it does, you'll need to know the inner dimension of that ring.
2. When picking out a finished necklace, you want to make certain that one, it's sturdy enough to hold the charm or pendant, and second, you'll need to be sure that the attached jump ring on the necklace can slide through the ring on your charm.
3. Open the necklace and slip the necklace through the attached jump ring on the charm.
That's it! You have a sterling silver ready-to-wear jewelry piece. Watch the video above to see how quickly one can be assembled.
Adding a Charm to a Sterling Silver Earwire
This is another quick way to build up your inventory with very little effort. For this process, you'll need a set of chain nose pliers (make sure it doesn't have serrated jaws or you'll damage your earwires!).
1. Again, make sure your charm or pendant has an attached ring (see below if it does not). Unless the charm has a tiny jump ring, it's not necessary to get the inner diameter of the ring. Now, check to see if the earwire has an open ring or loop.
2. Hold the earwire in your dominant hand and use your pliers to twist the ring open. Never pull your ring open, always twist it open so the ring isn't damaged. (Check below if you're unsure of how to open and close rings.)
3. Drop the ring on the charm onto the ring on the earwire. Before closing the earwire, hold it up and check that the charm is hanging in the right direction when worn.
4. Using your pliers, twist the ring on the earring finding closed. Repeat these steps to make a pair.
You're finished! Watch the video above to see the process steps from start to finish.
Charms without Jump Rings
Please note that all of the charms and chains in our RTW section are compatible and do not require an extra jump ring or any tools to assemble. But what if you like a charm that doesn't come with a jump ring attached? See below to figure out the proper size of jump rings and chain.
|
|
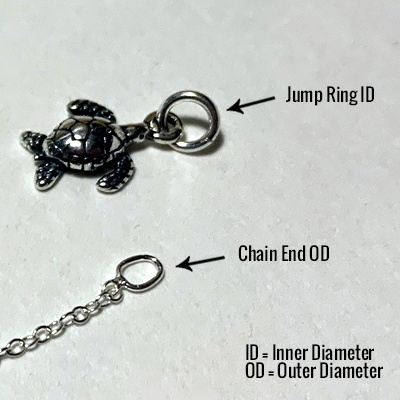
Jump Rings & Chain EndsWhen choosing a charm that has a jump ring included, you need to be sure that it is compatible with the finished neck chain you're using. It's crucial that the chain end's outer diameter can slip through the jump ring's inner diameter. Note: The jump ring on the turtle charm is large, allowing the chain end to easily slip through the ring. |
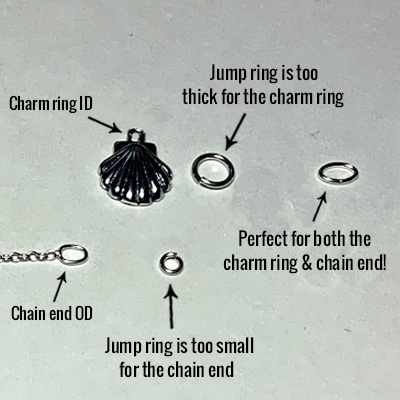
Choosing A Jump RingWhen you find a charm that doesn't have a jump ring attached, you'll need to choose one. There are two important factors when choosing: 1. The jump ring must be large enough for the chain end to slide through it. 2. The jump ring must fit through the charm ring inner diameter. To find out if all of these are compatible, you'll need to get three things; the chain end OD, the charm ring ID, and the gauge of the jump ring. The jump ring gauge will then need to be converted to mm. Once you know what the gauge of the jump ring is in mm, compare that to the charm ring ID to make sure the jump ring will fit through the charm ring. Jump rings in the 5mm range are usually perfect for chain ends. These large rings can usually work for all of the medium-sized finished neck chains. If you're working with a tiny chain, you can usually fall comfortably down to a 4mm jump ring (but getting the actual measurements are critical to finding the perfect match). Note: Popular jump rings are: SJ350, SJ755, SJ855 & SJH1 (for tiny chain ends). |
 |
Opening & Closing Jump Rings
Not all charms and pendants have jump rings attached and that's okay! Adding a jump ring is extremely easy to do. Did you know that sterling silver jump rings are the most popular jewelry finding out there? You'll use them so much in your jewelry making career that it's important to always have some on-hand.
To find out how to open and close jump rings, check out our video below.
Note: This is the same process you'll use for the ring on the earwire, too.
Continue Your Jewelry-Making Journey with these Educational Articles:
Jewelry Packaging Ideas & Inspiration
Popular Jewelry Trends: Rings Galore!
Holiday Gift Guide: Ready-to-Wear Jewelry Items

