


Learn about the top three jewelry soldering techniques used at the bench to create stunning jewelry designs.
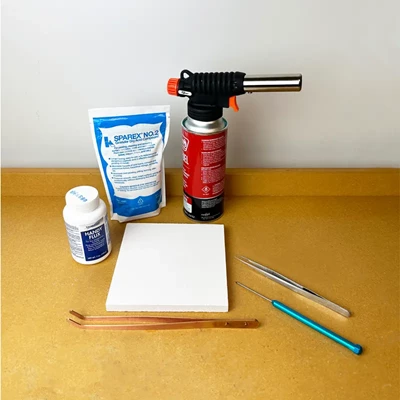
Jewelry soldering is a key skill to add to your jeweler's repertoire. There are three soldering techniques you'll use frequently and each one has its place. Below we outline each technique with tips, advice, projects, and more. To prepare your studio for soldering, make sure you have the necessary tools. You can shop our jewelry soldering kit to get all the basics in one place!
Pre-Placing Solder
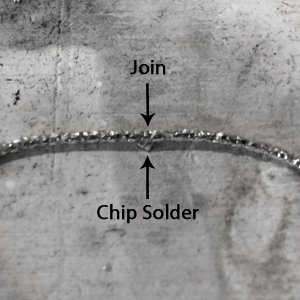
Pre-placing solder is great for many applications, especially if you are new to soldering and jewelry making. This is when you place a chip underneath or on top of the joint. When you heat it, the solder will flow into the joint connecting the two pieces together. This method works great for soldering the ends of two wires together. You can also pre-place solder at the edge of a joint, like a bezel to backsheet. Make sure to flux your piece before placing the solder. Heat it gently to evaporate the water in the flux without it bubbling up - this will keep your solder where you placed it. We take a deep dive on learning this technique in our blog How to Solder Silver.
Jewelry Soldering Tips:
- Make sure your metal is clean.
- The metal must be touching.
- Use flux to help the solder flow.
- Concentrate the heat on the metal, not on the solder.
- Heat both pieces evenly
- Practice, practice, practice.
Sweat Soldering
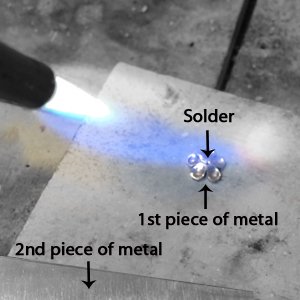
Sweat soldering is a technique used extensively by jewelers. Sweat soldering is when you pre-flow solder onto one component before soldering into another, likely a piece of sheet metal. For example - a flower solder ornament to a round blank for a pendant. This technique usually has very little clean up and can allow you to join small pieces to larger areas without melting the small pieces. Sweat soldering is a two-step process. First, you'll pre-flow solder onto the smaller components. Flux your piece, place the solder, and heat until you see the solder fully flow and spread out. Next, you'll re-flux that piece and place it solder-side down on the piece you want to connect it to. Heat the pieces until the solder flows - you'll see a bright line around the smaller piece once it's flowed.
- Tip: You'll likely want to heat from underneath or focus heat on the backsheet. The backsheet will take longer to come up to temperature and you want to suck the solder down onto it from the smaller element on top.
Sweat soldering is ideal for joining an embellishment to flat metal sheet or other jobs where you don't want the solder to be visible on the jewelry piece. Below we dive into two example projects to explore the possibilities of sweat soldering jewelry.
Sweat Soldering Wire Embellishments to the Surface of Your Jewelry Designs
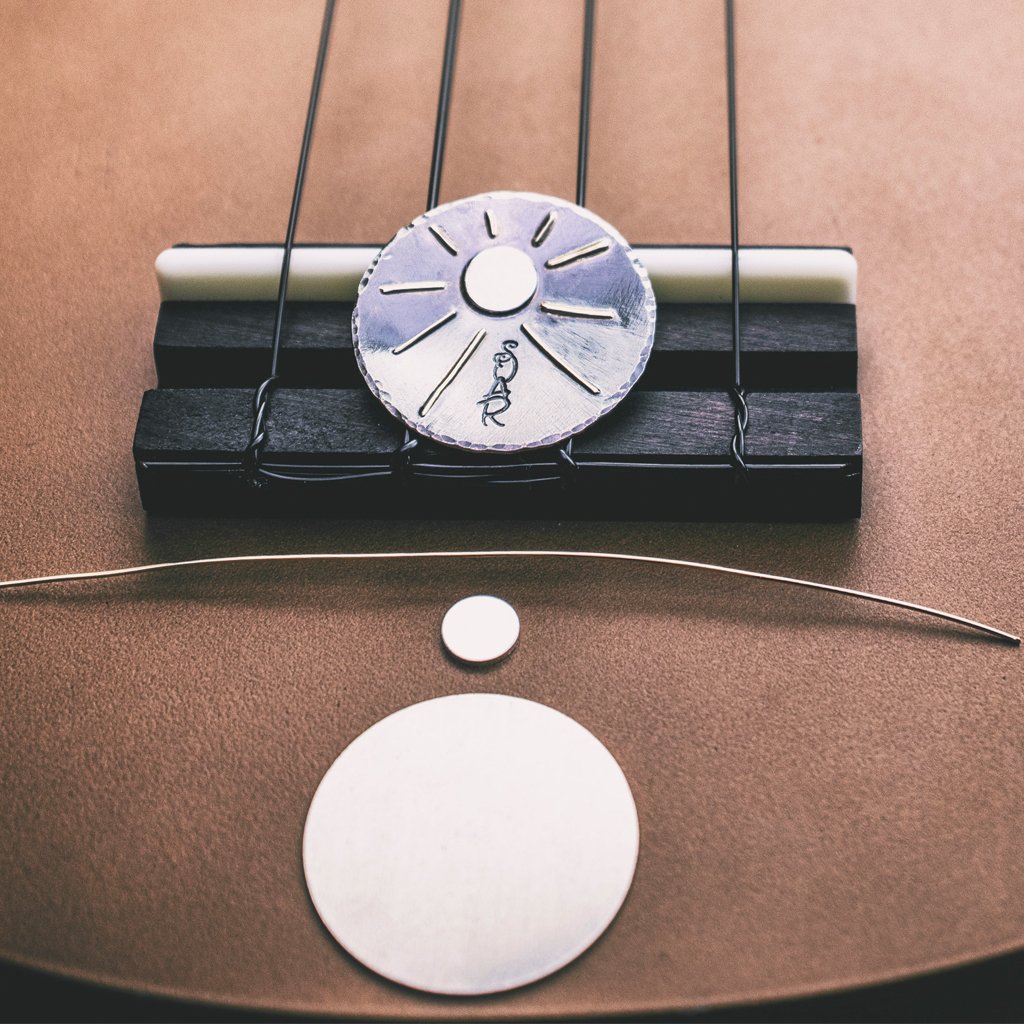
In this project, I sweat soldered 14kt gold wire pieces onto a round 20 gauge sterling silver blank. The key when soldering wire is to control the amount of solder because if you use too much you'll have a lot of tricky cleaning to do at the end. Soldered wire accents allow you to create geometric designs with a line drawing feel. But, soldering thin wires onto sheet metal is a challenge.
What you'll need:
- Ruler
- Wire cutters
- Torch
- Pickle
- Pickle pot
- Quench bowl
- Soldering pick
- Tweezers
- Copper tongs
- Soldering board
- 3rd hands
- Flux
- Sandpaper (800 grit)
- Easy 14KYH gold easy plumb solder (pallion chips) (9 pcs)
- 20ga sterling silver blank (1 pc)
- 20ga, 14kt gold wire (2 3/4in)
- Letter stamping set (optional)
- Hole punch or drill bit (optional)
- Finishing tools
- and most importantly safety gear (apron and safety glasses)
- SHOP JEWELRY SOLDERING KIT >>>
Prepping is key to getting a great solder join. Not only do you need to remove all of the oils and dirt, but you also need a tight connection. If I'm working with round wire, I always flatten one side by running it back and forth across 800 grit sandpaper. This will allow a wider soldering surface between the join.
I chose to use gold plumb solder in this case. Plumb solders are a color match for 14kt yellow gold items so I knew the colors would match perfectly, however, using gold solder in this instance also created a longer cleanup where the solder flowed out from under the wires. But, I prefer to clean the gold solder off of the sterling silver blank than clean the silver solder off of the fragile gold wire embellishments. If you choose to use silver solder with sterling silver wire and sheet, I would still suggest cleaning the solder off of the sheet rather than possibly damaging the jewelry wire.
Note: I'm using an air/acetylene torch with a Smith set-up and the #0 torch tip. This #0 torch tip is very small so I can focus the heat better on the tiny wire embellishments on this piece.
Soldering wire embellishments to the surface of your jewelry designs can really get your creative mind flowing. Whether it's geometric or organic, round, straight or zigzag, wire shapes can add some fun to your designs. Soldering wire can be intimidating at first. Some wire is thick and difficult to shape while other wires are thin and fragile; however, it's rewarding to feel the satisfaction you'll have after finishing a piece successfully. Nonetheless, there are certain things you should be aware of when adding wire embellishments:
- The wire must lay flush against the sheet's surface - this means you might have to flatten it yourself with sandpaper, as mentioned above
- Be careful with abrasive rotary tools on the wire - they can take away a lot of material really fast and change the shape of the wire
Since wire embellishments are so narrow I recommend using solder chips so I don't use too much. For this specific project I used easy solder for the wires, as I had already used medium solder for the circle embellishment. I took the smallest pallion chips in the studio and used one per piece of wire.
Soldering Steps
Note: Adjust any of the materials above for the item you want to create. These are very specific steps for the sunburst pendant shown above.
- Step 1: Use the ruler to measure the lengths of wire. I cut two = 1/2" pieces, two = 3/8" pieces, two = 1/4" pieces, two = 3/16" pieces and one = 1/8" piece. Cut the 14kt gold wire using wire cutters.
- Step 2: Take each piece of wire and using the 800 grit sandpaper, slightly flatten one side of each piece.
- Step 3: Place the 14kt gold wire pieces on a soldering board about 1 inch apart. Flux them and place one tiny pallion chip in the center of each piece of wire on the flat side. Flow the solder and remove the flame right away to prevent the wire from overheating.
Tip: Keep your torch moving at all times running it back and forth along the length of wire. and at the same time, move slowly in with the torch, to heat the flux at a distance. By doing this, the flux will slowly dry which will prevent the pallion chip from bubbling off.
- Step 4: Flux the blank and wires. Place each wire where you would like it in your design, solder side down.
- Step 5: Heat the blank from underneath (use a tripod or 3rd hand to elevate the blank) and flow the solder. Focus heat more on the blank, not the wires, as it will take longer to come up to temperature. Look for the bright edge on the wires to know the solder has flowed.
- Step 6: Pickle the piece.
- Step 7: You can now use finishing tools. To remove any extra gold solder from the blank, use a flex shaft with 3M bristle disks or a sandpaper set. Be careful not to touch the wires because it just takes a little bit of sanding over the 14kt gold wires to deform them.
- Step 8: Add a punched or drilled hole for cold connecting your piece as a pendant or link and/or stamp it now, if you'd like.
Check out the video below to see this process in action!
Sweat Soldering Gold to Sterling Silver
Adding 14 karat gold solder ornaments to your silver jewelry adds a mixed metal pop of color. The contrasting metals look beautiful and it also adds perceived value to your jewelry designs. Jewelry artists have more pricing latitude on designs that include gold. The combination of these benefits truly makes it worthwhile. The solder and supplies for this jewelry soldering technique are the same as the wire embellishments example above.
The steps to add gold to silver are essentially the same as the project above too. One of the only differences is that if you're using soldering ornaments or small gold blanks, you won't need to flatten them first - they're ready to go! Pre-flow 14k or silver solder onto the embellishments, place solder-side down onto the large silver blank, and re-flow the solder! Remember to heat from underneath or focus heat on the backsheet to protect the embellishments and get the solder to drop to the backsheet. Check out the video below for more!
Pick Soldering
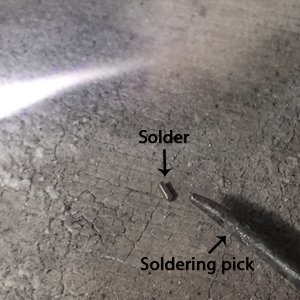
The last of the most common soldering techniques is pick soldering. This is where you pick up the solder with your soldering pick and place it exactly where you want it on your piece. It's great for more precise jobs or where pre-placing the solder won't work because it will fall off. It allows you to use just the right amount of solder and minimize clean up, because you can always place another piece if you need more! For this technique you'll need a heat-resistant surface to lay out your solder chips, like a solderite board. This allows you to pick them up without a problem.
I pick solder jump rings, earring posts, chain links, and any other fragile findings. This is a great technique to learn and one that will really help with delicate pieces. When you pick up the ball of solder and move it to your piece, keep the heat on the solder and the piece itself. If the piece cools down too much, the flux won't be sticky anymore and your solder won't want to grab on - it'll stay on the end of your pick. This applies to picking up your solder too - make sure to go in with your pick and flame at the same time.
Steps to Pick Soldering
At the bottom of this post, you'll find a video that will show you the process overview. However, there are a few steps I'd like to cover with you first:
- Step 1: Be sure that your metals are thoroughly clean of all oil, dirt, and grime.
- Step 2: The pieces being soldered must fit together tightly. It's imperative that they touch or you won't get a secure, soldered connection at the join.
- Step 3: Flux all pieces you need to solder
- Step 4: Ball up the solder that's sitting on your board and scoop it up with your pick.
- Step 5: Keep the heat on the ball of solder and your piece. Place the solder ball at the joint, making sure it's touching both pieces that need to be soldered.
- Step 6: Heat and flow the solder!
Pick soldering will work with almost any type of jewelry solder whether its pallion chips, wire or sheet. When the solder melts, regardless of the shape it started in, it will ball up. Keep in mind that you'll still want to use the appropriate amount of solder so clean-up is at a minimum during the finishing process.
Watch the video below, to see pick soldering in action!
Read the articles below for additional jewelry soldering tips, tricks, and instructions!
5 Steps to Start Silver Soldering
6 Steps to Soldering Earring Posts
Got questions? Email our studio coordinator at [email protected]. We’d love to hear from you. Sorry, studio support is not available by phone. Emails only, please.

