


Texturing is a lot of fun! Discover popular ways to texture on jewelry metals. Watch the video below for even more information on this popular jewelry-making technique.
Texturing is one of the most fun techniques used in jewelry making. It’s exciting to discover new ways to achieve the results you’re searching for, plus it can add so much dimension to your finished piece. We’ve outlined a few different ways to texture you’re metal in this blog. We’ve also talked to some of our favorite teachers to get their thoughts on these techniques! They give us helpful tips and some of their favorite tools. Read on to discover new ways to add personal touches to your jewelry.
Adding Texture with Hammers
Hammers are one of the most popular and easiest ways to add texture. Most new makers start out with copper sheet or brass sheet as inexpensive practice materials. As you progress, you can apply this technique to silver sheet metal, jewelry wire, or use a pre-cut blank so you can focus on the fun part! We’ll talk about the tools you’ll need and common types of hammers used in texturing.
What You Need
- Metal blanks or sheet metal
- Steel bench block or anvil
- Chasing hammer or other steel hammers
- Plastic or rawhide mallet
- Jewelers Torch
- Pickle
Types of Hammers
There are a few types of hammers that are very common for texturing metal, but that doesn’t mean you can’t branch out and try new things. The most common are cross pein, ball pein, and texturing hammers – which have interchangeable faces with different patterns on them. I love to pick up old hammers at flea markets and antique shops – sometimes old hammers that don’t have a nice, polished face can create really interesting and unique textures you won’t find anywhere else.

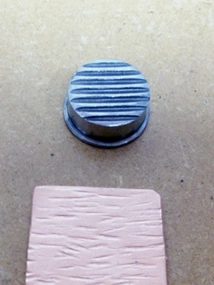
Cross pein hammers have perpendicular wedges to the handle. They can be wide, skinny, pointy, flat, or curved with sharp or rounded edges. Each will give you a different impression on the metal. Ball pein hammers have a ball on the end, just like the name describes. They can be tiny, large, more rounded or slightly flatter. As you start exploring hammers you’ll find there are so many out there.
|
|
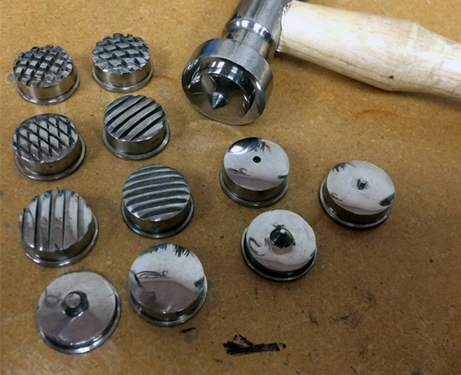
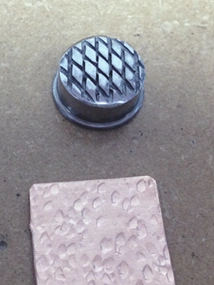
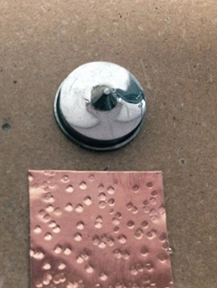
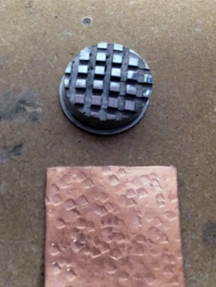
Texturing hammers are a great option because you have multiple hammers in one! They come with interchangeable faces that each have a different pattern on them. You’ll find a grid, diamond pattern, lines, and points to be common.
"I’m in love with my Fretz texturing hammers! They are a dream to hold and work with. Whenever hammering, it's best to hold the farthest back on the handle you can manage. For the sake of your joints, remember this and think of it throughout your project. I find my hand creeps forward as I work and I've learned to stop every so often to reposition my hand."
- Tammy Honaman
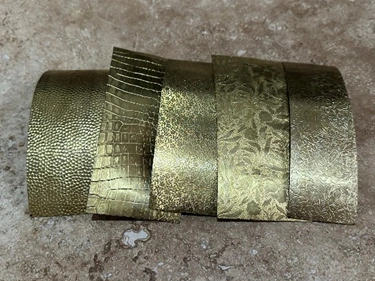
One of the best things you can do, however, is to make test samples of each hammer texture. Take a piece of copper or brass and apply the hammer texture to it. Make sure to label what hammer you used. Now you have samples and will know exactly what the texture will look like when you’re ready to apply it.
 |
 |
 |
 |
Hammer Texture Best Practices
When adding hammer textures to your metal there are a few things you want to keep mind. Always start with annealed metal – this will give you the best opportunity for a more pronounced texture. You can also purchase dead soft sheet. Remember to anneal partway through if necessary. Hammering will work harden your metal. If you want to keep applying texture or form the metal once it’s already been work hardened, you risk cracking and damaging your metal. You’ll also want to hammer on a steel block or anvil. This supports your metal so that the impression is crisp. If you hammer on wood or something softer, the whole piece of metal will also move.
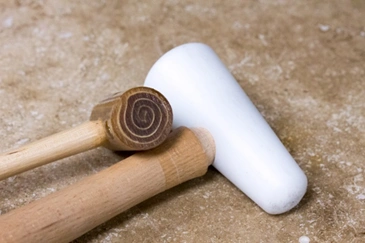
At the beginning I mentioned you might need a rawhide or plastic mallet too. You’re probably wondering why, since those hammers don’t add texture to your metal. Every time you hit your metal with a steel hammer the hammer face is displacing and moving your metal. This means that with repeated hits, your metal is likely to start to curve or distort slightly. This is ok! You’ll just anneal it and tap it out with a rawhide or plastic mallet to flatten it out. This won’t affect your texture either!
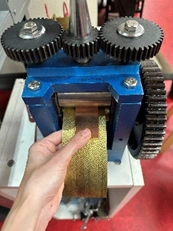
Adding Texture with a Rolling Mill
Using a rolling mill to add texture to sheet and blanks is a great option. It allows you to impart a more precise image onto your metal than hammering.
"My favorite texturing tool is the rolling mill, the possibilities are endless! For best results, make sure metal is annealed. And to protect your mill, make sure the metal is clean and dry."
- Eva Sherman
To get texture on metal with a rolling mill, you roll your annealed metal through the mill with a texture place, leaf, piece of fabric, thick paper, and much more. Texture or pattern plates are the most common. You buy these pre-made and they are usually brass. You’ll want to make sure your pressure is set tight enough to only roll through once – it’s very difficult to line the metal up with the plate exactly again.
Texture plates might be too ‘perfect’ for you. But that’s ok – there’s so much more you can use! Leaves and flowers from nature make excellent impressions. Textured fabric, paper, aluminum foil, sandpaper and more also can add really interesting textures. You can roll them through multiple times for a more irregular effect. When using natural materials, aluminum foil, or sandpaper, you’ll want to make sure to protect your mill from possible damage. Make sure to put another piece of metal on top of the material that adding the texture.
Rolling Mill Best Practices
It’s important to remember to always use annealed metal when texturing with a rolling mill. Your metal is work hardened when it goes through the rollers. If you don’t start with soft metal you won’t get as nice of a texture, and risk cracking your metal. Only put clean, dry metal through your rollers – water will cause rust and can damage the rollers and result in costly repairs. You never want to put steel through your rolling mill – it can also damage the rollers, which are made of steel themselves. Lastly, you want to remember to protect your rollers from the texturing material. Use a piece of copper or brass on top of your texturing material to prevent it from touching your rollers. Rolling mill are precise machines and we want to keep them that way!
Texturing with Rotary Tools
Another common way to texture metal is by using rotary tools. These are used with your flex shaft or micromotor. It’s very important to have the proper safety measure and equipment in place before using this technique. Always wear a mask and safety glasses and be sure to tie back long hair, sweatshirt strings, or long necklaces. This is another technique where experimentation is key. I’ll list a few common tools used to add texture, but feel free to try other ones out!
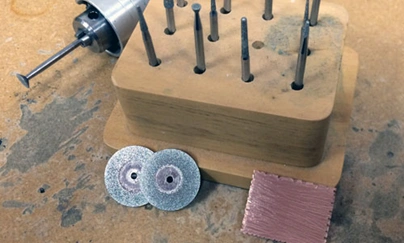
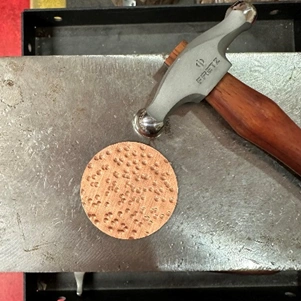
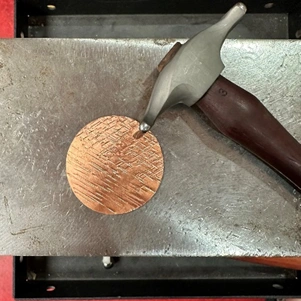
Diamond coated burs are a great way to leave a sparkly texture. They come in all different shape and sizes so you can get into all the nooks and crannies of your piece. You can also find diamond coated wheels. They are great for adding deep cuts into your metal. Apply all in the same direction or overlap them for a cross-hatching effect. Ball burs and the edge of hart burs can be used to draw texture in. Create a wood-grain pattern or a speckled dot effect. Rotary tool textures are perfect for pre-cut blanks because they don’t distort the shape of the metal like other methods can.
The fun thing about texturing is there isn’t really a right or wrong way to do it! We’ve outlined some common ways you can texture metal, but that doesn’t mean there aren’t other ways. Play around and experiment! And remember to label your samples!
Related Articles:
Types of Hammers Used in Jewelry Making
Shop for jewelry supplies at Halstead today!

