


One way to take your jewelry business to the next level is to have your jewelry photographed on models. Read on to find out the benefits of modeled jewelry photos and how to make it happen.
Showing jewelry on models is beneficial for many reasons.
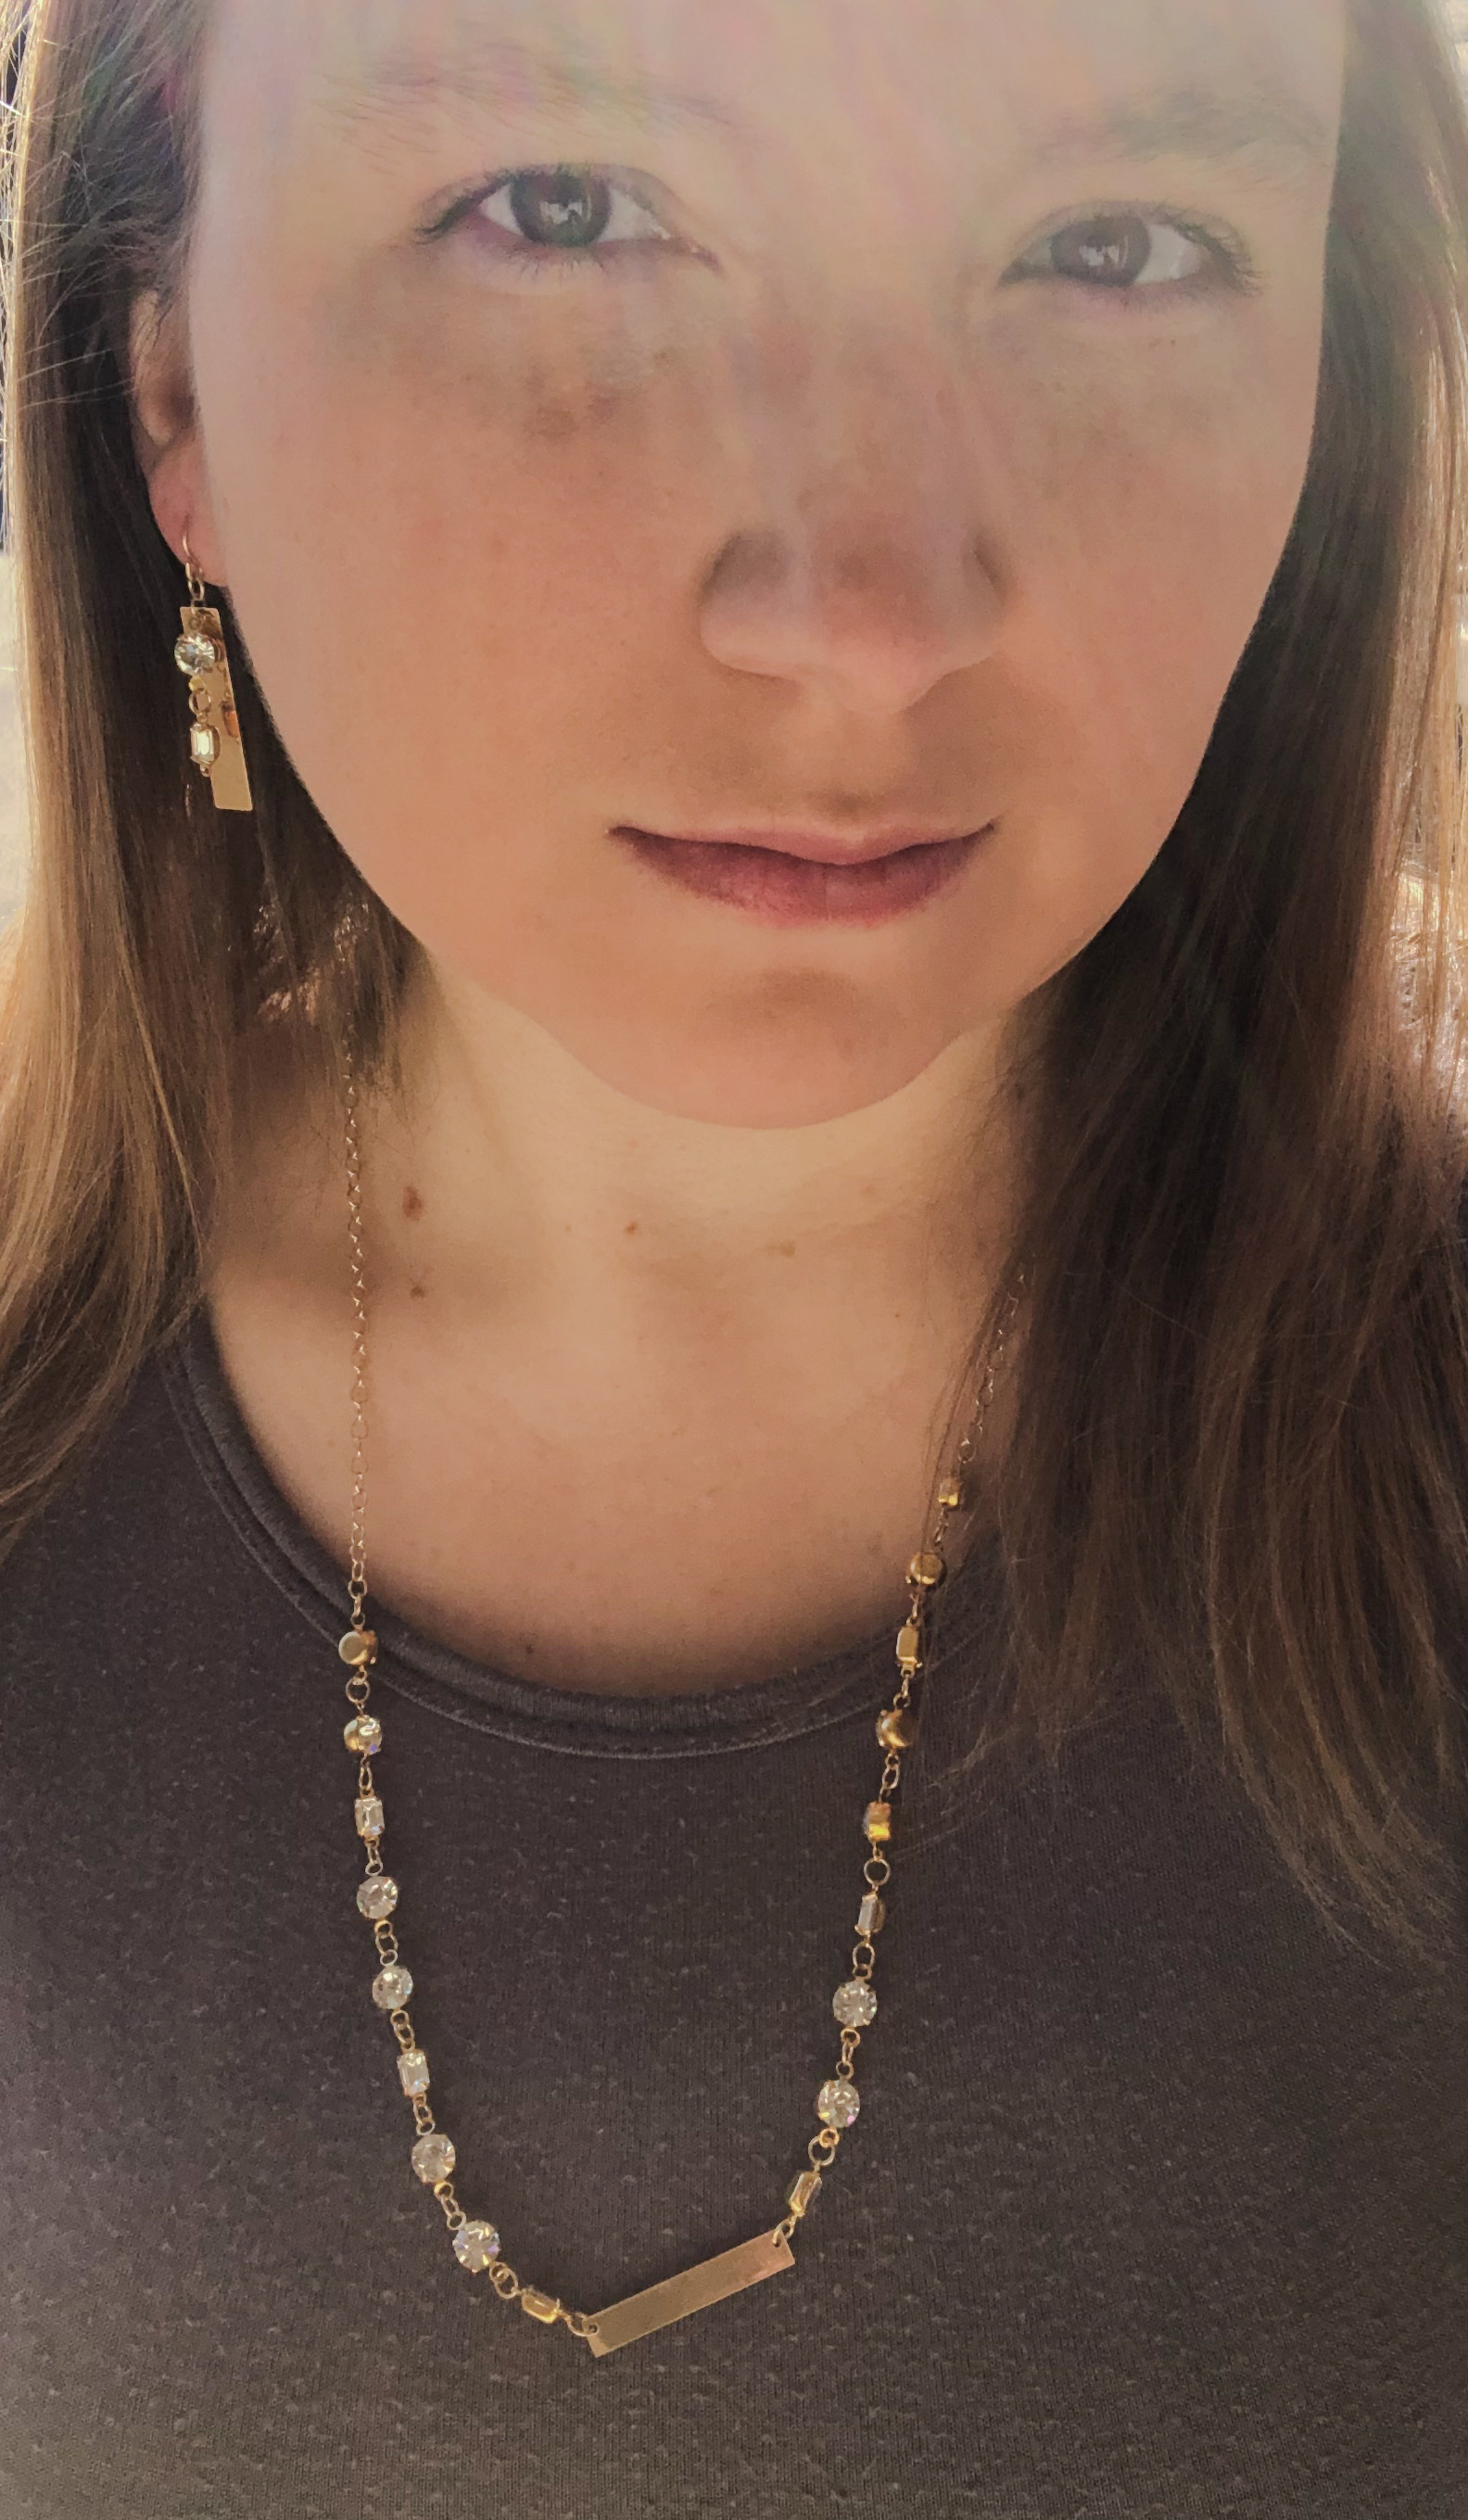
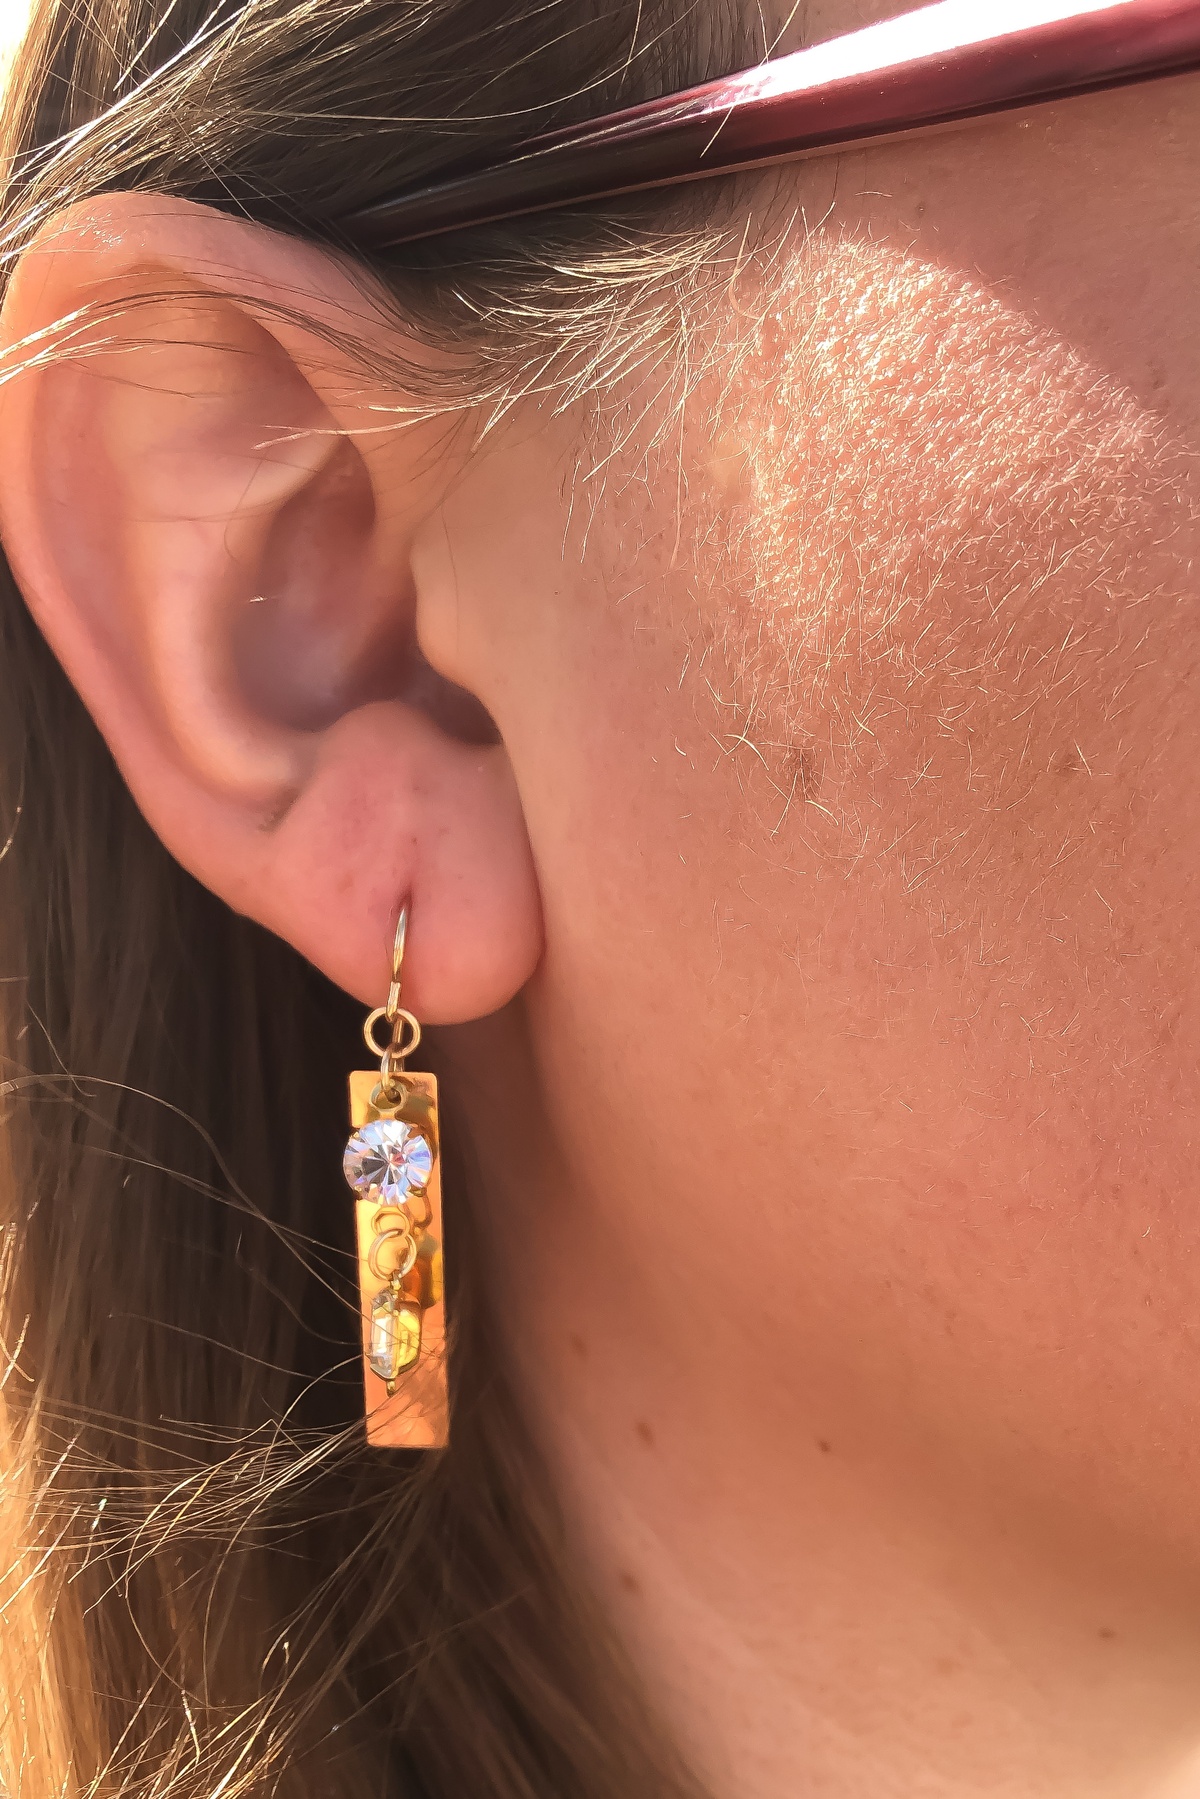
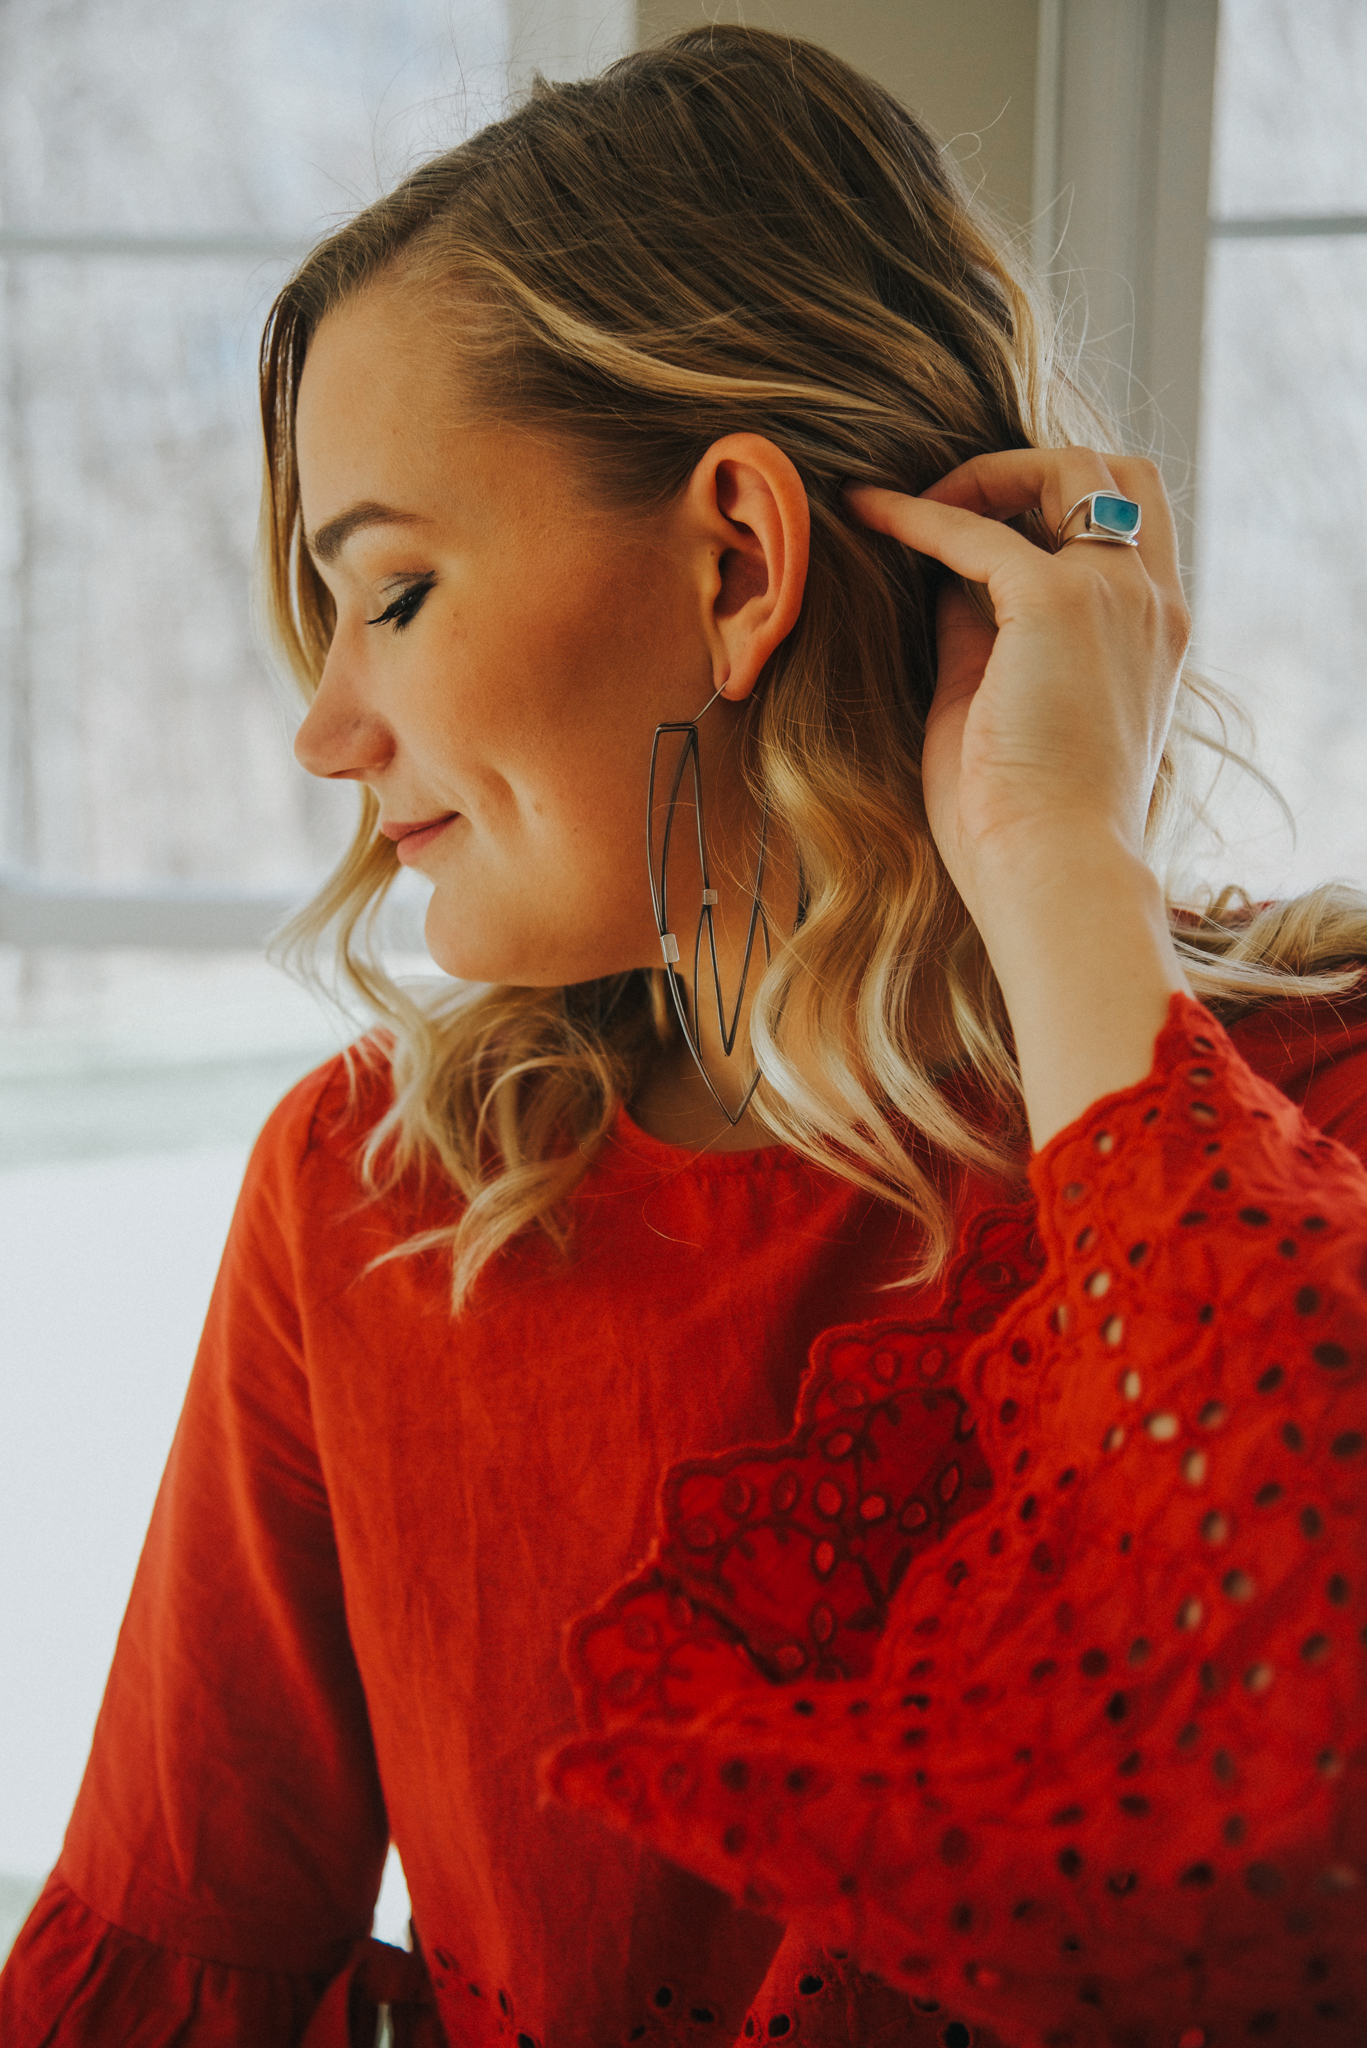
First, it is an excellent way to show the scale of your jewelry. Your buyer (especially online shoppers) can picture size and how the jewelry will look on them better when they can see it modeled on a real person, compared to white background shots.
Second, having modeled shots of your jewelry add great content for your website and social media. Model shots are great feature images and add yet another view for each item’s page. While a product shot on a plain background is important to be your main image, your jewelry on a model can offer great insight to customers.
Third, model shots can help customers understand your brand. The look and feel and target audience can sometimes be portrayed better with model images.
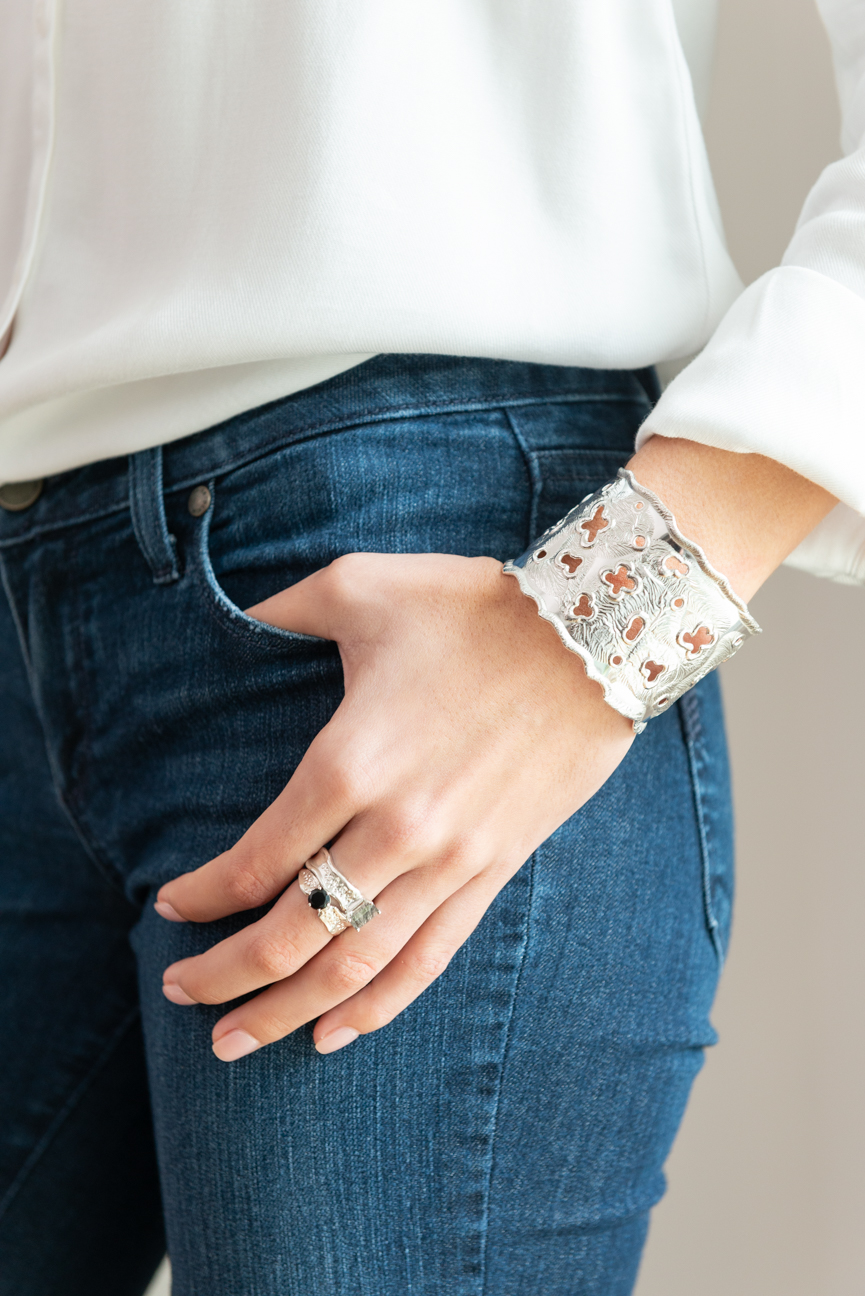
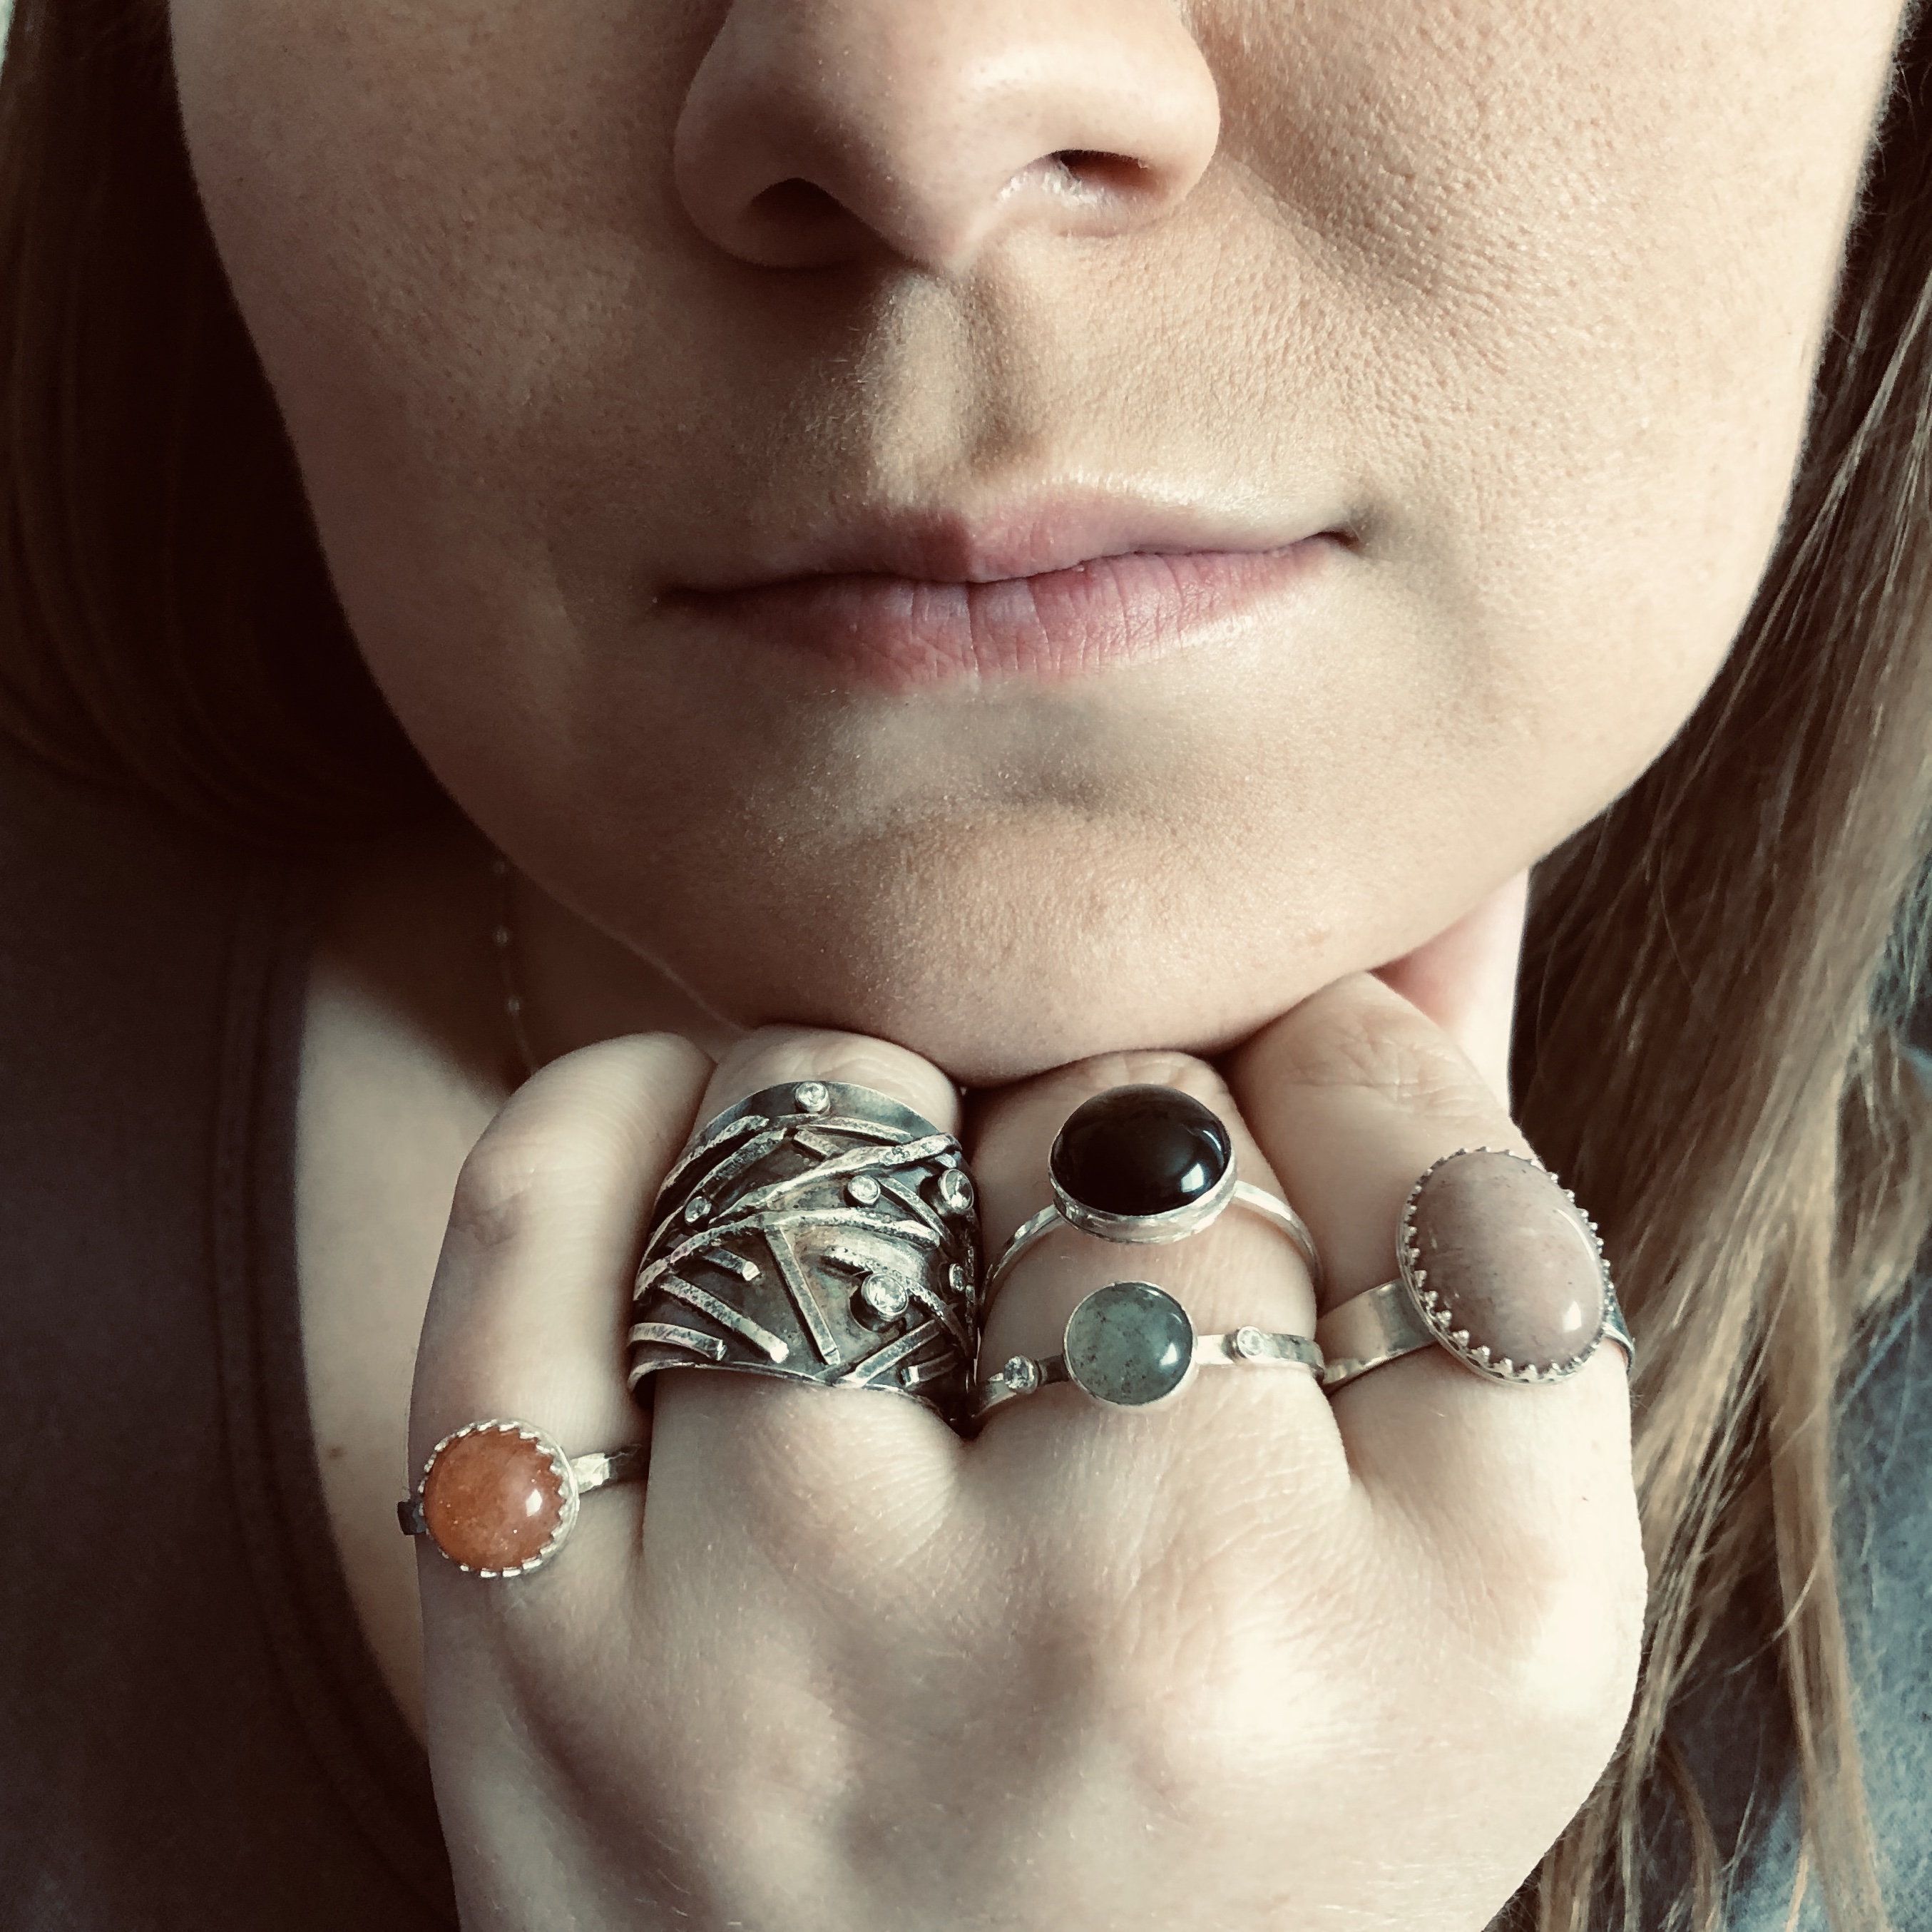
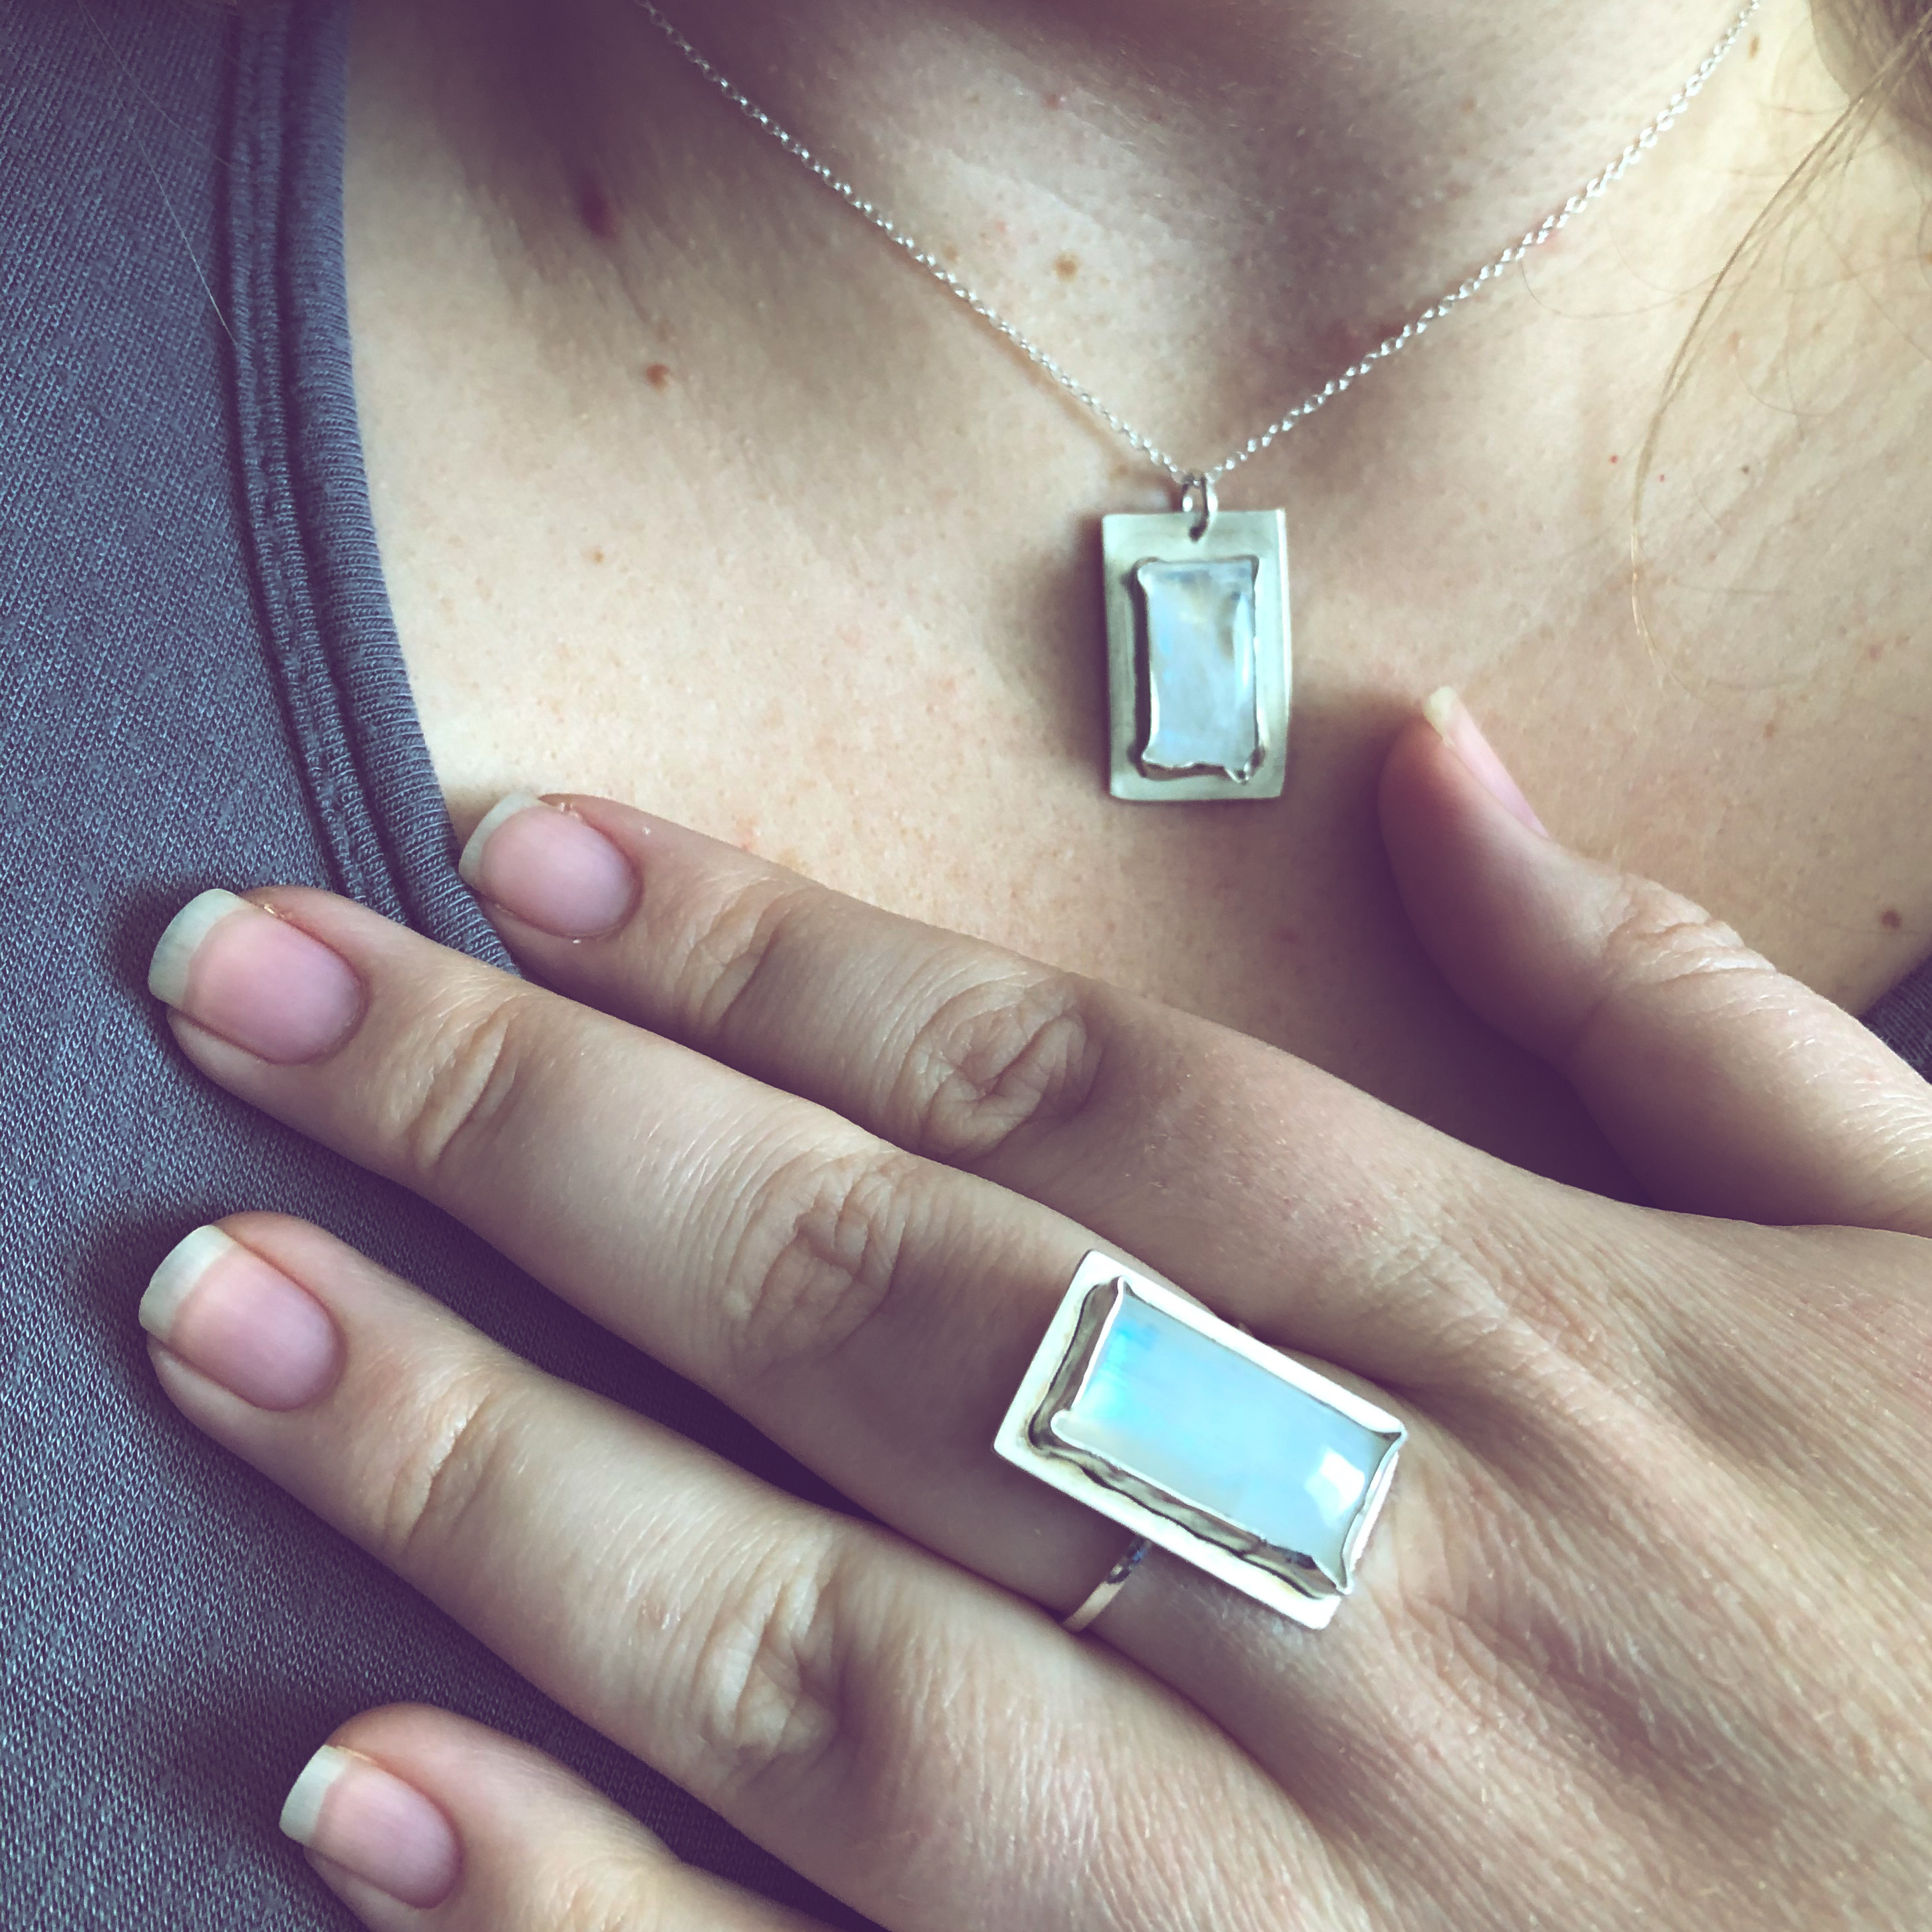
Another benefit of modeled jewelry is that you can showcase multiple jewelry items at once. Show customers how they can stack rings or bracelets. Offer a beautiful necklace that pairs well with those earrings. Let them see how multiple pieces of the line work together as a set!
What our Halstead Grant Winners Say
We spoke with two of our past grant winners, Emma Hoekstra of Emma Elizabeth Jewelry (2019) and Kristen Baird-Rabun of Kristen Baird Jewelry (2017) about their decision to use model photography for their jewelry businesses
1. Why do you have your jewelry shot on models?

Emma Elizabeth: I think it is important for the customer to be able to see the jewelry being worn especially if they are shopping online. This way they can picture what it might look like on them. It also really helps with interpreting jewelry scale.
Kristen Baird: I didn’t have "Model Photos" for a very long time and then in 2019, I finally had my first official model shoot for my brand. I used my friends, and fellow small business owners, Paprika Southern Studios to style and photograph the shoot. My goals for the shoot were to give a sense of scale to my jewelry and to have content for social media and my website that really showcase the feel of the Kristen Baird® brand. I've found that on-model shots are a great way to showcase multiple coordinating pieces, a variety of color options, or an assortment across several collections- all in one image. The detail shots we get are also important! I use them to send to customers all the time especially when they are asking questions about a piece, or have thoughts about scale or fit. It gives me a way to say, “Hey, I think you would like this piece or that.” For me, it’s already made a huge difference!
2. What do you look for in a model?

Emma Elizabeth: The first photoshoot I did for my website I had all my cousins over and had them model for me since I didn't really have many connections to local models. The second time I had been introduced to some local models through a collaboration I did. I ended up reaching out to them on Instagram and they all seemed pretty excited about it. It was more of a collaboration shoot, so it gave them an opportunity to build their portfolio, practice their posing and have images they could use on their social media. To thank them, I gave them each a dollar amount towards a piece from my website
Kristen Baird: With my first "unofficial shoots" I started by using friends who were willing to help me out. For my latest shoot I wanted a different look and Paprika Southern Studios had the perfect suggestion of a beautiful Latina model with gorgeous hair and a striking smile. I’ve had other models through collaborations – I've used a model with blonde hair and blue eyes, several African-American models with flawless skin and drop-dead-gorgeous hair, a red hair fireball of a model with piercing features. As time passes, I have a couple of other models that I want to use - an Asian model and at some point, a pregnant woman and a mother with her kids - because I want my brand to relate to all women, not just one particular look.
For the latest shoot, I did pay for the model's hair, nails, and makeup. It is important to my brand that nails look really nice. It worked out quite nicely because one of the first things you look at when shooting jewelry is nails, ears, hands, neck structure, those types of things.
3. Who shoots your jewelry (on model or otherwise)?
Emma Elizabeth: I have a good friend from high school, Emily Moelker Photography, who shoots my website photos. We do need to set up another shoot but it is hard to keep up on modeled images when making one of a kind jewelry. My lifestyle/studio images of myself are have been taken by Ashley Wierenga, she is a local marketing consultant who also wrote a really nice blog about me and my story. Betsy Schipper Photography has been really awesome to work with because we barter our services and she happens to love my work and I hers, so it has been a great business relationship. I have also done a lot of collaboration type styled shoots in the past which have been a great way to get my work out there, Chettara T. Photography has such an imagination and I love her creative vision. My all time favorite creative shoot was working with Jen Vermeulen Photography to bring my vision of EEJ to life, we are hoping to work together again soon!
Kristen Baird: That would be Paprika Southern Studios. They are great – they are friends of mine, and I’ve known them since we both started our businesses. I like to use people who are local and who are in a similar situation as I'm in. We can help each other by working together and we "get" each other. It also helps that we know each other and have been following each other's business for a while.
The thing with Paprika Southern Studios is they understand environment, mood, and "feel". They were the ones who suggested neutral backgrounds, non-distracting props, clothing that fit the goals...they would suggest, "Let's bring in this or that for different looks" and it worked! I try to let them do what they are best at and when I let them do their thing, the results are far greater than if I try to dictate.
4 - Any tips for shooting jewelry on models?
Emma Elizabeth: The jewelry should be the focus of the modeled images. The light should be hitting the jewelry directly rather than highlighting the model. It is really important that you photographer fits your vision and that they have product photography in their resume.

Kristen Baird: First thing, know what you want to get and what your goals are prior to starting. When I went to the ladies at Paprika Southern Studios, I knew I needed to get certain earring styles - things that need to show scale or particular details that are hard to show otherwise. I needed stacked pieces. I needed combinations. I needed to show gemstone variations. I needed show-stopping images for banners, certain images for business cards. Pictures I could use for website content. My list was long but doable.
Also, it's key to come into the shoot with the jewelry organized - knowing what you need from your model, and knowing what you need from your photographer.
One final tip from Kristen is to think about where you will be utilizing the photos and make sure there are shots done specifically for those needs. "My photographers also shot images with a lot of white space specifically for me to add announcements or do graphics with them, which was really helpful. They made sure to shoot images for use in different areas like banner signs, announcements, graphics, etc."
Tips for Getting Started
Research has found that people tend to be drawn to photos of people. This means showing your jewelry on a model is more likely to catch a customer’s eye. But if you’ve never done it before, having your jewelry photographed on models can be intimidating.
Never fear, here’s some tips to get started! If you will be hiring a photographer for your shoot, you can ignore Steps 3 through 5. You’ll still need to sit down with the photographer and discuss the first two steps before the jewelry photoshoot so you know you’re both on the same page.
Step 1 – Know What You Want
As you would with propped shots, you’ll want to come up with a plan - including some sort of theme - for your shoot. Doing a photoshoot without a plan will leave you with a lot of lost time as you try to figure out your next shot and frustration when you think of shots you could have taken after the session is over.
Things to think of when planning out a session:
1. How many final shots are you wanting?
Think about the minimum number of shots you’ll want out of the session. If you’ve taken photos of your jewelry before you know you can’t just take one photo and you’re good. Add in a model and now you have to worry about the model blinking or other issues that may ruin a shot. Take extra photos of each pose so there’s less of a chance of not being able to use a shot from that particular set.
2. Where & When?
This is especially important when working with a hired model. With friends you can ask them if they are open next weekend for a session, but with someone you hire you’ll need a more exact date.
3. What jewelry do you want to promote?
Plan ahead and organize what jewelry pieces and/or jewelry collections you want photographed. You not only can group by set (earring, ring, bracelet, necklace, etc.) but also by jewelry collection, metal type, or stone color!
Not only does this make the photo session go more smoothly, getting photographs of jewelry groups will make it easier for you to create promotions for both social media and your website. Here's a few examples of how you can group and what they can be used for below:

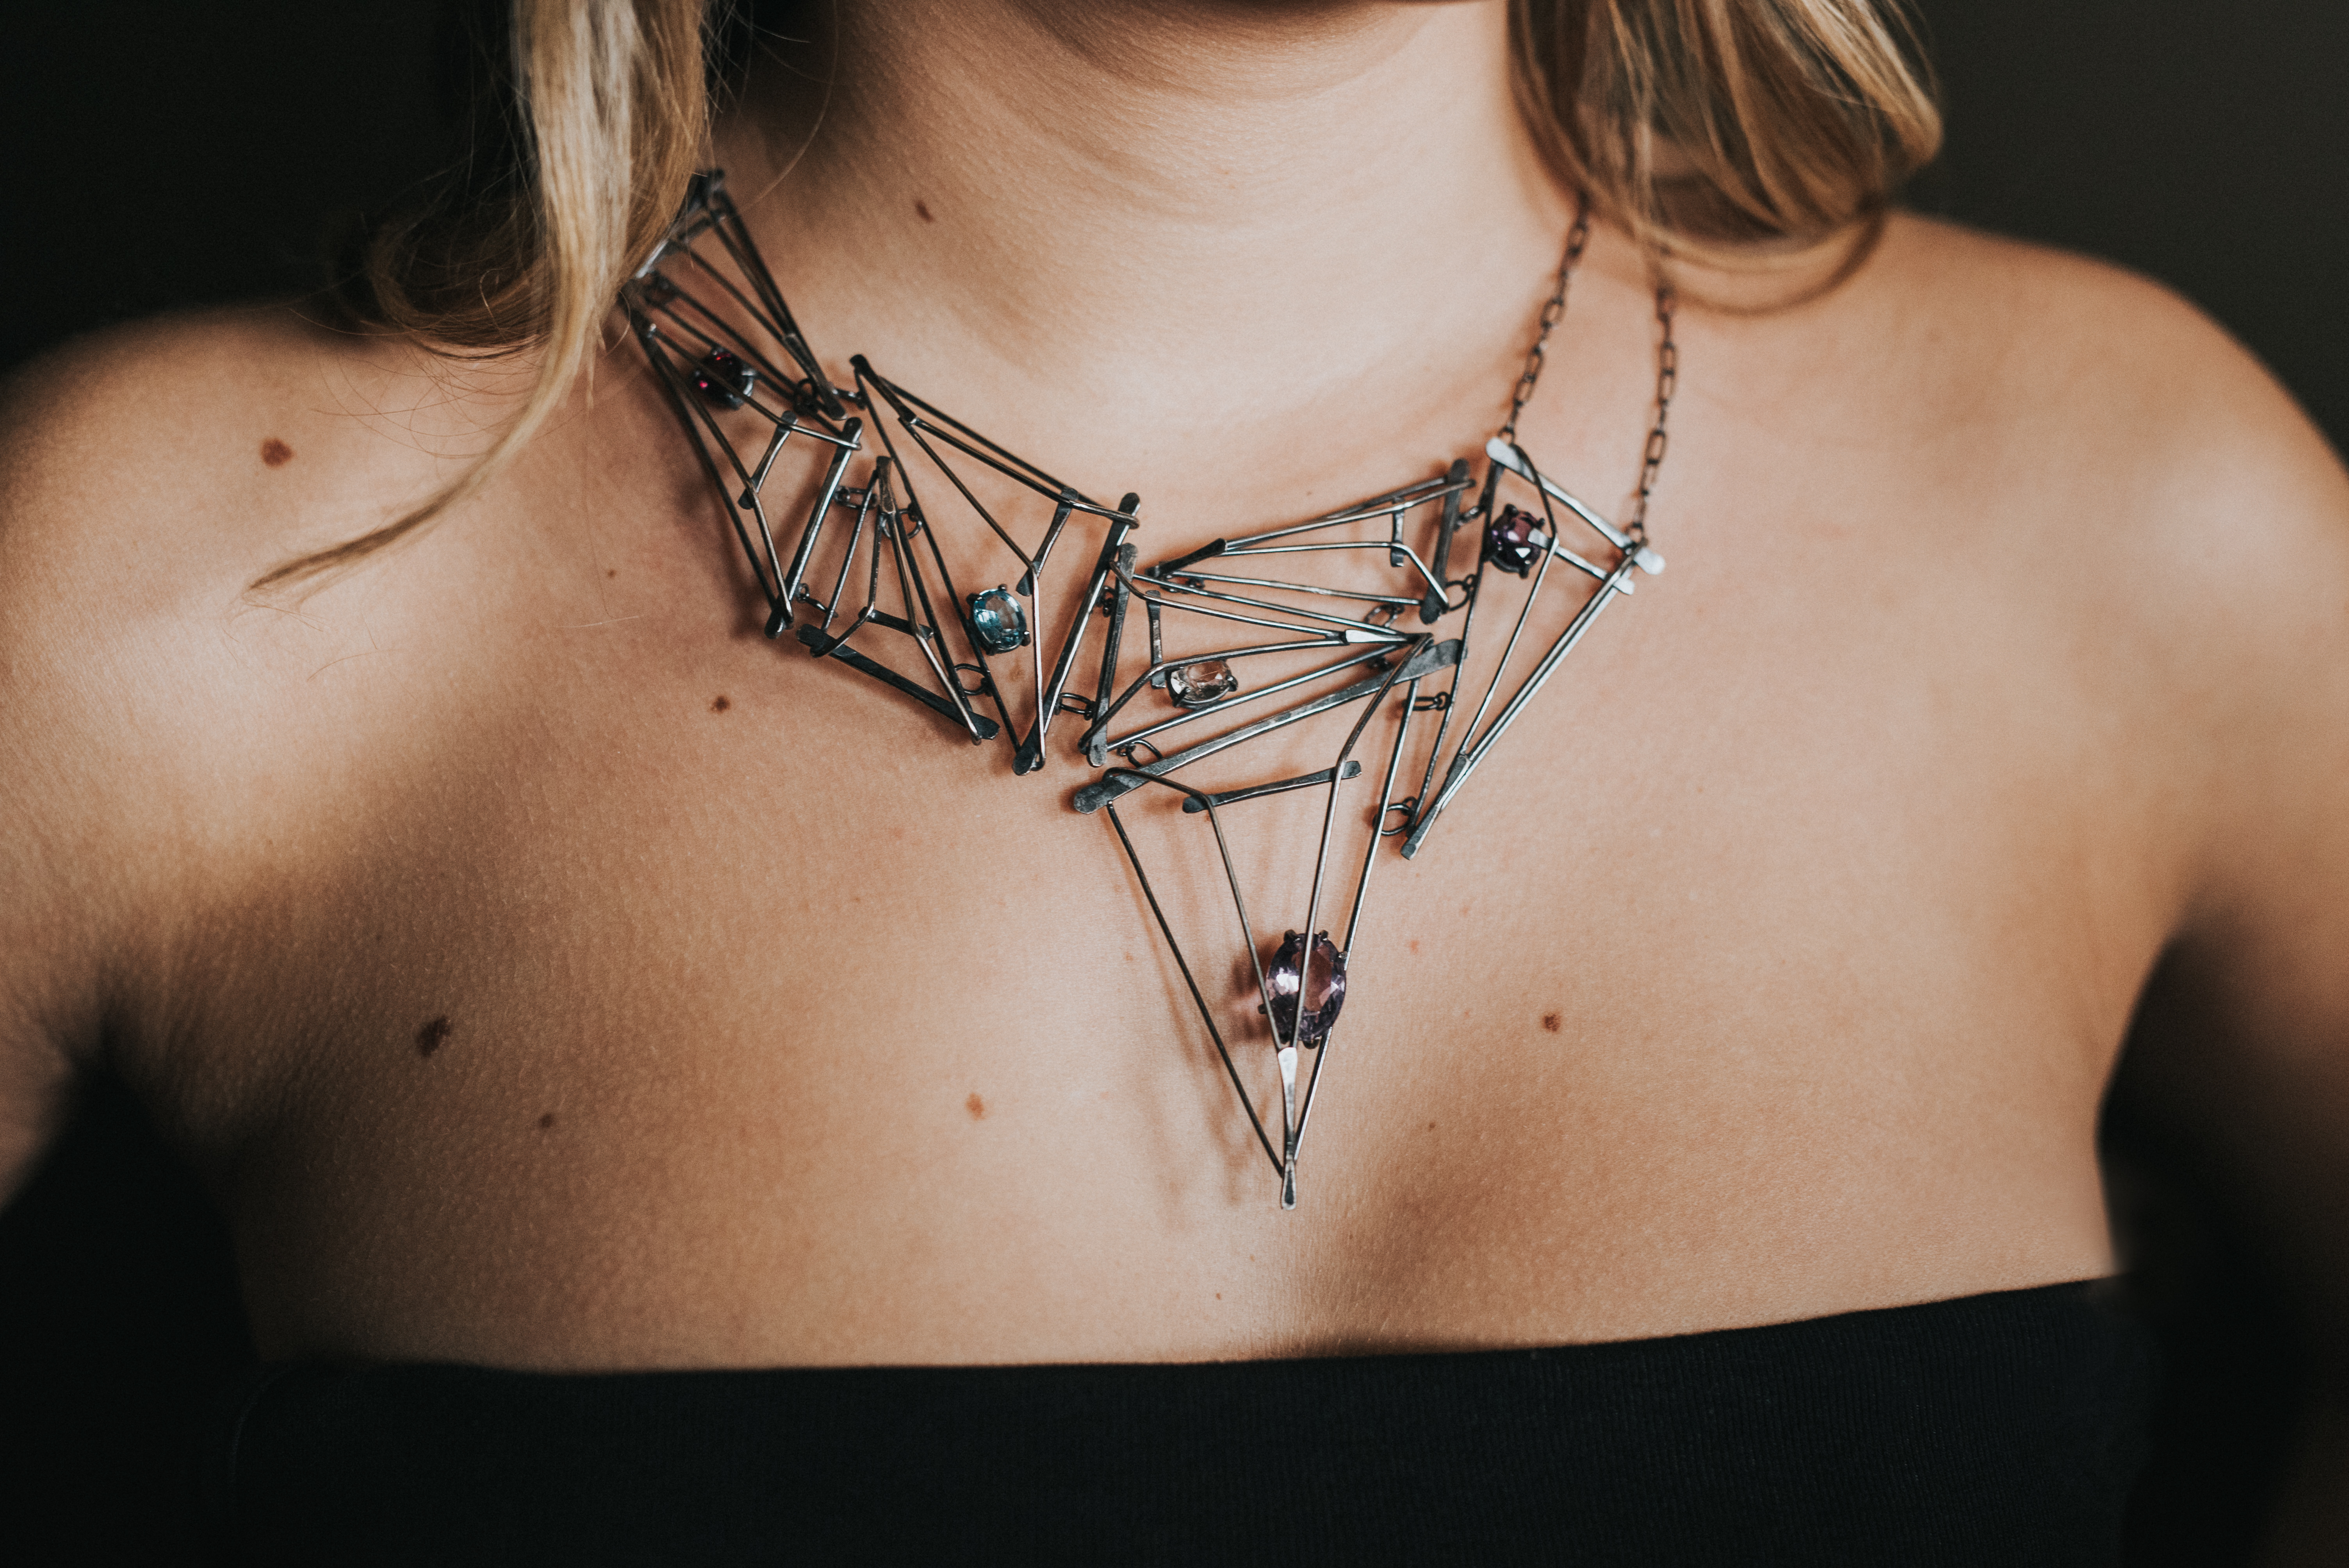
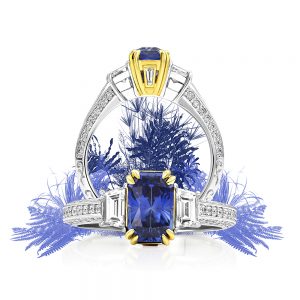
This shot is great to promote multiple pieces from one collection. Jewelry pieces are from the Ripple Collection by Kristen Baird Jewelry.
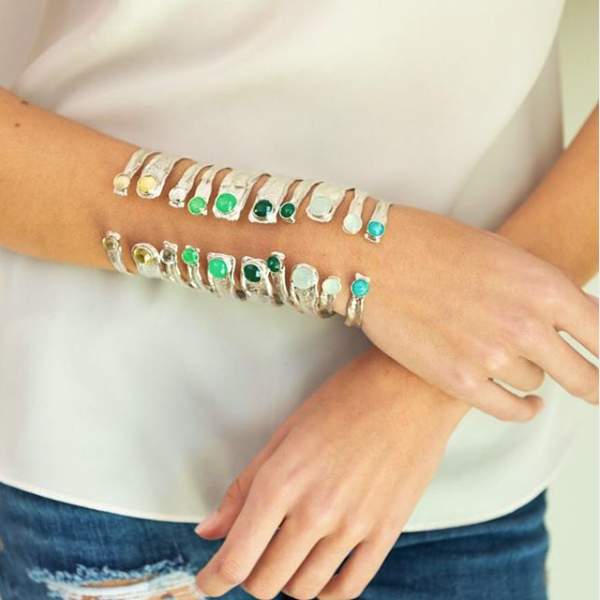
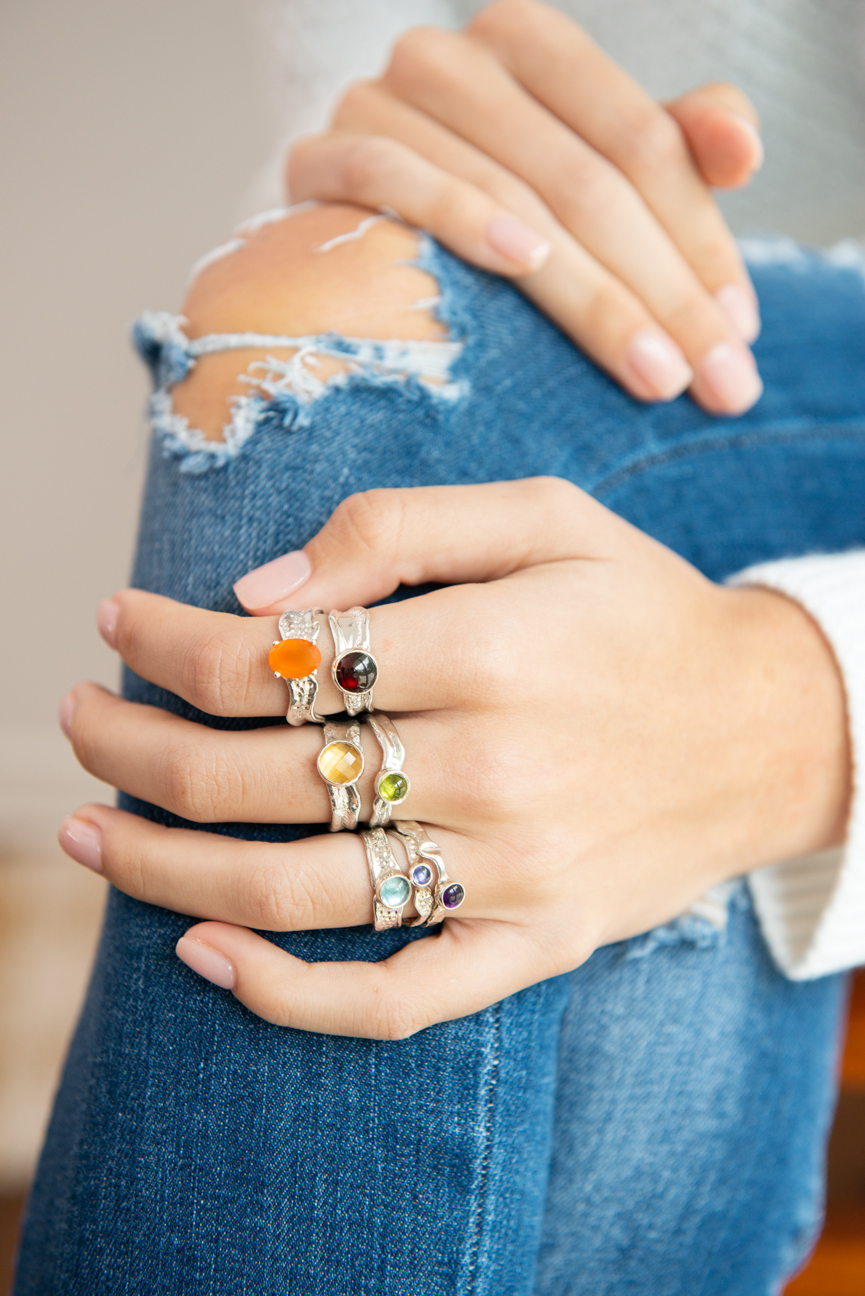
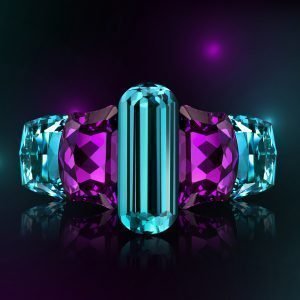
This shot is great for promoting the different types of stones you may offer. Bracelets are from the Ripple Collection by Kristen Baird Jewelry.
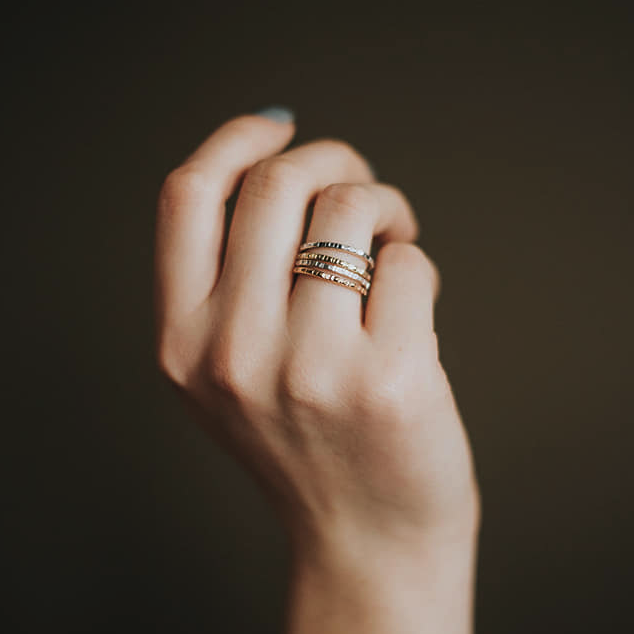
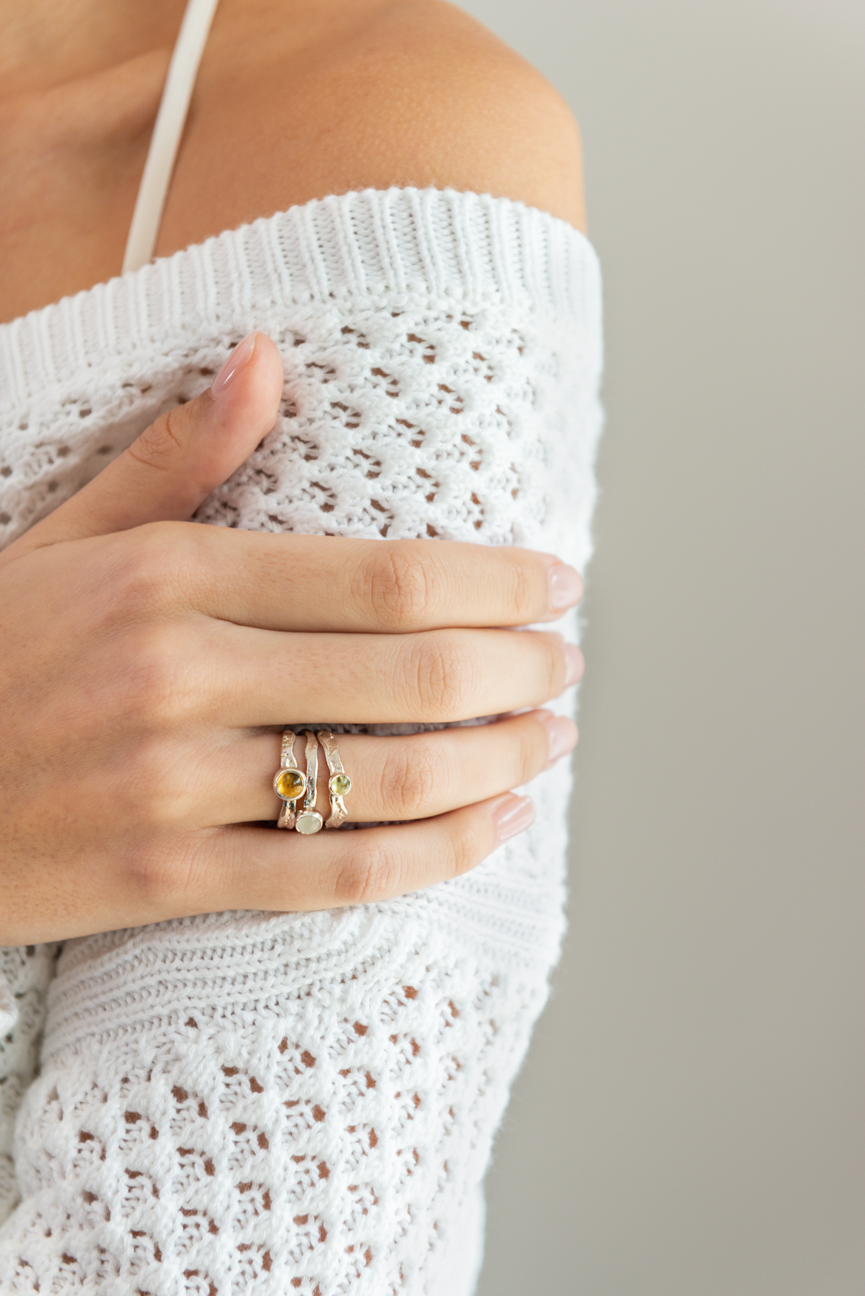
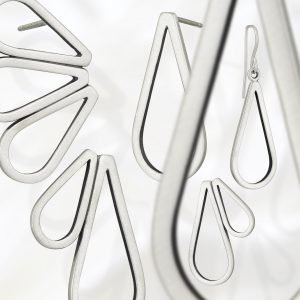
This shot is a great example of how to show off metal options of the same style. Rings are from Emma Elizabeth Jewelry.
4. What is your theme?
Creating a theme will help give you (or your photographer) and your model direction during the jewelry photoshoot. This will also give you direction on how your model should dress and wear their hair.
Knowing the theme will also give you direction on where you should hold the photoshoot. Will it be indoors or outside? Should you head to the park or go to a beach?
Some things to think about for on location (not in a studio or at your shoots – if you are wanting wardrobe changes for your model, will there be a place for them to change? Will you need permission to photograph in the area? Do you need to worry about the weather?
5. If your shoot is not in your studio or shop – How do you plan to transport and store jewelry for the shoot?
We suggest coordinating the pieces beforehand and sectioning off the bundles. This way you can quickly change looks without fumbling for what will match. It will also make you less likely to forget a piece that you were wanting shot. If you are going to a public area and can’t lock the pieces up in a car, plan on having someone, it can even be you, be in charge of watching or holding on to the jewelry at all times.
6. Who will model?
Consider your clientele. You want your models to reflect who is currently buying your jewelry and who you want to buy your jewelry.
Some other things to consider are:
- Do you want just one model or multiple?
- Will you be hiring, or will a friend be helping you out?
- If you are working with a photographer, will they be in charge of hiring the models?
- Make sure to have whoever is modeling, whether hired or a friend, sign a model release form. You can easily find blank forms by searching for them online. Be sure to keep the forms on hand in case a dispute over image usage rights ever occurs.
If you are unsure of where to look for a model, check social media. Facebook has groups dedicated to connecting models to photographers and business owners.
Tip: If a friend is helping you out by modeling, make sure to compensate them in some way!
Something to keep in mind: photographing people adds an emotional element that is generally not present in prop shots. Do you want the models’ expressions blank? Happy? Fierce? You’ll want to communicate this to your model and/or photographer beforehand. Just remember - having a theme in mind can help with deciding what expression to go for!
Step 2 – Find Inspiration
Throughout working on all our themed photography we’ve found having a batch of inspiration photos is essential. This is especially important since now you’ll have the added element of having to pose a model. If you are hiring a photographer, you’ll most likely go through this process together and set up both a mood board and a shot list.
Go through your favorite jewelry tags on social media (Instagram & Pinterest will be your friends here!) and see how both jewelers and wearers show off their jewelry. Fasion tags are another great source of inspiration. See the Pinterest board Kristen Baird created as inspiration for her latest shoot!
If you are using Pinterest, make a subcategory so you know what poses would work best for rings, necklaces, bracelets, etc.
When you have found enough inspiration, the next step is to make a shot list. If you're the photographer, you won't want to be going back and forth on all your social media channels during the jewelry photoshoot, so having a simple, printed list will make the session go more smoothly. You can segment your list into jewelry lines or by piece, whatever you think would make things easier on you.
Rings
- Hand on Cheek
- Hand on purse
- Drawing
- Hand in hair
- Holding necklace
- Holding a mug
Bracelets
- Holding purse over shoulder
- Putting hair behind ear
- Holding hat
If you want the list more visual, use thumbnail sized images of your inspiration board in addition to or replacing the text. As long as everything is in a simple list format you’ll be good to go.
If you are hiring a photographer, skip below to our Tips for Hiring a Professional Jewelry Photographer.
Step 3 – Understand You are the Director
This may seem awkward at first, especially if you are not used to working with people, but you are the director. You will need to give your models direction, and trust us, your models will be happy for the help. Even professional models who have lots of experience will need you to tell them things such as, “Could you look a little more to the left and bring your hand closer to your face?”
The best way to do this is to first give them the general pose: “Can you sit over here with your chin resting on your hand?”. Take a couple of photos then pause and analyze the shots. Maybe the position of their hand is awkward or doesn’t fully show off the jewelry. Tell them how you would like them to adjust: “Can you rotate your wrist a little more towards the camera? Thanks!” Rinse and Repeat until you are happy with the shot.
If there is something you may need to help them adjust, such as moving a necklace to lie correctly, make sure to ask permission first. “The necklace has gotten a little tangled, do you mind if I fix it?”
Step 4 – Taking the Photos
Framing
While full body shots are great and can help catch customer’s eyes on social media, remember you are selling your jewelry. Customers won’t be able to see all the details you put on that ring from that far away. Be sure to get close-up detail shots, in fact most photos should be these.
We’re not saying 90% of the shots should be extreme closeups (such as all you see is a ring on a hand), they should be close enough that customers can see the jewelry clearly (a headshot with the model’s chin resting on their hand.)
Lighting
You will want to pay extra attention to how your jewelry looks during the session, especially if you are outdoors where you will have less control over lighting.
Soft lighting will always look best for both your jewelry and your model. If your session is indoors, that means using lighting such as softboxes. If you are outdoors try to stick to shade, aim for either an early morning or late afternoon shoot where the sun is less harsh, or hope for an overcast day. Bright sunlight leaves harsh shadows on both your piece and the model and can wash out details.
If your shoot is split up over multiple days, try to keep the lighting consistent. A harshly lit photo will look out of place next to photos with soft lighting.
Assistant
When using a model, you may want to think about having someone assist you. The assistant would be in charge of things such as lighting, keeping the jewelry organized, and switching out sets (if indoors). This will save you precious time and money, especially if the model is paid by the hour,
Having an assistant for an outdoor shoot is especially helpful since they can be the one in charge of watching the jewelry that’s not in use, freeing you up to focus on photography. They can also help with lighting by using reflectors to bounce light right where you want it.
The best part is you don’t need to hire anyone to assist, you can ask a friend or one of your employees to help. Don’t forget to compensate friends in some way since they are taking time out of their day to help you!
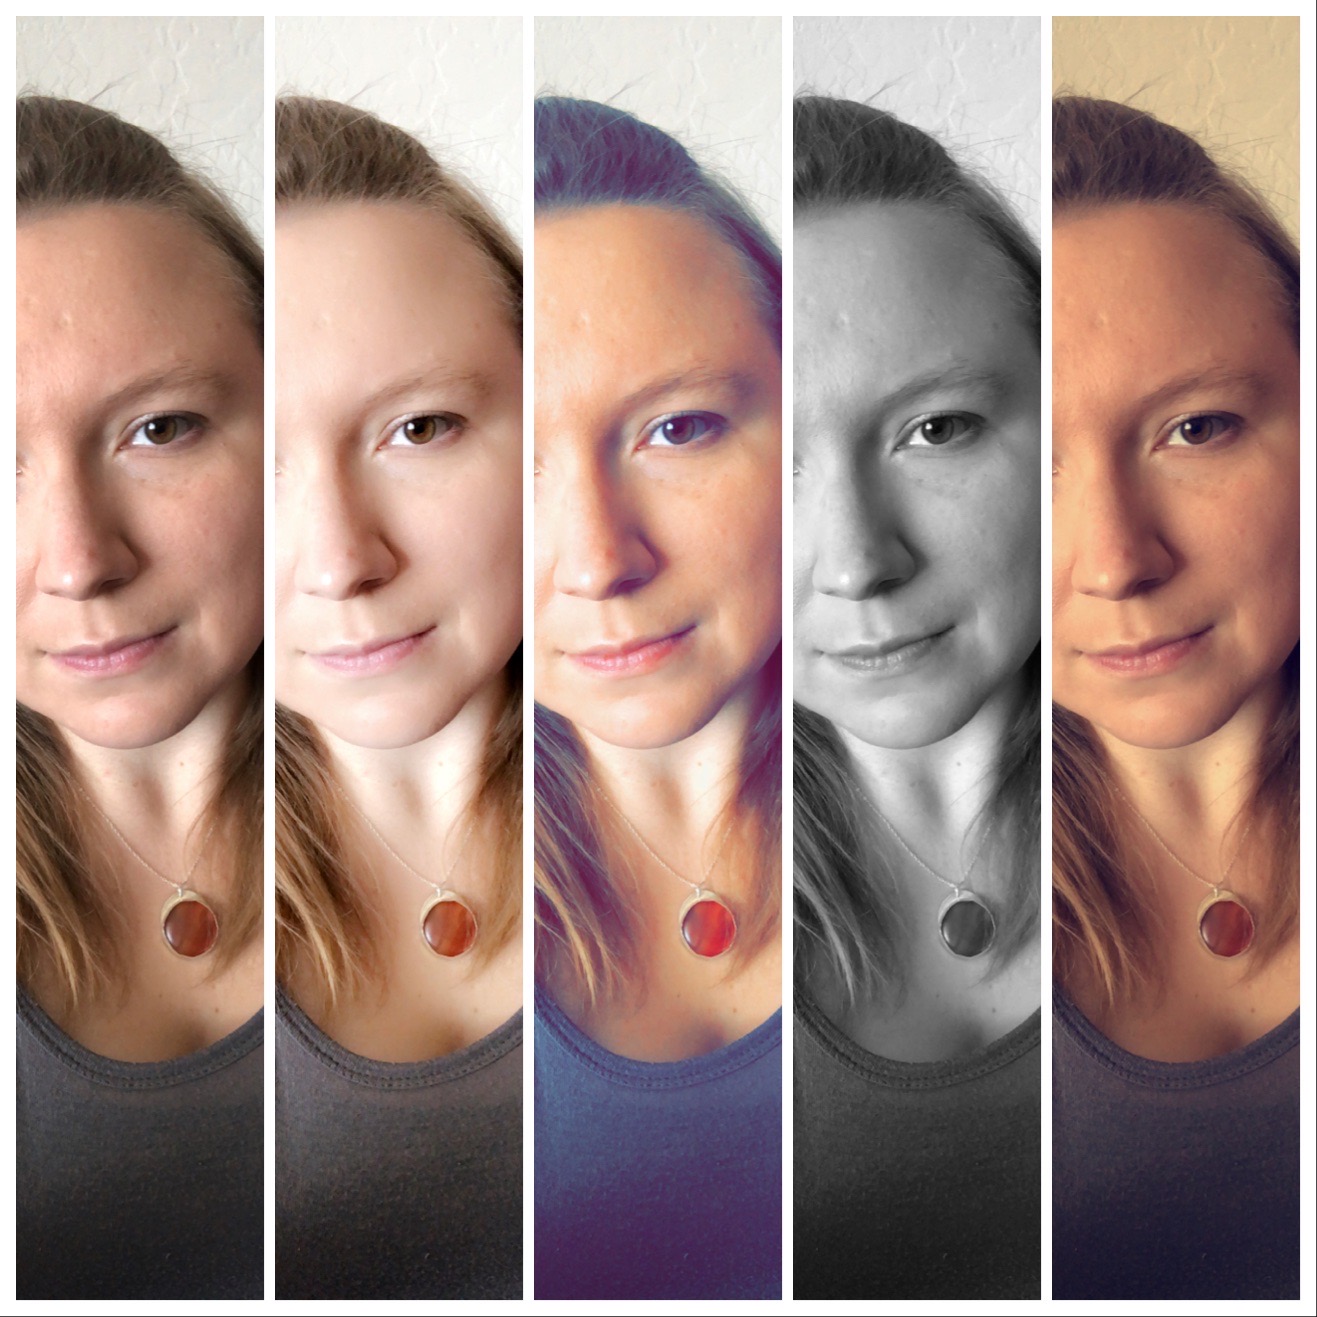
Step 5 – Editing
Using a model in your photos will complicate your editing process. Whereas before you only had to worry about desaturating your silver or making sure your gold-filled didn’t look green, you now have to make sure your model’s skin tone looks natural. One solution is to find a photo online of someone with the same skin tone with similar lighting that you can use as a comparison while you are editing. Another is to bring in a skin color palette and follow this tutorial (if the colors turn out awful, try a different midtone from the color palette.)
Even skin tone can be another issue (think of someone whose face is somewhat blotchy from a cold wind). In cases like this you can either use a healing brush (if the problem areas aren’t too big) or try to spot color correct (generally you’ll be lessening redness in areas).
Besides having to worry about flaws on your jewelry, you’ll now need to consider flaws on your model. Things like acne or mascara smudging should be edited out. While we are all for the all-natural and unedited photo movement, things like acne can be distracting for your jewelry photography, especially on the closeup shots. Most editing programs have something called a healing brush that allows you to brush over the problem area and the program will copy a spot from a nearby area to fix the issue. This will allow your edits to keep the model’s skin texture and color, keeping you from having a plasticky looking model.
Finally, remember to not over-edit the photos. When you think you are done editing, toggle back and forth between the edited and unedited version. Has the saturation been too overdone? Are the whites now overblown? If so, either track back or tone down the layers or effects that are causing the issues.
If you are just getting started in photo editing, here's some beginner retouching tutorials for Photoshop and Snapseed for mobile.
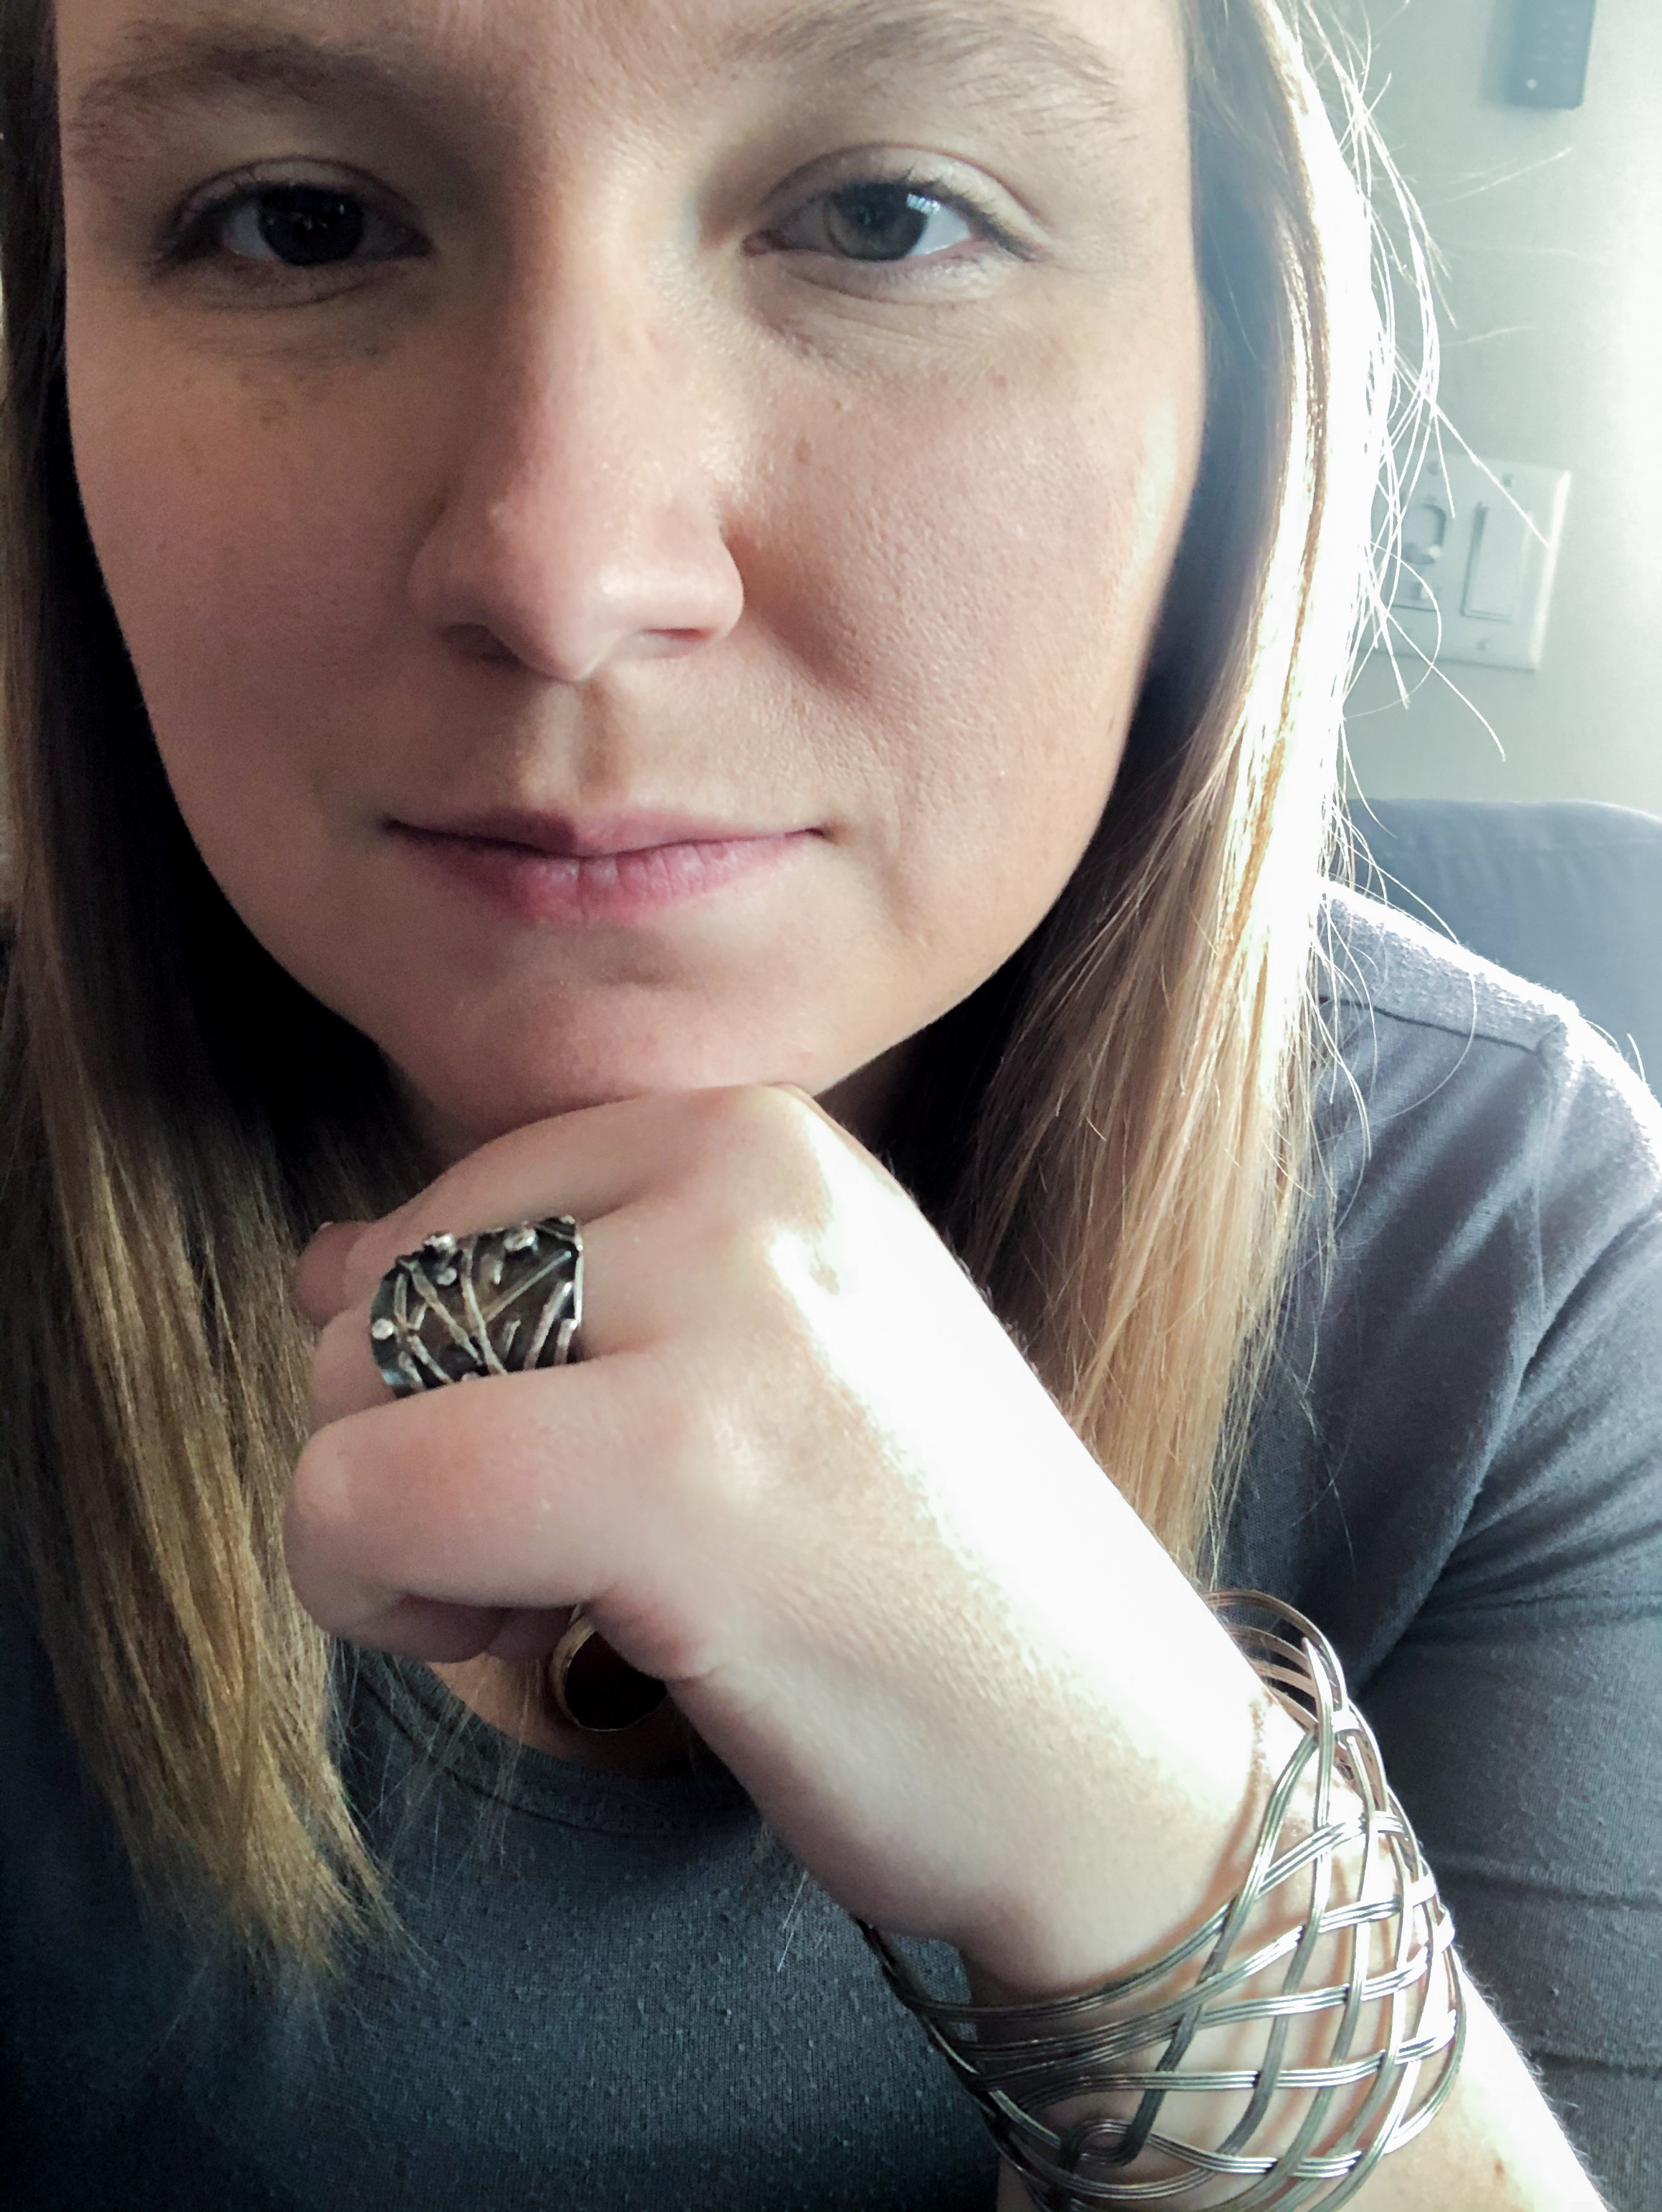
The Art of the Jewelry Selfie: When You Are Your Own Model
Photography is one of your jewelry business’ most important details, especially if you mostly sell online. White background and model shots are great ways to give your website a professional and artistic look. But for social media you can be more relaxed. Put a few of your pieces on and post a few selfies! You’ll be able to show off your jewelry, introduce your followers to you, and be more relaxed and natural than a professional photo shoot. Your selfies still need to look good and show off the product beautifully. We have some ideas and tips to take the perfect jewelry selfie.
Note: all photos in this section were shot on an iPhone 8 and edited only using the basic editing tools in the photos app or using Photoshop Express.
Always Remember Basic Photography Tips:
Selfies are still photos and will always look best if you remember your basic photography rules. Some of our phone photography tips will also come in handy for selfies.
Lighting
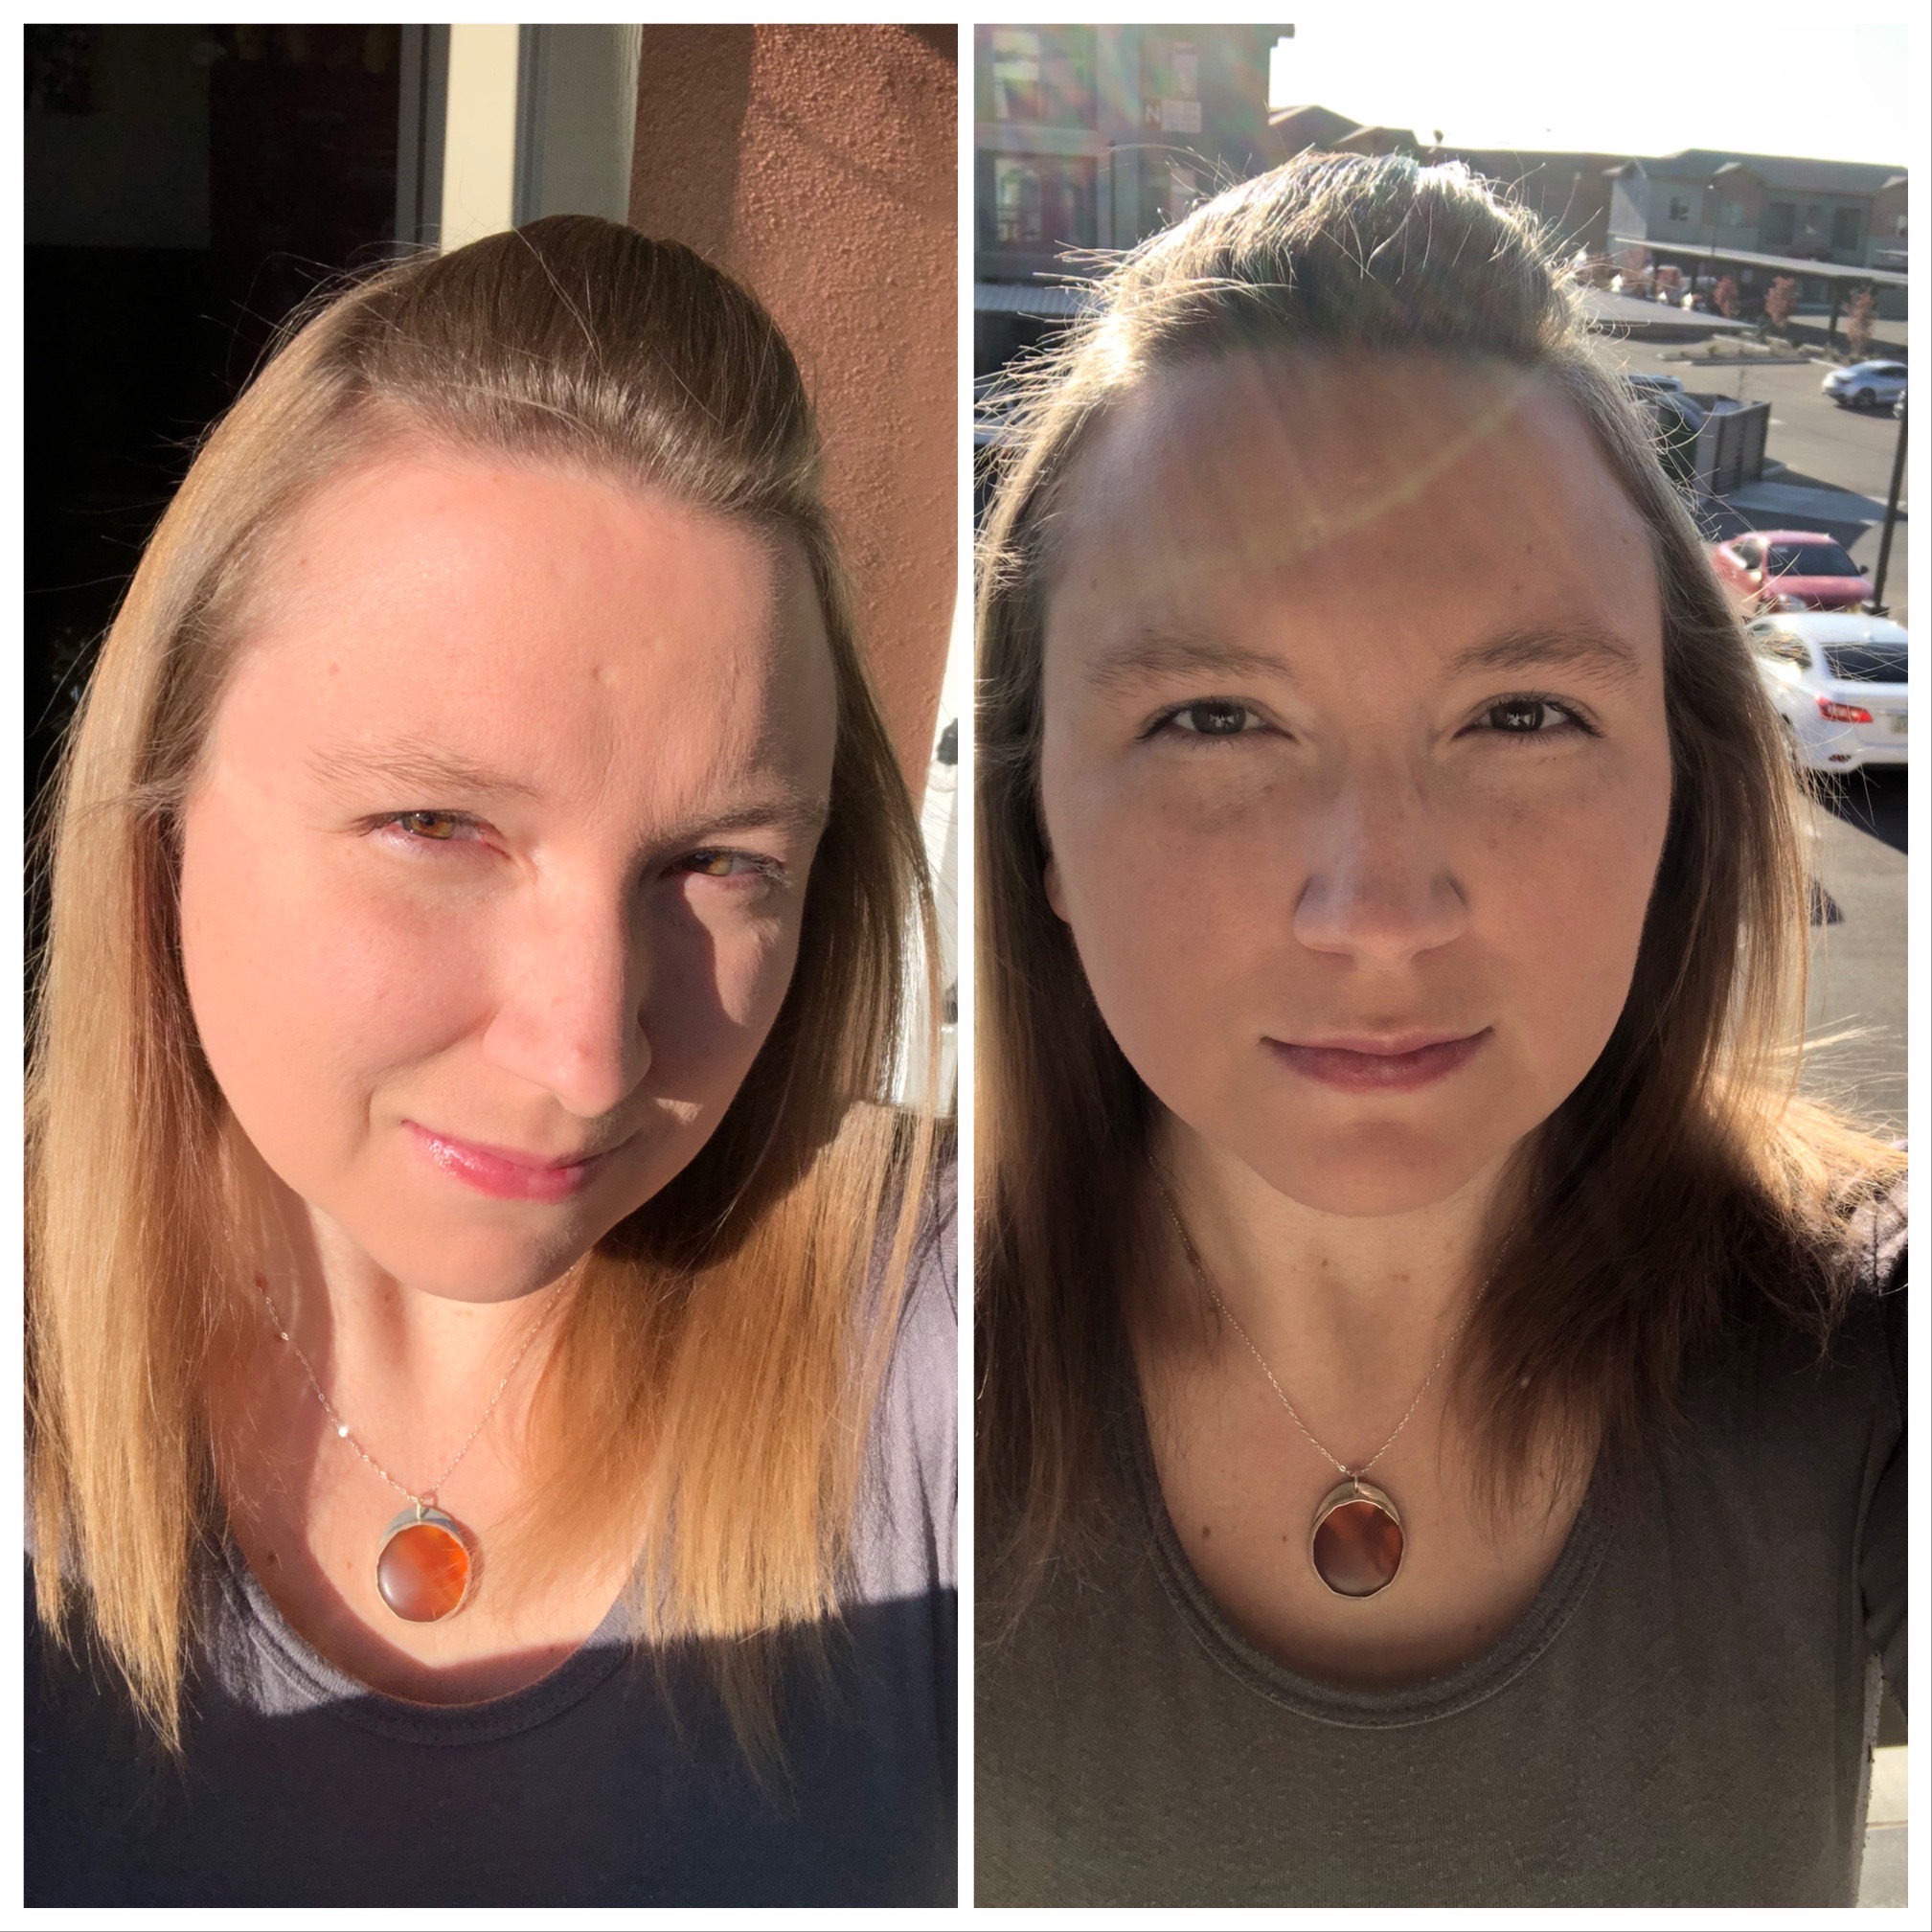
Your subject (you) will need to be well lit. Even without any equipment, you can create beautiful selfies. Interior lighting can create problems with shadows, since most lighting is overhead and can create harsh shadows on your face. If this is your only option, play with angles. Raising your phone to a slightly higher angle is the most popular way to reduce shadows on your face. But also play with your physical angle – try turning your head a few different ways to see how you can affect the shadows on your face. There’s also a reason that bathroom selfies became popular. Since the lighting is often not directly overhead, the shadows tend to be less harsh (wouldn't necessarily recommend taking your photos in the bathroom, but keep the lighting setup in mind). Ideally if you’re taking selfies inside, try taking them near a window for a softer light (be cautious of where the sun is). Side lighting is best, or you may end up with nothing but a blown out white background.
worked here. There was only slight editing involved.
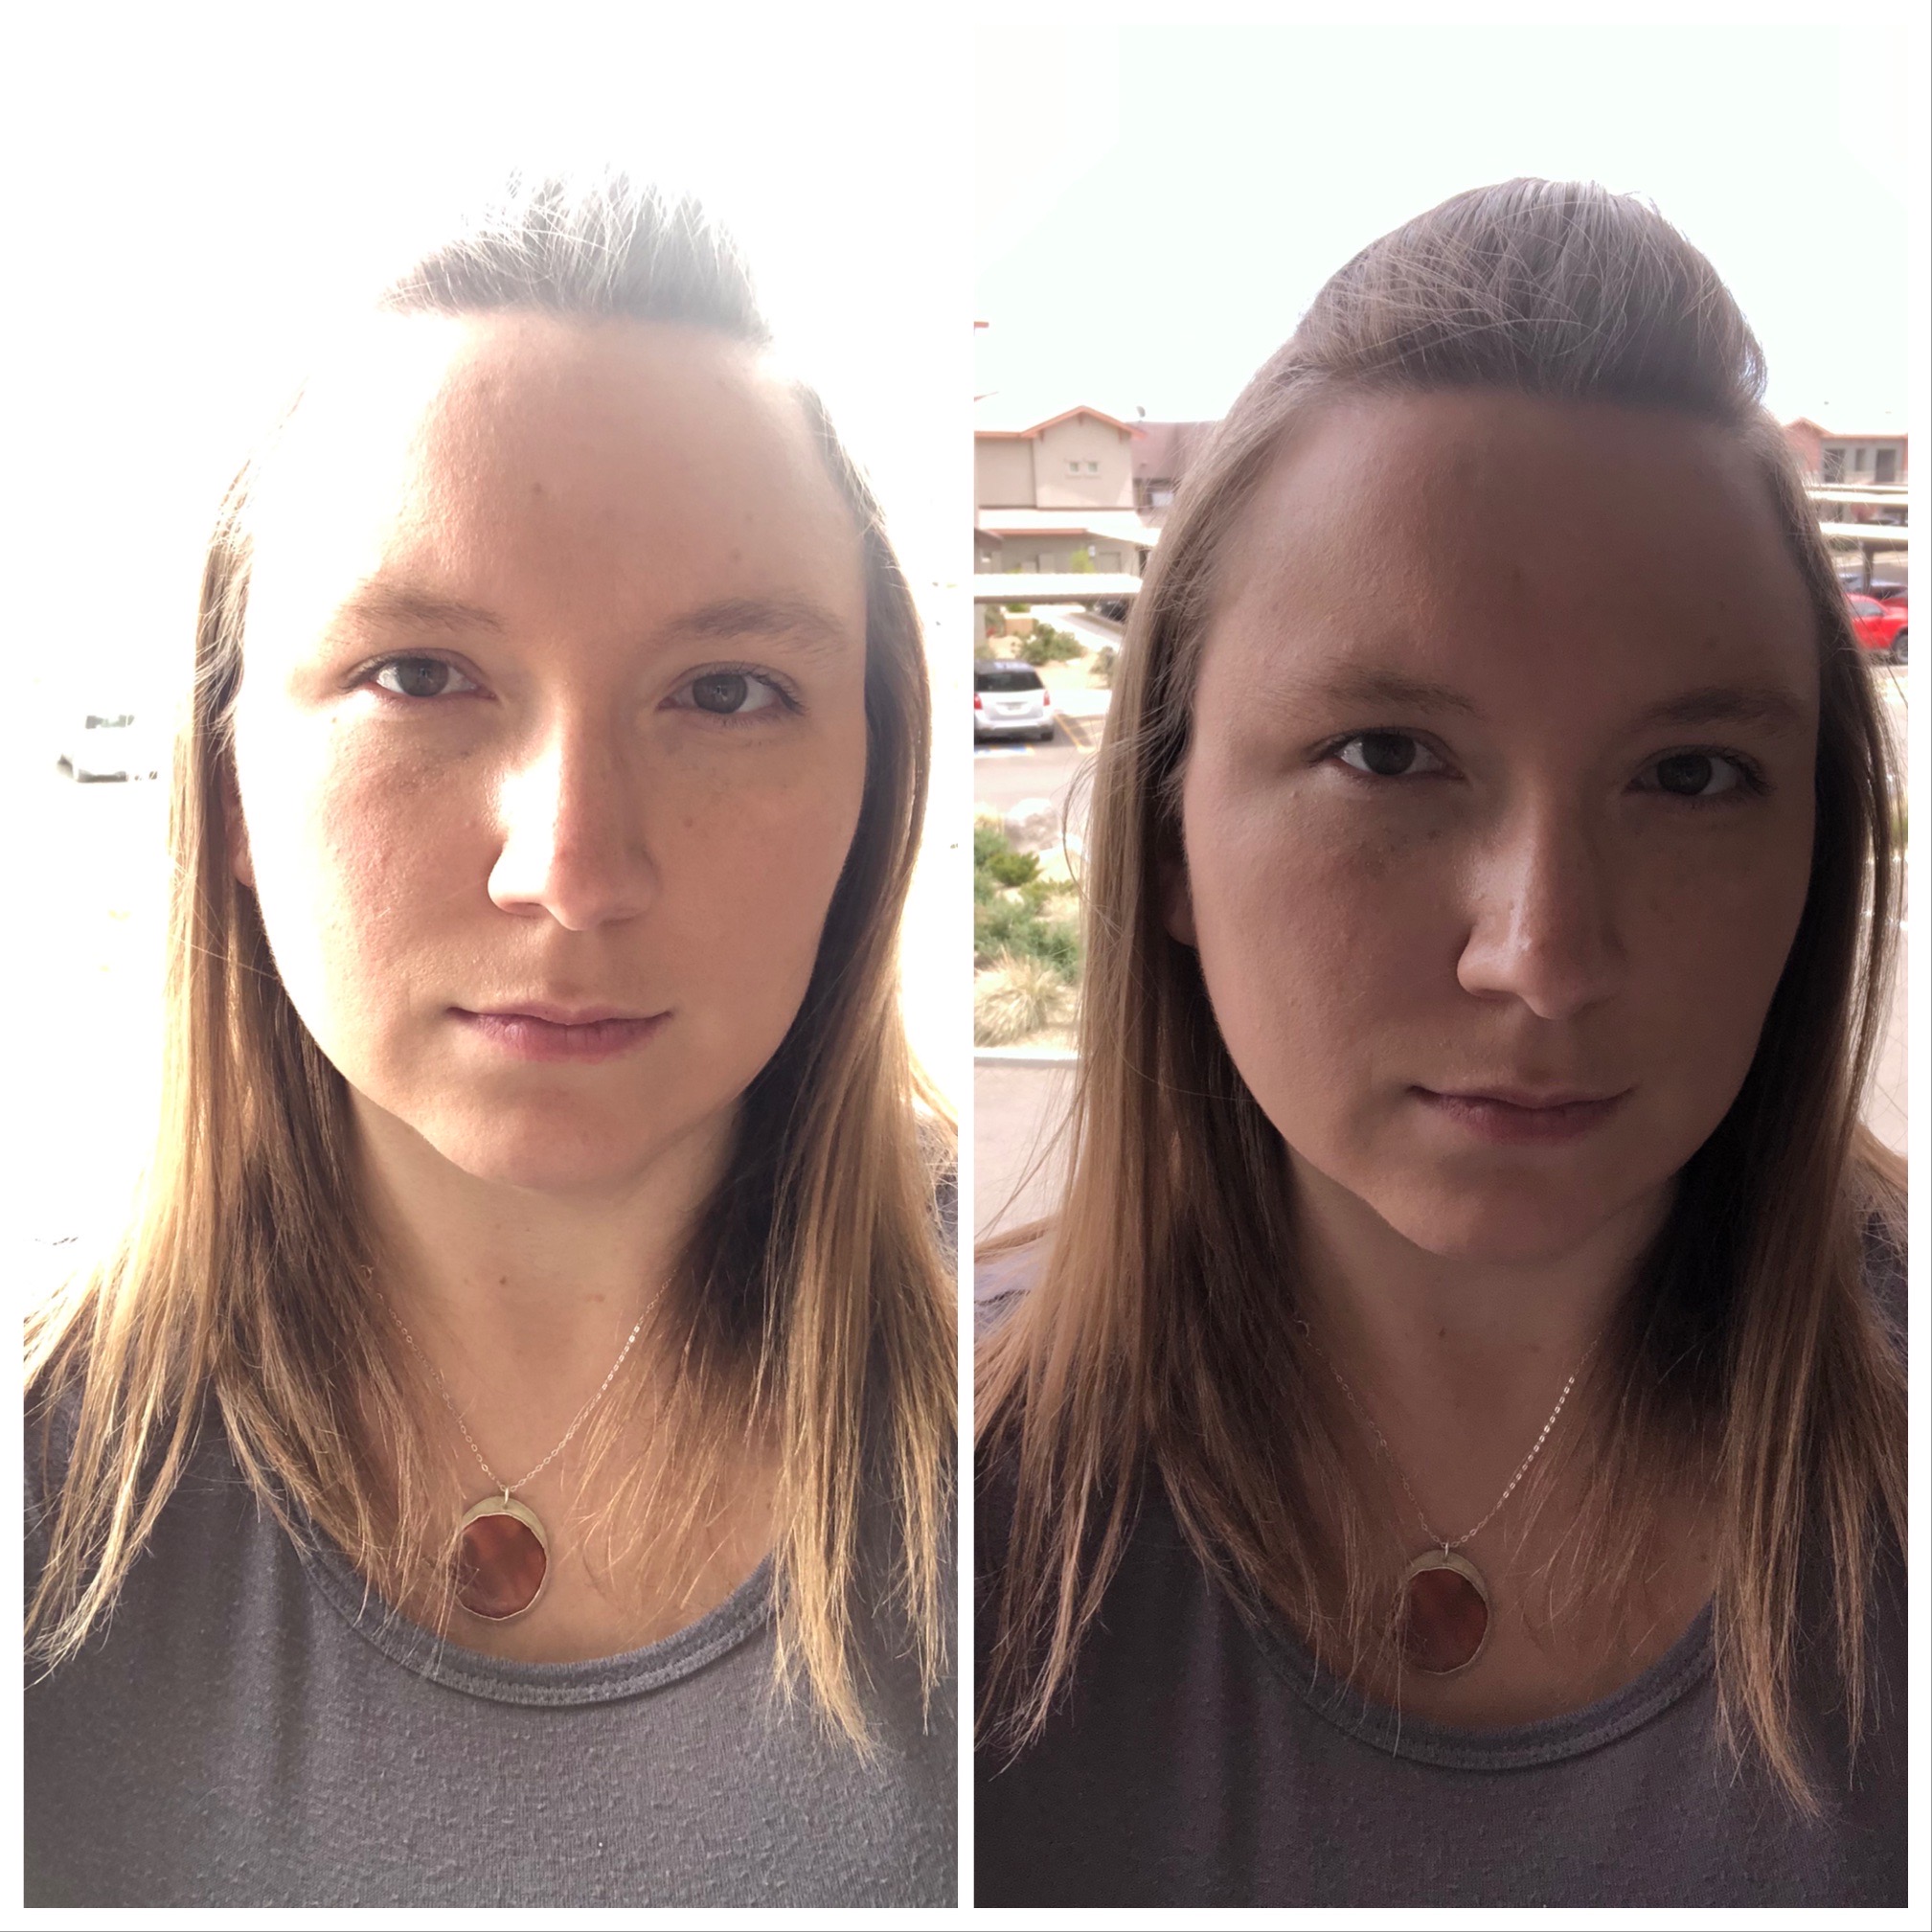
Or you can take your phone and jewelry to the great outdoors! Sunlight can create a different set of problems though. Beware of where the sun is. You don’t want your picture to have you squinting because the sun is so bright. Try angling the sun behind you so your body is blocking it. This may also help the background be seen more. It’s not going to create a perfect picture, but it’s a better starting point than a big sun glare. Don’t be afraid of a cloudy day. The clouds can help soften the sun and help your lighting situation.
Right: Sun behind
Do your best to not squint into the sun. Not only does it make your picture less appealing but it's extremely uncomfortable. You'll also get way more shadows. The sun behind you can create a cool effect, just be careful because it can lead to some glare (as you can see in this one).
A phone flash isn’t always great, but it may be able to balance out the lighting enough for a good picture, or at least one that’s easier to edit. If your phone’s camera app doesn’t have flash ability from the front camera, try taking a picture using Snapchat - they can be downloaded and never sent. There are also many accessories on the market that can help with your lighting. One of the most popular is a small light that clips on to your phone. They’re usually relatively inexpensive and can potentially help you take the perfect selfie.
Right: With flash
In this example, the photo on the right with flash is by no means perfect, but at least it's not as horribly blown out as the one on the left. So I might still be able to edit it to be usable.
The Rule of Thirds
This might be more of a design aspect but following the rule of thirds will give your selfie that extra touch. In basic terms, this rule recommends you not perfectly center everything. Most phones have this option in their settings to make it even easier for you. Your screen is broken up into a 3x3 grid and the idea is to have the main focal point along one of the lines of the grid rather than centered in the center grid square. Following this is thought to give photos more interest and intrigue.
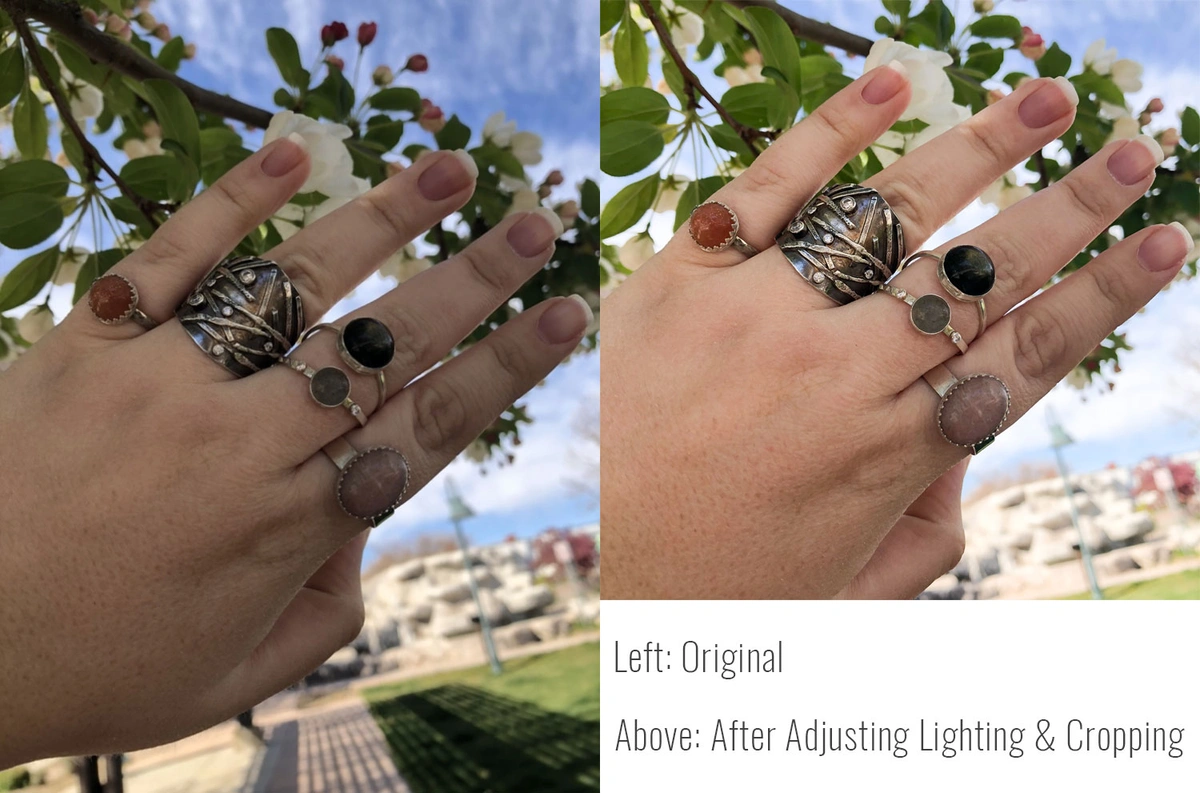
Think About Your Background
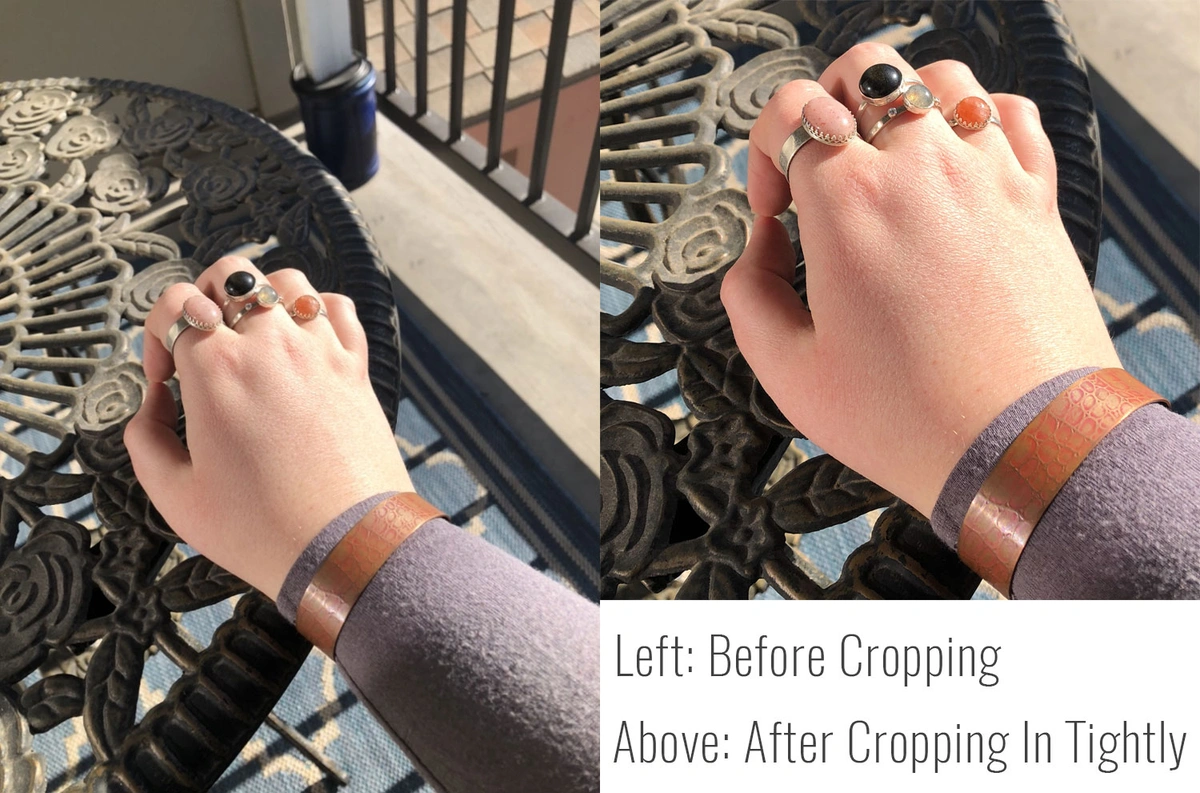
Even if your background is relatively plain, you’ll want to crop in as tight as you can to the jewelry you’re trying to showcase. If there are too many things going on in the picture, the viewer’s focus will be diverted from the intended subject. If you need to do a wider shot, put some extra thought into the background. Maybe try for a background that’s not too busy or that matches the theme of the jewelry you’re showing off. You can also use the crop to put a photo in line with the rule of thirds if you couldn’t get the original to work right.
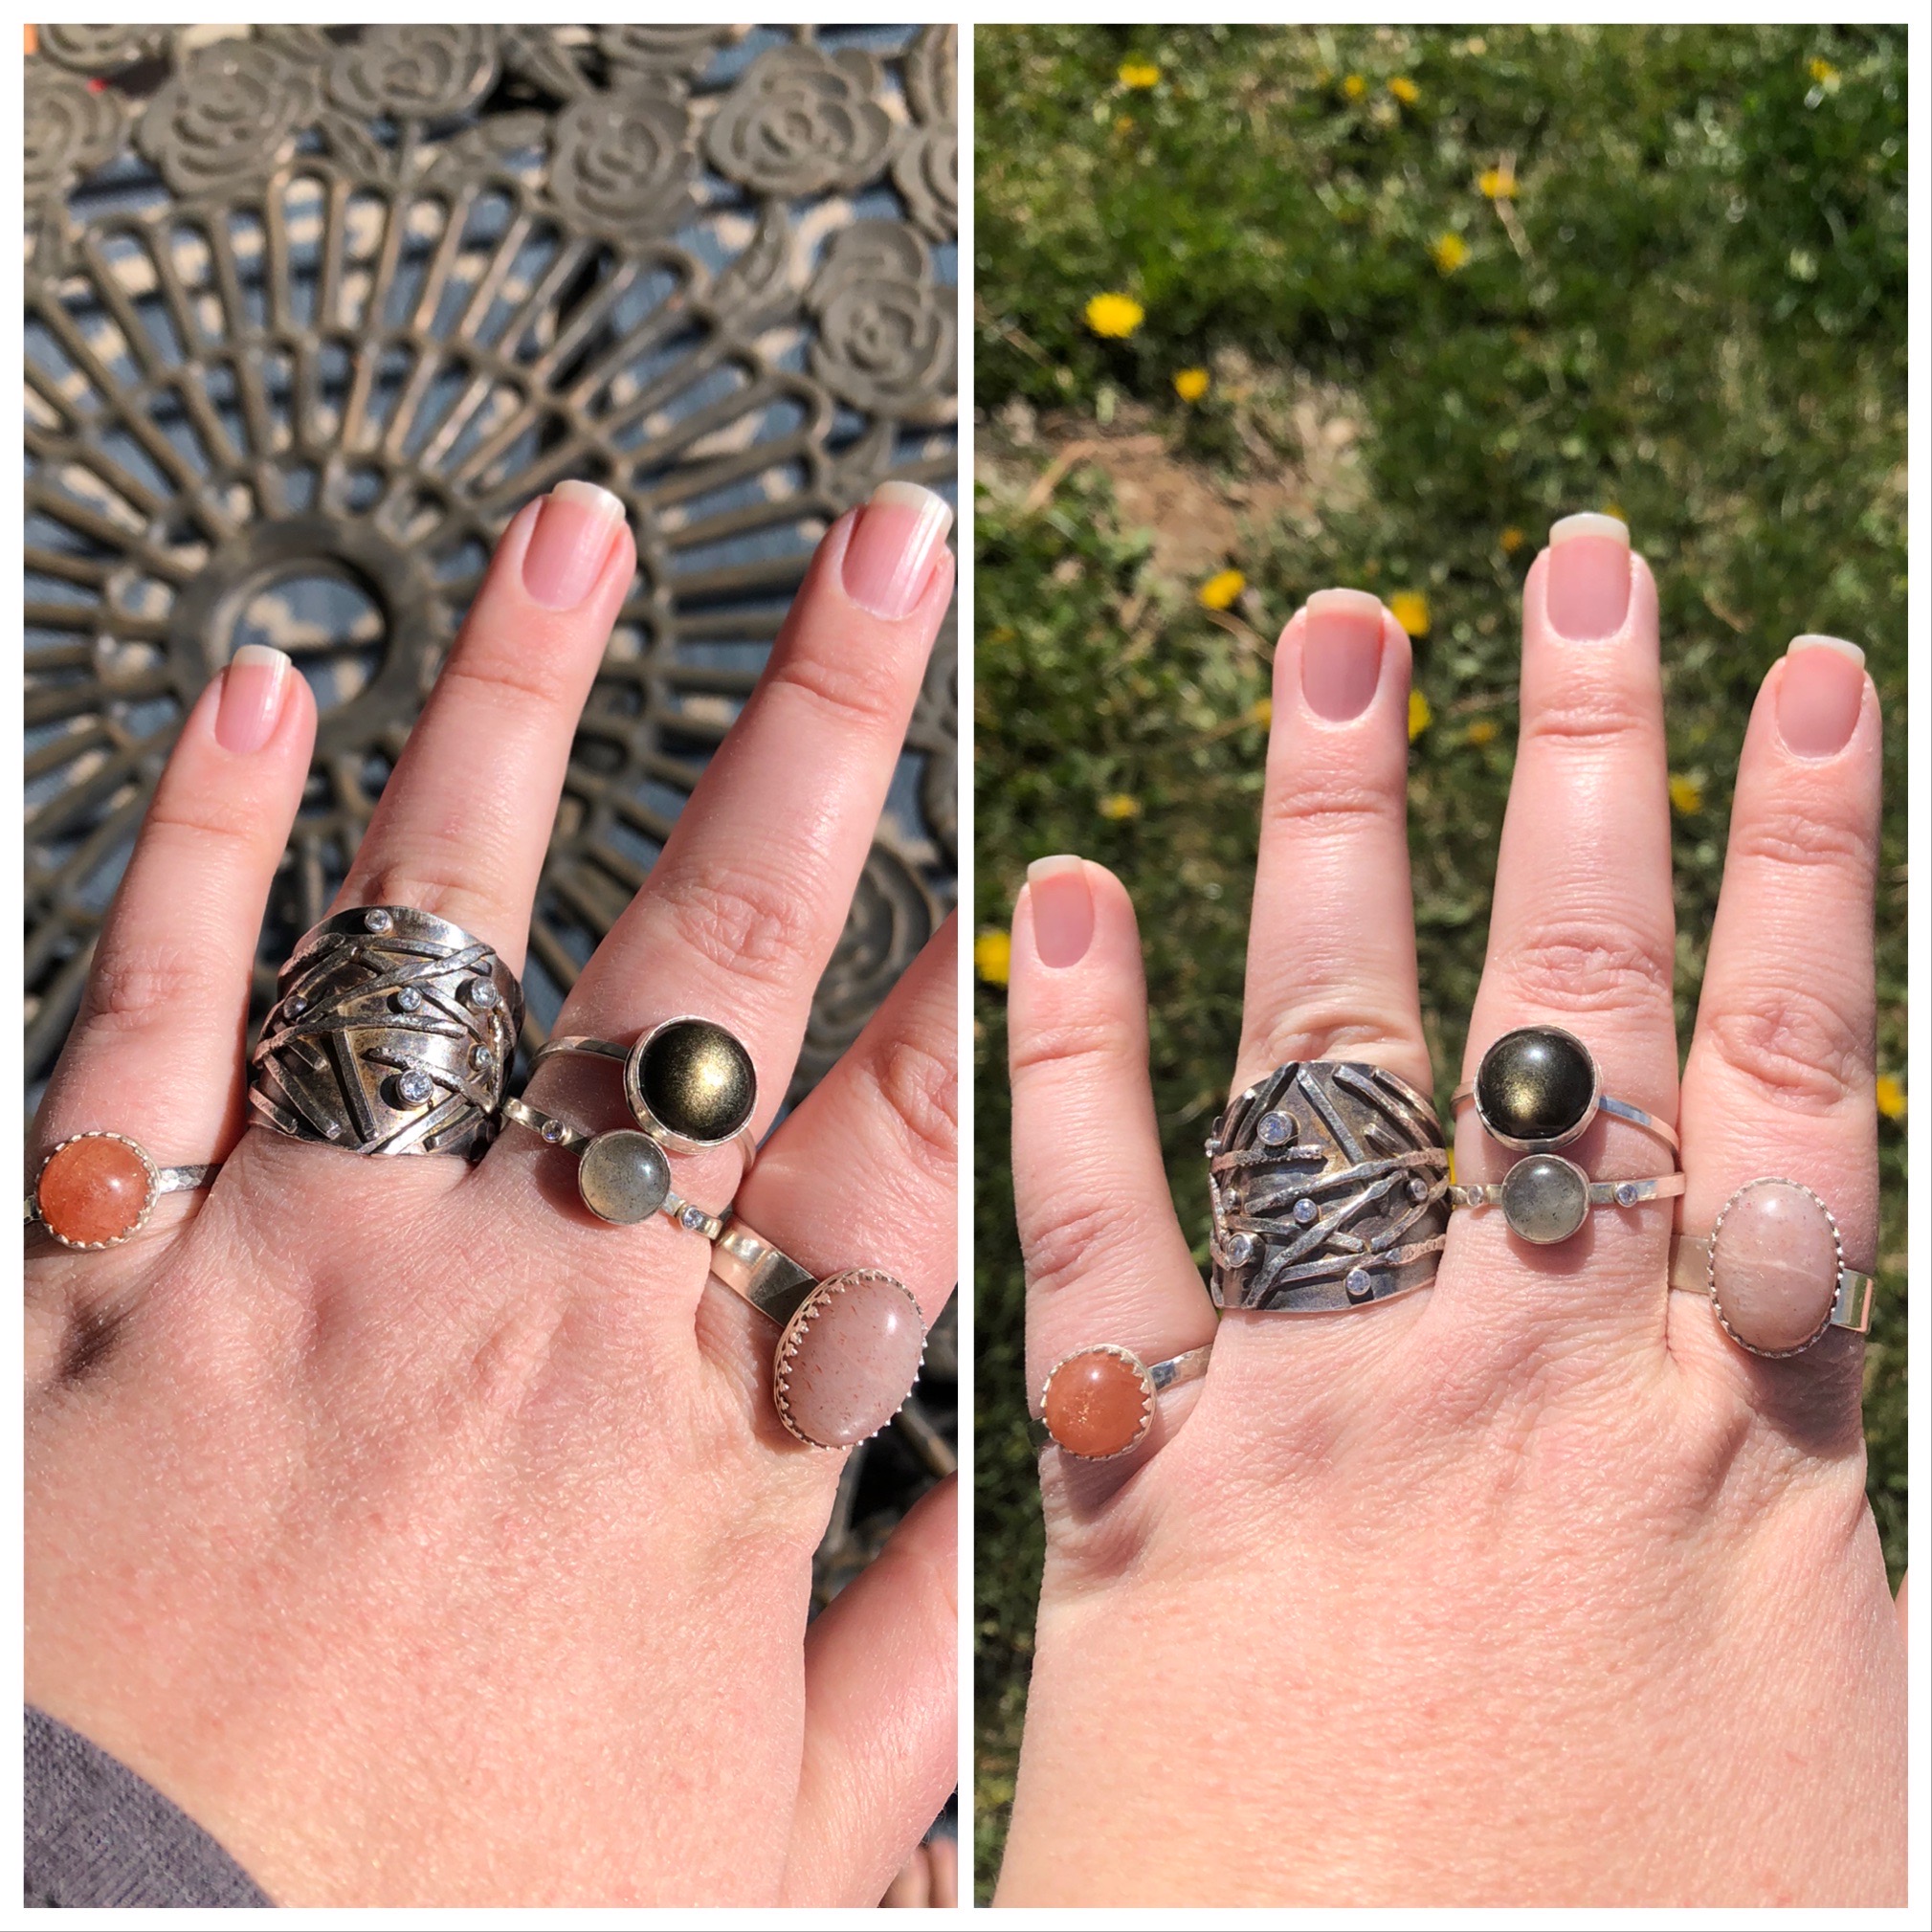
The grass on the right draws more attention to the rings.
Take a Lot
Even the most seasoned professionals can rarely get the perfect photo or selfie on the first take. Be sure to take a lot of pictures! Try experimenting with the lighting around you, your pose, the crop or anything else you can think of. When you’re done, you can go through and see which ones you like best for posting. Once you’ve done your selfie shoots a few times you’ll be able to get your good photos a little quicker.
Quick Tips for Jewelry Selfies
Don’t overthink a selfie. You want it to look nice and professional, but these are not photos going in for judging. Be natural and your photos will turn out beautiful.
Don’t over-edit a selfie. A nice filter will go a long way. Instagram has quite a few built in or if you’re using Snapchat they have even more. You can also try a basic photo editing app. Adobe Photoshop Express is free (but if you already have an Adobe account, login to get the Premium subscription) and has a wide assortment of pre-made filters as well as some of the basic editing tools of Photoshop, all on your phone.
They have many fancy ones, but be careful
it doesn't distract from the jewelry
Keep your branding in mind! If you have a filter you use for all your photos, you might want to use that. If your branding is bright and colorful, keep your selfies bright and colorful.
Make sure your clothing and hair style allow your photo to show off your jewelry the best. You may have pieces that just won't work with a patterned shirt for example.
If you're not a spur-of-the-moment selfie type of person, here's a few tips to do a selfie photoshoot:
- Dress in what makes you feel most comfortable, whether that's your studio gear or getting a little dressed up. Even if it doesn't work with your jewelry, at least it'll help you get in the groove.
- Start with the pieces you're most excited to show off. If you're excited about the piece, you'll be more excited for the photos.
- Get everything pulled in advance so you can easily switch between pieces and/or outfits
- If you have a photo studio setup, you may be able to use some of your lights and tools for your selfies
There are some tools on the market to help you achieve the perfect selfie. We weren't able to test these items, but they're all highly rated and recommended. A selfie stick is popular so you can get the phone far enough away for a wider shot. These are available in a wide range of options from basic to ones that also double as tripods. Clicking the button to take a photo is often the hardest part. You’ll get the perfect angle then mess it up as you have to move your phone. Try a shutter remote control! This will let you get your phone setup then click a remote button to take the picture. For the full assortment of accessories, this set on Amazon will give you a circle light, phone tripod and shutter remote control. And of course if you want your studio dog in on the selfie action, they make an accessory for that!
Tips & Ideas for Poses
In addition to some of the images above, here's a few ideas and tips to show off your jewelry in a selfie.
It was easy to keep the phone steady and you can crop
it to include your face or not depending on your preference.
time. Play with angles and various poses. With shorter
or pulled back hair, you could likely show off some earrings
with this type of pose as well.
Wide shots were fairly easy to get with a basic selfie.
a time you'd want a mirror available so you can use your
rear camera and see what you're taking a picture of.
with my hand near the necklace.
to show off some detail. For this example I turned the
necklace while taking the photo then was able to set it to
"bounce" to create a GIF. Imagine being able to easily show
off how the light reflects a stone
Tips for Hiring a Professional Jewelry Photographer
You'll likely have to start out with photographing your own jewelry as you start your business. Hiring a pro doesn't come cheap. But at some point, you'll reach a point where hiring a professional jewelry photographer makes a lot more sense than taking time away from your studio for photos.
Photographing Jewelry is Different
Photographing jewelry is no easy task, especially if you're looking for plain background shots, and not just any photographer can do it well. If you're going to spend the money to professionally photograph your jewelry, be sure you have looked through a photographer's portfolio for other jewelry photography. Photographer Sara Rey has found that many clients come to her after hiring an inexperienced photographer to save money. So what about hiring a professional wedding or portrait photographer? They're very skilled at capturing beautiful moments, people, and even the occasional piece of wedding jewelry. But most are still not specialists at jewelry photography. Sara says, "jewelry is one of the most difficult things in the world to photograph, so working with someone who doesn't specialize will most likely not yield the results you're looking for."
Getting your lighting right, avoiding bad shadows or blowouts, capturing minute detail...most photographers can speak to these challenges, according to Cole Rodger. However, add in the challenge of working with metal, which is often like a tiny mirror with its reflectiveness, and jewelry photography becomes a unique specialty. As Sara Rey says, the photographer wants "to show the reflectiveness of it, without actually seeing the reflection" of anything in the studio.
If your jewelry has gems or diamonds, the setup can be very different than a purely metal piece. Special lighting and camera techniques are required to capture the color and translucence of stones. Jewelry photography is also, by nature, considered macro photography. This means a small object becomes larger than life in a photo. Any minor flaw can look much more prominent than it actually is, according to Sara.
Additionally, as a jewelry artist, you've probably thought long and hard about how you want your piece to look. From the design itself to how customers see it, makers are "as intimate with their piece as they are with their own reflection and have acquired very distinct thoughts on how they'd prefer to be viewed" according to Cole Rodger. Many portrait photographers are not necessarily accustomed to working with a fellow artist. So they may not be able to pick up on what Cole describes as the "maker's language." Professional jewelry photographers have become accustomed to working with other artists and have a better sense of how you might want your piece shown to the world.
The Jewelry Photography Process
Don't assume a jewelry photographer will simply click a picture and send it to you! You're not paying them for the simple picture, but for the work that goes into setting the piece up and digital editing as well. All photographers will have their own process depending on their styles, but generally, they'll follow a similar path as Sara Rey:
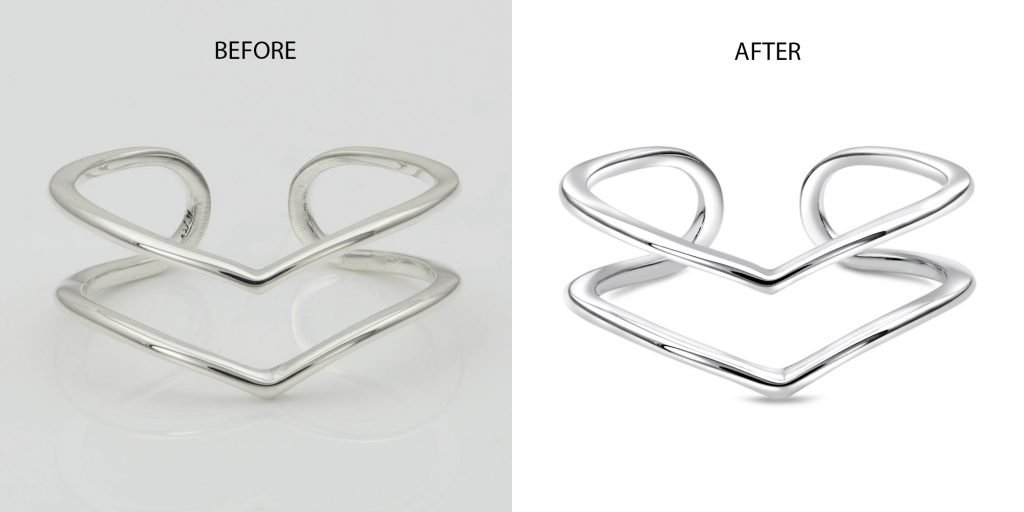
After shooting the pieces, the first step is to clip the images in Photoshop. Clipping separates the subject from its background. This alone can take quite a bit of work so it doesn't lead to the "clumsy scissor cut-out effect" as Cole Rodger notes. The photographer then places the image of the jewelry piece onto a pure white background (or a scenic background if that's the look you've chosen). The photographer will then retouch the image. This may include removing minor flaws such as dust or scratches, color correcting any metal and stones to bring out the true color, and adjusting brightness, tones, etc. as needed.
For Sara, this retouching work can often take just as long, if not longer, than actually photographing the jewelry pieces. Have you ever seen an image that doesn't look right because the shadow is crazy? You shouldn't get that from a professional jewelry photographer.
Shipping Jewelry to The Photographer
Some photographers may charge extra for on-location shoots. So if you just need simple photos of your jewelry and not model shots, you'll most likely be shipping your jewelry to the photographer. This might make you nervous, but if you follow Sara and Cole's tips it'll be easy!
- Send the parcel by 2 day or overnight shipping. UPS, FedEx, and USPS all offer these options. The less time your piece is in transit, the less likely it will get damaged.
- Use a third party shipping company that specializes in jewelry such as ParcelPro.com or IFS Inforsure. Since they specialize in jewelry shipping, they can help you out the most if the worst should happen. They may even be able to save you some money!
- Add insurance and a signature requirement. The signature lets you know it's arrived at its destination and who received it. That way if there's ever a question, you have that information. Insuring any high-value item is always a smart idea to protect you in case of damage or loss.
- Get a receipt when you drop off the package so you have the proof of you handing the item over to the shipper.
- Follow any packaging requirements such as double boxing or inner shipping labels.
Just remember it's always better to be safe than sorry. If you're wondering if you should do or request something, just do it.
When To Hire A Professional Jewelry Photographer
Cole Rodger believes it's great for jewelers to start out photographing their own jewelry. It will help you see "how the view from a camera lens differs from the perspective of an eye" and give you an idea of how your pieces can be shot. If you find yourself enjoying the photography process and are able to produce the images you need, that's great! If, however, you find yourself pulling your hair out it is definitely time to consider a professional.
Julie Sanford has been taking her own jewelry photos for years. However, when she needs absolutely amazing and high-quality photos in specific formats she turns to a pro. This is usually for jury photos, gallery shows, and the occasional booth shot. If you hope to put your jewelry pieces in a juried show, they may require specific image formatting - which a professional can easily give you. They'll also give you high-resolution shots that can be used for many different things.
When your business takes off though, do you really want to put more work into your photos and less time into your studio? "You hire me when you're not one of those...overachievers [who can handle every one of their own needs], you can't be bothered, you suck at Photoshop, and you need your work to look at its best," as Cole puts it. Let's face it, Photoshop isn't the easiest program to learn inside and out and if your business is taking off you won't want to take too much time away from precious studio time. And, as Sara Rey points out, "since most people will be seeing your designs for the first time in photos rather than in person, it's critical that those photos are the highest quality possible."
You'll most likely feel it when you're ready for a professional photographer. Don't get overstressed at setting up the perfect shot or editing the possibly 100s of images to get a few good ones. Photography is really one of the first things you should outsource when you have the capital available. Julie Sanford was nervous the first time she invested in a photographer. At $50-$100 per image (and do you need multiple images of a piece?) it can make you wonder if it's worth it. But once she saw her images and put them to work for her she said, "I knew it was worth it."
Tips To Find A Good Jewelry Photographer
- Talk to your personal network for recommendations - someone you know has probably worked with a photographer they loved (or maybe they have ideas of who not to use)
- Look in jewelry books and magazines for photos you like, then look for a photo credit
- Do some Google research. Find photographer's websites and portfolios to see their jewelry photos.
- Make sure any photographer you pick is comfortable with shipping and handling high-value items. Maybe they even have a safe to store your jewelry in.
- Be detailed in what you want from your photographer, but also understand they're the professional. Be open to their ideas on how to photograph your jewelry. You just might find they make it look better than you ever imagined.
This article was co-authored by Bethany Blackshear and Ashley Maldonado.
Special thanks to our article contributors:
Emma Elizabeth from Emma Elizabeth Jewelry
Kristen Baird from Kristen Baird Jewelry

