


Learn how to set a stone in a prong settings! This tutorial covers stone vocabulary and the basics of prong setting both faceted stone and cabochon cuts.
We have sterling silver prong settings in our inventory! Included are faceted and cabochon settings in multiple sizes. Of course, you could fabricate your own out of jewelry wire by soldering, filing and notch cutting; but, these pre-made findings can save you a lot of time when you are using calibrated stone sizes in your work. Learn how to start prong setting your own loose gemstones in this step-by-step guide.
Stones are said to be "calibrated" when they are precisely cut to even diameters such as 4mm, 6mm or 8mm with a traditional shape (round, oval, etc) and a standard crown and pavilion height. These are the most commonly used stones in jewelry making and we have setting findings available to fit a broad range of options. Fancy cuts or stones with unusual proportions will need custom fabricated settings.
Let's cover some stone basics first.
Cabochons & Faceted Stone Settings
Faceted Stone Settings
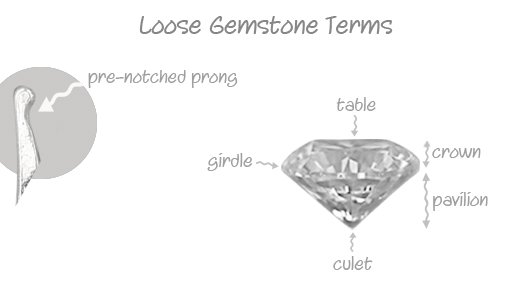
The illustration below shows a faceted stone. Our SEF series of prong settings are designed for this type of cut. On the illustration is the basic "anatomy" vocabulary for a faceted stone. If you're new to gems, you'll need to know these terms in a minute. On the left, I've added a close-up of a pre-notched prong. The girdle of the stone should nest right into the prong notch.
Cabochon Prong Settings
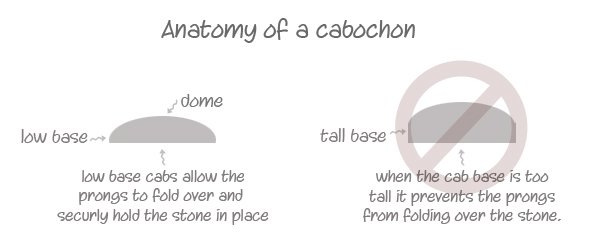
Prefabricated cabochon settings work best with low dome cabs in calibrated sizes. Deep cut cabs with high side walls may be difficult to secure. The prongs must have room to bend over the curvature of the stone to grip it in place.
Be careful when ordering!
Yes, the faceted prong settings and cabochon prong settings both have prongs, but they're different! Our pre-made faceted prong settings will always be pre-notched. This notch is an important part of any faceted stone prong setting, even ones you make yourself. It provides a place for the girdle of the stone to sit so it can be held securely. The cab settings do not have a notch. The flat bottom of the cabochon simply rests on the bottom of the setting and the prongs are pushed over the curved surface.

As you can see in the illustration above, the culet of a faceted gem would protrude from the bottom of an SEC cabochon setting. Moreover, the prongs would be difficult to secure around the girdle and table of the stone without notches to accommodate the faceted shape.
Be sure to choose the right type of setting for your stone cut.

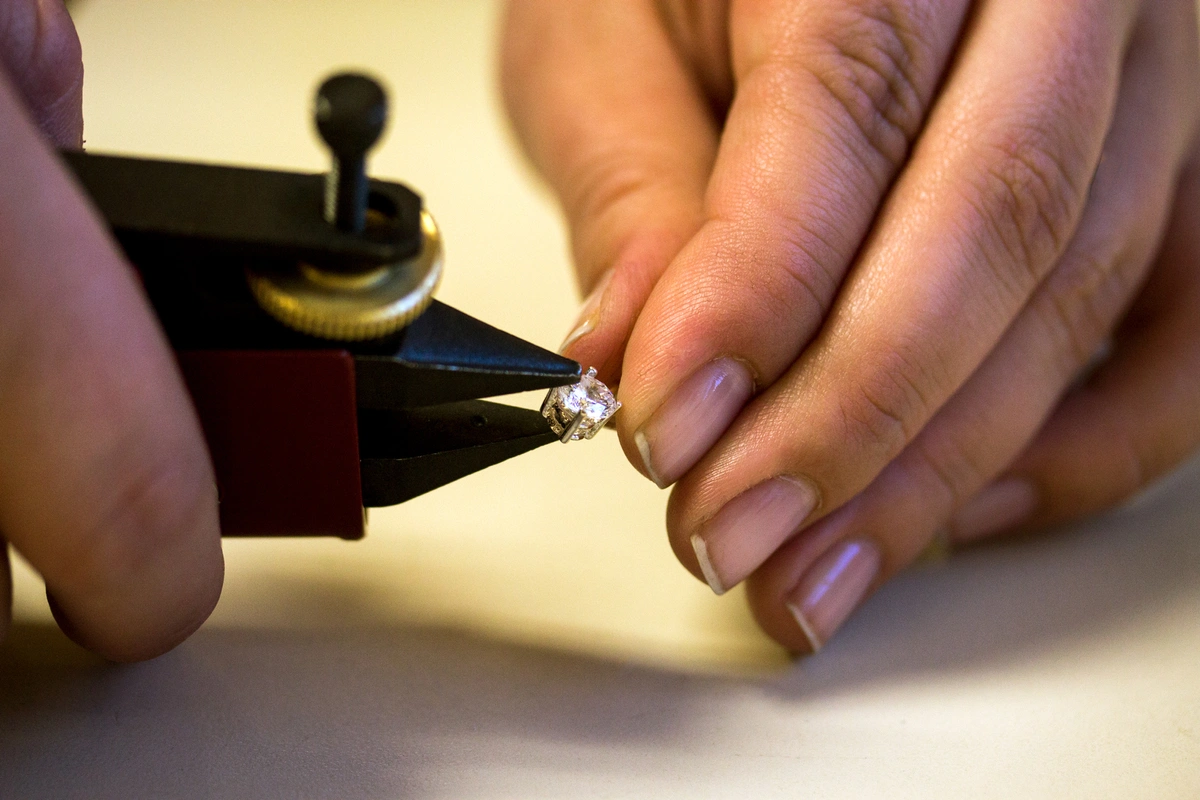
Prong Setting Tools

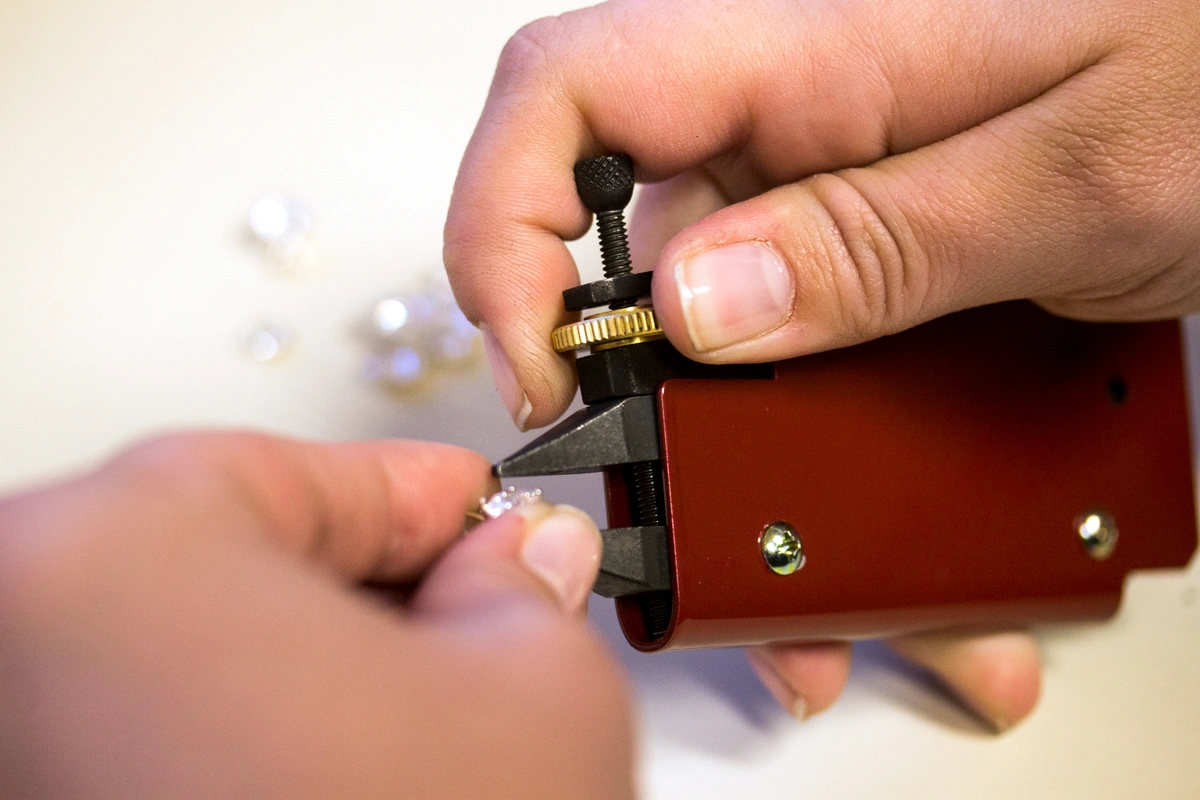
There are a few different tools you can use when prong setting. The above image shows two different types of prong setting pliers and a prong pusher. Both pliers achieve the same outcome - one jaw is placed below the setting, one is placed on top of the prong, and a gentle squeeze closes the prong over the stone. These pliers are often used with faceted stones. Prong pushers can be used with both faceted and cabochon stones. You just place the pusher on the prong and rock it towards the top of the stone, closing the prong. If you need some extra force, you can tap the end of the prong pusher with hammer.
Step-by-step Prong Setting Instructions
Below are the steps to prong setting. We've used a faceted stone for the example, but it's the same process for a cabochon stone. No matter what tools you're using, the process is the same too!
Step 1: Placing the Stone
Using tweezers or fine-tipped pliers, place the stone between the prongs. When you have situated it, make sure it is resting on all of the pre-notched grooves in the prongs and the stone itself is sitting evenly. Check from all angles that your stone sits level.
Tip:
Tip: Use a small piece of wax on the end of a q-tip or toothpick to help maneuver the stone. It keeps your fingers out of the way so you can see what you're doing and the wax wipes right off the table of the gemstone.
Step 2: Adjusting the Prongs
Sometimes the prongs need a little bit of adjusting before you close them up. This might mean moving some left to right so the spacing between each prong is the same, or pulling one away from the stone if the stone doesn't quite fit. Once you have your prongs even, you'll want to squeeze them at the girdle of the stone - this locks the stone into place before you push the prong tip over.
Step 3: Closing the Prongs
Regardless of which tool you're using, the last step is to push the prong tip over the stone.
- Prong Pusher - Place the pusher on top of the prong at a 45 degree angle to the stone. Rock it towards the top of the stone to push the prong closed. If you notice the prong doesn't fully touch the top of the stone, you can gently hit the pusher with a hammer for some extra force. Be careful not to hit it too hard!
- Prong Pliers - Place one jaw underneath the setting and one jaw on top of the prong. Gently squeeze the pliers until the prong is pushed down.
When closing prongs, you'll want to work in opposites; or north, south, east, west. Always close the prong directly across from the one you just did before moving on to one next to it. This helps keep your stone even and level while setting. Once all of your prongs are closed, double check your stone isn't loose. Go back in to tighten the prongs if you need to.
Now get out your luscious gemstone stash of beautiful colors and cuts and get started. Shop for gemstone settings and loose CZs and learn more about setting stones at Halstead today! Continue reading for how to make prong settings from scratch!
Creating Your Own Prong Setting
For non-calibrated stones, you'll need to create your own setting. This is a more advanced technique, but makes sure that your setting is the perfect fit for your stone! You'll want to start with a stone that's on the larger side, like 6mm or bigger to start. To make your own prong settings, you'll need a full soldering set up, plus a few extra tools. Below is a list of everything you'll need.
Setting Tools & Supplies
- Faceted Round Stone
- Round wire - 18g or 16g will work great
- Ring Clamp
- Hart Bur - 1-2mm smaller than the size of your stone
- Flat Nose Pliers
- Round Nose Pliers
- Saw
- Circle Template
- Needle Files - triangle and flat
- Wire Cutters
- Round Bezel Mandrel - this is for shaping the rings on your setting. If you don't have a round bezel mandrel, anything to round out the loops will work
- Soldering Set Up - you'll be using hard and medium solder
- Soft Charcoal Block - a magnesia block will work also - you want something soft you can push the wires into
- Yellow Ochre - this prevents solder from flowing
- Prong Pusher - you can purchase these, or make your own by filing a V-shape into the end of thick brass wire
- Finishing and Polishing Supplies - silicone wheels, tumbler, sandpaper, etc.
How to Make Stone Settings
Below are the basic steps to create your own basket setting. This is an introductory type of prong setting. You'll find many different variations on how to make a basket setting, but the basics are below!
- Start by creating two round rings, or bearings, with your round nose pliers. You'll want one ring to be about the size of the stone - if you place the stone on top, you will not see the wire underneath. The second ring can be the same size for a straight setting, or slightly smaller for a tapered setting. Solder the rings closed with hard solder and round them out on your bezel mandrel.
- Mark 4 evenly spaced points (N, S, E, W) on both bearings using the circle template. This is where your prongs will sit. Place one mark on the solder seam. File into each mark so the prong wires have somewhere to sit. You can start with a saw to mark, and move to a triangle file to open it up. Finish it off with the flat file (teeth on the edge). If you have a cylinder bur, you can use this also. Only file into the bearing 1/3 of the way.

- Bend two pieces of wire, into a 'U' shape. Adjust the wire until the lower bearing (or smaller one) sits snugly into the U.
- Place the lower bearing flat on your charcoal block. Push the U wire into the block until it makes contact with the ring in the notches. Solder with hard solder. Double check the alignment and repeat with the other U shaped piece of wire.
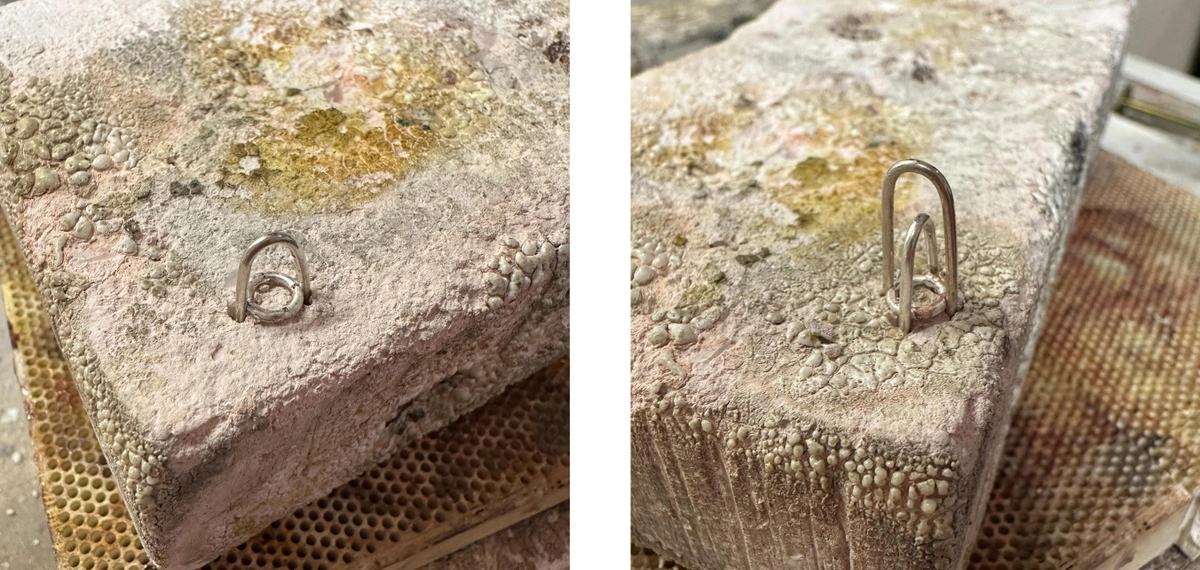
- Gently open up your wires until the second bearing (larger one) slides in and fits snugly. Coat the solder joints on the smaller bearing with yellow ochre to prevent them from reflowing. Place the large bearing flat on the charcoal block and push the setting into the block until the wires make contact with the notches on your ring. You can trim your prongs some if it is too difficult to push the setting into the block. Solder with hard solder.
- Trim the U shaped pieces off the bottom of the setting and file the wires flush with the bottom bearing.
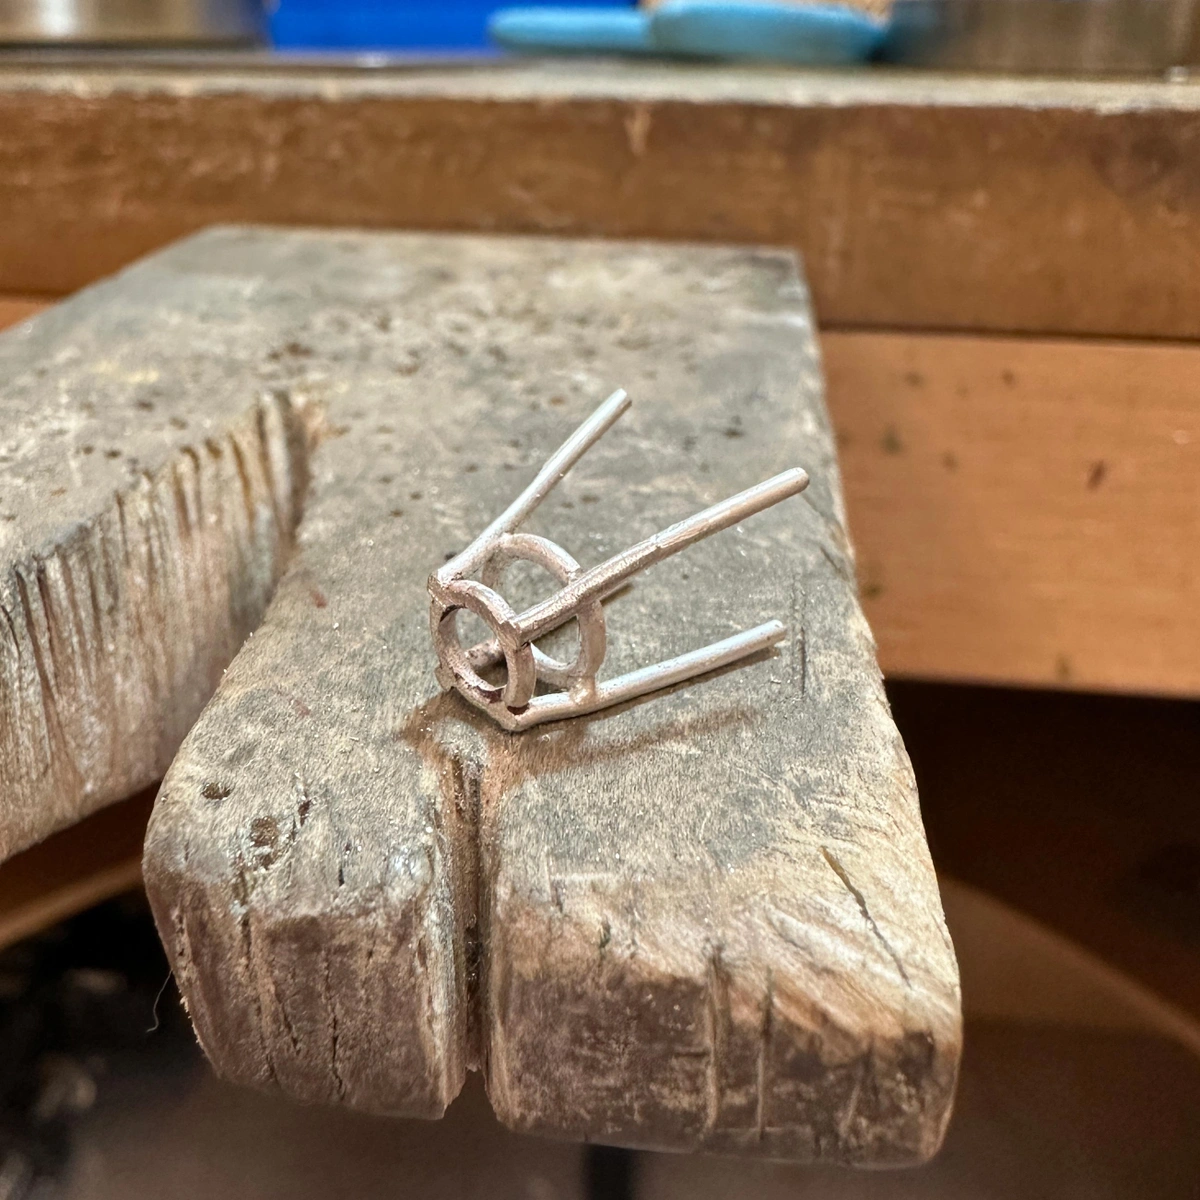
The basics of your basket setting are done! This is a more advanced technique, so it may take a bit of practice to get it right. You can make your setting into whatever format of jewelry you wish - add a bale for a pendant, drop it into a ring shank, or add earring findings. The final step will be setting the stone. Make sure to do all of your finishing before you set the stone.
- Trim the prong wires so they are shorter and file the tops flat. They do not need to be the perfect length just yet.
- Using your hart bur, cut a seat for the stone into the prong wires just above the large bearing. You want the bearing to support your stone. Cut into the prongs about halfway. Test fit the stone to make sure it’s sitting level.
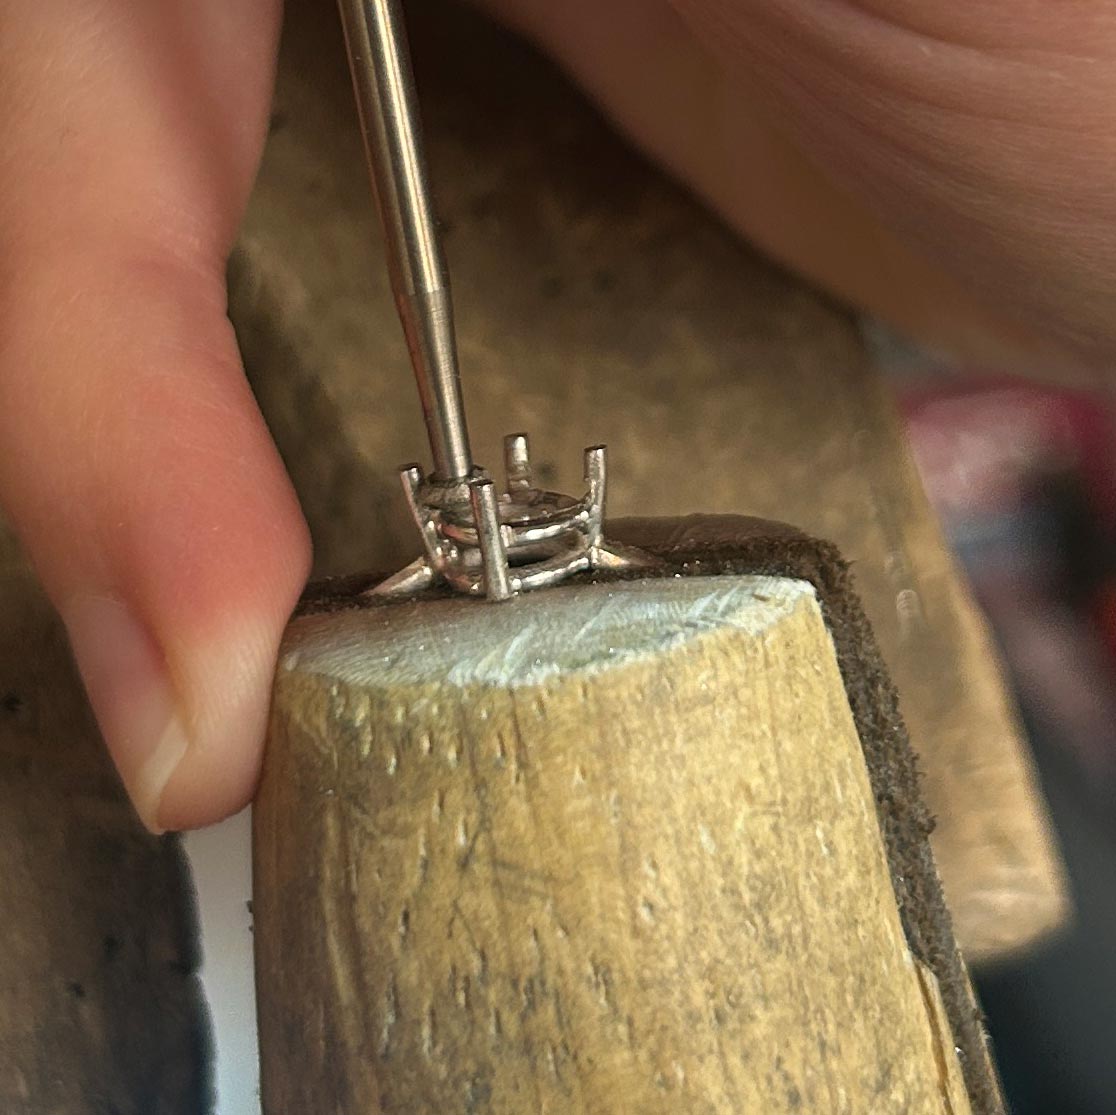
- Tighten the prongs around the stone by giving a gentle squeeze with flat pliers at the girdle of the stone. Use your prong pusher to push the prongs over the stone until they are touching. Work in opposites.

- Trim the prongs with your wire snips. The prongs should be halfway up the crown of the stone. Using your needle file, round out the prong head. Make sure to use a file that does not have teeth on the side. This protects the stone.
- Use a silicone wheel or polishing papers to shine up the prongs. Clean in an ultrasonic or use warm water, soap, and a soft brush to clean any polishing residue.

Notching and Leveling
I wanted to expand upon cutting the seat for your stone a little bit. This can be the trickiest part because it involves a lot of bur control! Below are some tips to help this go smoothly.
- Always use a sharp bur and lubrication. Burs can and will dull over time, so will need to be replaced.
- Check the recommended speed for your burs – this will help prevent against chatter and uneven cuts.
- Make sure to brace your hand on something – supporting your fingers/hands while cutting can go a long way in making sure you get a level cut!
- Tilt the bur as needed to open up the seat to better fit your stone. If your stone has a particularly thick girdle, a cylinder bur can be a great option to widen the seat.
- Always cut and test fit your stone – you may need to adjust some notches after the test fit.
For leveling your stone – adjust each individual notch after you test fit your stone. If you need, start with sharpie marks drawn on your prongs to guide your notches. This can help make sure your stone is level the first time. Check from all directions before you set the stone to make sure it’s level.
Making your own prong settings can be tricky and is a more advanced technique. Don’t let this discourage you – it just means you might need to practice a few times before you get it perfect!
Continue learning with our other related articles on jewelry techniques:
5 Tips to Start Setting Stones
Adding Diamonds to your Silver Jewelry Collection
Shop thousands of wholesale jewelry supplies with Halstead!
Got questions? Email our studio coordinator at [email protected]. We'd love to hear from you. Sorry, studio support is not available by phone. Emails only, please.

