


In this article we’ll discuss setting up your new jewelry studio. We cover setting up your bench, studio organization tips, and safety concerns to build in now. Follow these tips for a functional and efficient studio.
It can be overwhelming to think about setting up your new studio and stocking it with jewelry tools. This article will discuss setting up your bench, top studio organization ideas, and important safety considerations. These things will come together to create a studio that is efficient and easy to use.
Setting up Your Jewelers Bench
When it comes to setting up a new jeweler’s bench, you’ll find there are many options to choose from. From purchasing a traditional jewelry bench, to converting an existing desk, or building one from scratch, we’ll cover them all. Your bench is where it all starts, so it’s important to pick one that works for you. But, there are several low-cost alternatives to investing in an expensive jewelry bench. If you are not ready to take that leap, consider the options below.
Traditional Jewelry Bench
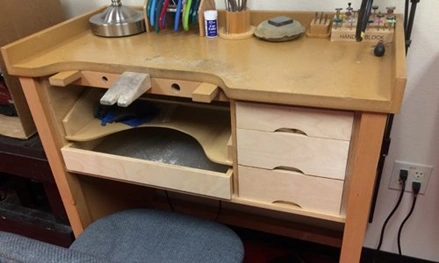
Traditional jewelry benches are a great option because they are specifically designed to accommodate your needs as a jeweler. They often come with storage drawers on one side for your most-used tools. They also have a U-shaped cut-out for sawing and a drawer to capture any metal dust or dropped stones. Jeweler’s benches also will have holes for holding tools such as ring mandrels, and arm supports so that you can work comfortably. When choosing your bench, consider that jeweler’s benches are on the smaller side, about 3 feet wide, and can run you between $500-$1,00 dollars.
Converting an Existing Desk
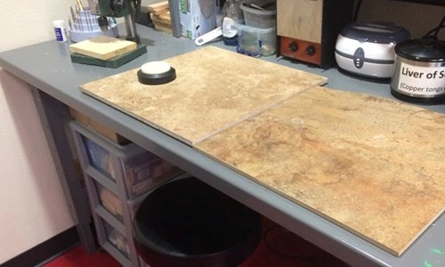
Another great option is converting an existing table or workbench. Often this allows you to get a larger work surface at a lower price. You can buy one new or search secondhand stores and websites for an even better deal. You can outfit an existing table with jewelry-specific tabletop organizers and add-ons to better suit your needs. Ideally, you’ll want a table that is closer to 40 inches tall, so when you’re sitting it’s about chest height. Remember that you’re looking for what works best for you, not for someone else, so make sure it feels comfortable, works with your body height, and working style.
Building Your Own Jewelry Bench
Building your own bench works well because you can fully customize and design it to fit your needs. It can be as simple or complex as you’d like. One option is to purchase table top material, like wood, a laminated tabletop, or a solid-wood door, and fixing it to a set of separate legs. Table legs can be purchased from a supplier like Grainger or built yourself. When crafting your own bench make sure it can stand up to the needs of a jeweler. It must be sturdy enough to not wobble around while hammering and have a hearty top to account for clamping vices, soldering, and a hammer blow or two. Consider the criteria listed below.
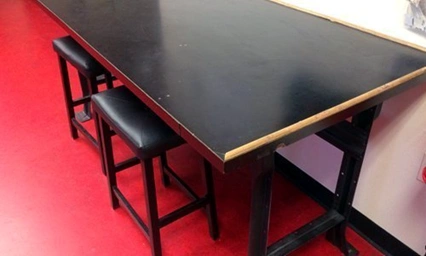
- Selecting a Table - Needs to be able to withstand hammer blows and harmful spills.
- Table Height - You'll ideally want a table that is about 40" tall, which is about chest height when sitting.
- Table Edge - Select an edge that vices can attach to easily.
- Fire Safety - Protect your table surface with a ceramic tile or masonry bricks for extra security.
Studio Organization Tips
Keeping your studio organized is a key part to a successful jewelry business. Knowing where your jewelry tools and materials are is critical to working efficiently. It’s fairly easy to find a variety of jewelry-specific tool organizers out there, but we’ll also discuss general storage and layout.
Jewelry Specific Organizers
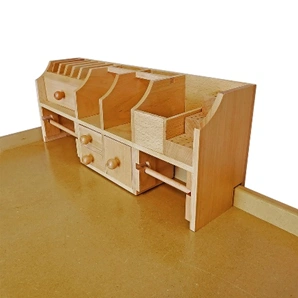
These items are made specifically for jewelers. That means you can purchase them at most supply companies, like Gesswein. They have areas for pliers, burs, and more to keep you organized and working efficiently. These can usually be added to any work surface you choose also.
General Organization Tips
- Jars and containers are a great way to keep longer tools, like files and sanding sticks, in order. You probably have a few laying around the house that you can repurpose. They can also sit on your bench top so you can see them clearly and have easy access.
- Magnetic stripping is perfect for hanging up pliers or saw blades. You can attach it to a shelf, your bench, or the wall. If you attach it to the wall, just make sure to add a spacer so you have room to grab the tool you’re looking for.
- File folders are a clean and organized way to keep wire stored. Each slot can be for a different gauge or material, and they won’t get tangled up.
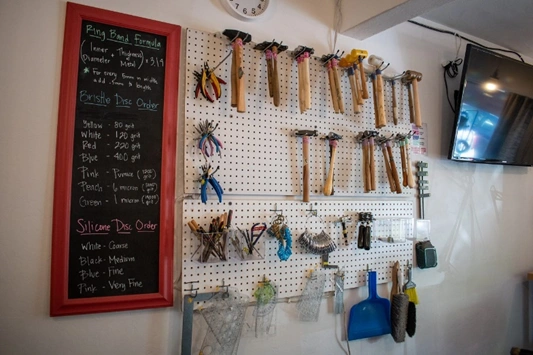
- Peg boards help keep tools out of drawers, where clutter often accumulates, and in a visible location. You can purchase these from your local hardware store and have a variety of different hooks and brackets to hang your tools on. The nice thing is they are super easy to rearrange as well! If your needs change, just change up the hooks and locations!
- Labels are your best friend! Sometimes you can’t have all your tools out in the open and need a storage cabinet. Make sure to label the drawers and keep similar tools together. Extra flex shaft attachments should be in one drawer, glues and adhesives in another, and jigs and holders in yet another.
Studio Layout
Studio layout is just as important as having organizers when it comes to keeping a well-run studio. Think about it kind of like a kitchen – sink next to dishwasher, stove near the fridge, etc. Consider your workflow and how you’ll likely be moving through the studio. I like to have my solder bench right next to my jeweler’s bench, either parallel or perpendicular in an L shape. This means when I’m ready to solder, I don’t have to transport lots of tiny (or big!) pieces all the way across the room.

Keep a separate wet area from your jeweler’s bench. This area is good for patinas, the tumbler and ultrasonic machines, and cleaning your work. It helps prevent steel tools from rusting by keeping them away from water and contains the mess to one place. Just make sure to have good ventilation if you’re using patinas in this area.
I also like to keep a ‘clean’ desk somewhere in my studio. I will sketch here, work on my website, invoicing, and packaging. It makes sure that you have an area without metal dust or dirt for things you don’t want to get contaminated. You’ll find it comes in handy!
Studio Safety
The last key component to setting up your new jewelry studio is making sure you have the right safety precautions built in from the beginning. You don’t want to forget them and find out later when it’s become a problem. For more in-depth information, watch Sylvie’s presentation on studio safety from the Jewelry Business Forum.
The Basics
The list below are things you should always have on hand in your studio.
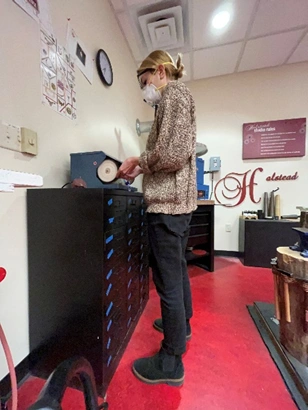
- Safety Glasses – for use with chemicals, the flex shaft, polishing machine, and soldering
- Masks – for use to protect against particles during sanding and polishing. If you’re using nasty chemicals, make sure to check if you need a respirator for fumes.
- Apron – protect your clothing from spills and hot metal that may get dropped
- Closed-toed Shoes – to protect your feet from tools being dropped, hot metal, and sharp objects
- Ear Plugs – wear while hammering or using loud rotary machines to protect your hearing
- Rubber Gloves – keeping chemicals off of your skin
- Hair-ties – keeping your hair pulled back and away from getting caught in rotary tools or in the path of your torch. Also remember no long jewelry or sweatshirt strings on your clothing that can also get caught
- Safety Data Sheets – information on all the materials and chemicals in your studio. They outline the risks associated with using them so you can properly use and store them. Keep these organized and in an easily accessible location.
Soldering
Many jewelers will have some sort of jewelers torch in their studios for soldering, and that means having flammable gasses, highly pressurized objects, and fumes in their studios. There are some key precautions to take into account when working with these tools and materials.
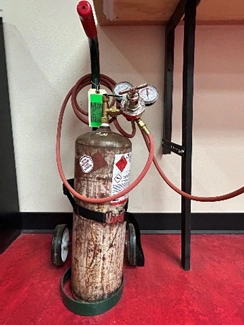
- First and foremost – have a fire extinguisher nearby, but not too close. If a fire does break out at your soldering area, you don’t want the fire extinguisher on fire also!
- Oxygen, Acetylene, and Propane Tanks – These are highly pressurized, and if knocked over can turn into projectiles. We don’t want that! Keep them chained to the wall or sturdy table leg or have a tank holder that keeps them secure and upright. Always check your torch connections for leaks with soapy water.
- Ventilation – Having proper ventilation is important to draw away soldering fumes and gasses. There are a few different systems, like bench top fume extractors, elephant trunk extractors, and built-in systems that vent directly to the outdoors.
- Fire-resistant Materials – Make sure the surface you’re soldering on is a fire-resistant material, like stainless steel, or covered in one for protection. Stone and ceramic tiles work great for this and are cost affective, but kiln bricks and Solderite boards also work. Make sure to keep other flammable materials away from this area too, like paper and rags.
Chemicals and Acids
Chemicals are a common part of the jewelry studio and need to be handled with care. Check out the list below for some best practices and key items to have in your new studio.
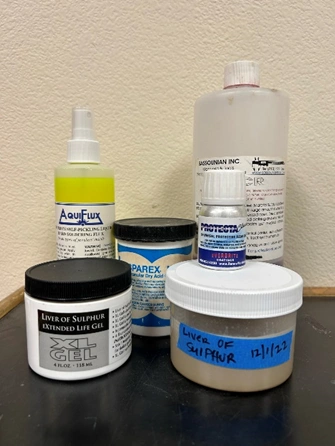
- Ventilation – You always want ventilation over your pickle, but it’s good to have when using other chemicals too, like liver of sulfur.
- Flammables Cabinet – Many chemicals are flammable and should be stored in a metal flammables cabinet. These prevent a fire from spreading and lock to keep unwanted visitors out who may not know the proper use and handling of its contents.
- Containers – Always store your chemicals in the containers they came in, if possible. If not, never use left-over food containers. Use containers that are unbreakable and can seal tightly. Label them with the contents and date, if necessary.
- Spill Kit – Have a spill kit near where you use chemicals. They include PPE, absorbent materials, and disposal bags to clean up any spills is a safe way.
There’s a lot to consider when setting up your jewelry studio. We know it can be intimidating! This article was meant to get you started on the right foot with the most important things to consider. Like what bench you’ll use, organization and layout tips, and safety information to build into your studio from the beginning. All these things come together to make a functional and efficient jewelry studio! Happy making!
More on Setting up Your Jewelry Studio

